Setup for all episodes.
Introduction to the Data for this Lesson
The data used in this lesson comes from a project observing a small mammal community in southern Arizona, US. This is part of a project studying the effects of rodents and ants on the plant community that has been running for almost 40 years. The rodents are sampled on a series of 24 plots, with different experimental manipulations controlling which rodents are allowed to access which plots. This is a real dataset that has been used in over 100 publications. It is published at Ecological Archives and can be found on Portal Project Database. This data is open and free to use for research purposes.
For Interest Only: Portal Project Teaching Dataset
The Portal Project Teaching Database is a simplified version of the Portal Project Database designed for teaching. It provides a real world example of life-history, population, and ecological data, with sufficient complexity to teach many aspects of data analysis and management, but with many complexities removed to allow students to focus on the core ideas and skills being taught. The database is currently available in csv, json, and sqlite formats.
The Portal Project Teaching Database’s GitHub repository can be found at: https://github.com/weecology/portal-teachingdb, where suggested changes or additions to this dataset can be requested or contributed. This database is not designed for research as it intentionally removes some of the real-world complexities. The Python code used for converting the original database to this teaching version can be found in create_portal_teach_dataset.py.
CITATION: Ernest, Morgan; Brown, James; Valone, Thomas; White, Ethan P. (2017): Portal Project Teaching Database. Figshare. https://doi.org/10.6084/m9.figshare.1314459.v6
Download Data for Spreadsheets Lesson
For the purposes of training, this data has been simplified a bit (you can still download the full dataset and work with it using exactly the same tools we will learn here). This simplified version of data is available from the Portal Project Teaching Dataset. In this lesson, you will need to download the following five files from the Portal Project Teaching Dataset:
- messy_survey_data.xls - this is the main file we will work with. It includes messy survey data
(in Excel’s
.xlsformat) that you will clean during the lesson and use to learn some best practices in data organisation. - surveys.csv - the cleaned survey data
Fields:
record_id,month,day,year,plot_id,species_id,sex,hindfoot_length,weight - plots.csv - clean information on plot number and type
Fields:
plot_id,plot_type - species.csv - clean information on species codes and scientific names
Fields:
species_id,genus,species,taxa - combined.csv - clean data from surveys, plots and species data
files combined into one clean file (a good example of what a clean data file should look like)
Fields:
record_id,month,day,year,plot_id,species_id,sex,hindfoot_length,weight,genus,species,taxa,plot_typeInstall LibreOffice
To interact with spreadsheets, you can use various software - for example Microsoft Excel, LibreOffice, Gnumeric, OpenOffice.org, Google Spreadsheets. Commands may differ a bit between programs, but the general ideas for thinking about spreadsheets are the same.
For this lesson, if you do not have a spreadsheet program already, you can use a free and open source tool LibreOffice as it can open Excel spreadsheets, which is the format of the data we will work with during the lesson (also all examples used refer to Excel).
Windows
- Download the Installer
- Install LibreOffice by going to the installation page. The version for Windows should automatically be selected. Click Download Version X.X.X (whichever is the most recent version). You will go to a page that asks about a donation, but you do not need to make one. Your download should begin automatically.
- Install LibreOffice
- Once the installer is downloaded, double click on it and LibreOffice should install.
Mac OS X
- Download the Installer
- Install LibreOffice by going to the installation page. The version for Mac should automatically be selected. Click Download Version X.X.X (whichever is the most recent version). You will go to a page that asks about a donation, but you do not need to make one. Your download should begin automatically.
- Install LibreOffice
- Once the installer is downloaded, double click on it and LibreOffice should install.
Linux
- Download the Installer
- Install LibreOffice by going to the installation page. The version for Linux should automatically be selected. Click Download Version X.X.X (whichever is the most recent version). You will go to a page that asks about a donation, but you do not need to make one. Your download should begin automatically.
- Install LibreOffice
- Once the installer is downloaded, double click on it and LibreOffice should install. The Portal Project Teaching Dataset is a real dataset that has been used in over 100 publications. We have simplified it for the purposes of this lesson, but you can download the full dataset (see below for details) and work with it using exactly the same tools we will learn here.
For this lesson, you will need to download the following file (remember where you downloaded the file!):
Data in some of the columns of the above file (e.g. geolocation, locality, county, country, JSON) are contrived for the purpose of the lessons and are in no way related to the original dataset.
Install OpenRefine
For this lesson you will need OpenRefine (formerly GoogleRefine) and a web browser. Download the most recent version of OpenRefine for your operating system, then follow the instructions below.
OpenRefine is a Java program that runs locally on your machine (i.e. you are not accessing a remote service on the Internet). Most recent versions of OpenRefine for Windows and Mac come with embedded Java, in which case you do not need a separate Java installation.
Once it is running on your machine, you access it via your browser at the address http://localhost:3333. No Internet connection is needed for this as the programme is running locally.
Windows
- If you have Internet Explorer (or Edge) set as your default web browser, check that you have Firefox or Chrome installed and set either of them as your default browser. OpenRefine runs in your default browser, but may not run correctly in Internet Explorer. You can check how to set your browser as default for Google Chrome or Firefox.
- Unzip the downloaded file into a directory by right-clicking and selecting
Extract.... Name that directory something like OpenRefine. - Locate
openrefine.exein the extracted folder and launch OpenRefine by double-clicking on it. This will launch a command prompt window first. - Wait for OpenRefine to launch in your default Web browser, which is where you will interact with the program. If this does not happen, head to http://localhost:3333 in your Web browser of choice.
Mac
- Check that you have Firefox or Chrome browser installed and set as your default browser. You can check how to set your browser as default for Google Chrome or Firefox.
- Locate the downloaded
.dmgfile and Ctrl-click it. You may get the warning “macOS cannot verify the developer of “OpenRefine.app”. Are you sure you want to open it?” Click ‘Yes’/’Open’ to this. - Drag
OpenRefine.appinto your Applications folder, and Ctrl-click to open it. You may get the warning “macOS cannot verify the developer of “OpenRefine.app”. Are you sure you want to open it?” Click ‘Yes’/’Open’ to this. - Wait for OpenRefine to launch in your default Web browser, which is where you will interact with the program. If this does not happen, head to http://localhost:3333 in your Web browser of choice.
Linux
- This requires Java to be installed on your computer. If you do not already have it, download OpenJDK Java.
- Check that you have Firefox or Chrome browser installed and set as your default browser. You can check how to set your browser as default for Google Chrome or Firefox.
- Unzip the downloaded file into a directory. Go to this directory from terminal and type ./refine to start.
- Wait for OpenRefine to launch in your default Web browser, which is where you will interact with the program. If this does not happen, head to http://localhost:3333 in your Web browser of choice.
Text Editor
A text editor is the piece of software you use to view and write code. If you have a preferred text editor, please use it. Suggestions for text editors are, Notepad++ (Windows), TextEdit (macOS), Gedit (GNU/Linux), GNU Nano, Vim. Alternatively, there are IDE’s (integrated developer environments) that have more features specifically for coding such as VS Code; there are also IDEs specific to languages will be listed in the appropriate section(s) below.
Project Demo Repository
We’ll be showing you how to manage an example academic software project.
If you’ve completed our Version Control with git workshop (linked here) , you’ll have an example project.
If not, please create a copy of our demo repository from this template (linked here),
and name it climate-analysis. You don’t need to run this code as part of the course! It’s purely for demonstration purposes.
Install Visual Studio Code
This workshop involves editing code files. Whilst you can use any text editor to do this, some code editors or Integrated Development Environments (IDEs) have features designed to make coding easier. If you’re already using a code editor or IDE (e.g. Atom, Sublime Text or Spyder), stick with what you’re comfortable with. If not, we’d recommend installing Visual Studio Code (link here).
Windows / MacOS
Go to the Visual Studio Code website, and download and run the installer.
Linux
If you’re on Ubuntu, Visual Studio Code should be available through the software centre! If not, follow the detailed instructions here to install it.
Open a Terminal
For this lesson, first you need to be able to open a terminal:
- On Windows: run “Git Bash”, to install git bash go here https://gitforwindows.org/ click download and select ‘Git-X.XX.X-64-bit.exe’ from the assets list.
- On Mac OS X: accessed by opening the “Terminal” application, which can be found in the “Utilities” folder which is in your “Applications” folder.
- On Linux: this will depend on the Linux distribution you are running, but you should be able to find a “Terminal” application in your desktop’s application menu.
Git Setup
Windows
We’ll be using Git Bash for both git and a shell to run it in. If you’ve already installed Git Bash then go to the next section. Otherwise, go to git for windows and click Download, then install it. Most of the options can be left on default, but be sure you check these:
- Choosing the default editor used by Git: Make sure Nano is selected from the drop-down. If you’re comfortable with other editors, feel free to change it, but we recommend Nano - we use it as it’s present on Windows, Mac and Linux. If you change it, you might not quite match what we’re doing on-screen.
- Adjusting your PATH environment: Make sure Git from the command line and also from 3rd-party software is selected.
- Choosing HTTPS transport backend: Make sure Use the native Windows Secure Channel Library is selected.
- Configuring the terminal emulator to use with Git Bash: Make sure Use Windows’ default console window is selected.
Mac OS
To use Git you must install the Apple Command Line Tools, this may take a few minutes.
You can obtain these from Apple (requires your Apple ID)
- Select Command Line Tools for Xcode 12 and click the link to download the dmg archive.
- If prompted, choose to allow downloads from developer.apple.com
- Open the downloaded dmg archive from the Downloads folder
- Double-click the Command Line Tools.pkg icon to install
Alternatively, you can install the tools from the command line:
$ xcode-select --install
Linux
Git comes pre-installed on most Linux distributions. You can test if it’s installed by running git --version.
If it’s not installed, you can install it by running sudo apt-get install git or sudo yum install git, depending on
your distribution.
GitHub
Later on in the session, we’ll be demonstrating how to share work with collaborators using GitHub. You’ll need to create an account there. As your GitHub username will appear in the URLs of your projects there, it’s best to use a short, clear version of your name if you can.
In addition, we’ll need to set up SSH access to GitHub from your computer. This is how GitHub checks your identity when you try to access it - and is more secure than a password. To set up SSH access, we generate a pair of keys - one public, one private. We want to add the public key to GitHub, whilst the private one stays on our computer.
There are full guides in the GitHub documentation for how to Make an SSH Key and Add an SSH key. However today we have simplified it like so:
If you already have an ssh key you can use it for Github by coping the public key into the clipboard and pasting it into the GitHub settings page.
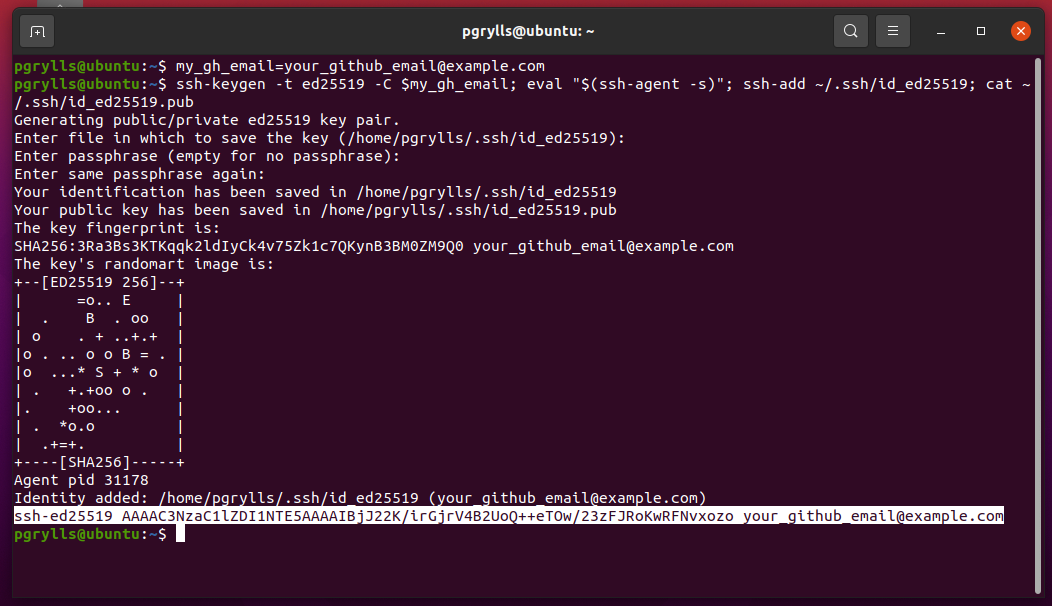
First we need to create a variable to store your GitHub email. Copy this command, substituting the email you signed up to GitHub with for your_github_email@example.com:
$ my_gh_email=your_github_email@example.com
Then we can run the following command to generate a key-pair and display the public half:
$ ssh-keygen -t ed25519 -C $my_gh_email; eval "$(ssh-agent -s)"; ssh-add ~/.ssh/id_ed25519; cat ~/.ssh/id_ed25519.pub
You will need to press enter a few times to select default options, and set the passphrase to empty.
Copy the last line of output that starts with ssh-ed25519 and ends with your email (it may have gone over multiple lines if your terminal isn’t wide enough).
Finally, go to your Settings -> SSH keys page and add a new SSH key (you’ll need to be logged into GitHub with the account you have created). Give the key a memorable name (e.g. the name of the computer you are working on) and paste the key from your clipboard into the box labelled key. Then, click Add SSH key and you’re done!
Download Data for Shell Lesson
Type the following into the prompt that appears (pressing enter/return after each line):
$ cd
$ git clone https://github.com/Southampton-RSG-Training/shell-novice.git
cd will move to your home directory, and git clone will download a copy of the materials.
Alternatively, if you have SSH authentication with GitHub enabled (if you don’t know what this means don’t worry, it is covered in the Git SWC course if you want to know more!) you can use the following:
$ cd
$ git clone git@github.com:Southampton-RSG-Training/shell-novice.git
This should download all the content for the lesson to a new directory. Please let the instructors know if you run into any problems.
Download Data for Git Lesson
Now we are ready to download the code that we need for this lesson, using Git on the command line. Open a terminal on your machine, and enter:
$ cd
$ git clone https://github.com/Southampton-RSG-Training/git-novice
cd will move to your home directory, and git clone will download a copy of the materials.
Python Setup
IDEs: PyCharm, Spyder, VS Code
We use Python 3*. The “Anaconda3” package provides everything Python-related you will need for the workshop. To install Anaconda, follow the instructions below.
Some old research projects may be in Python 2 but Python 2 has been retired and new projects should be in Python 3.
Windows
Download the latest Anaconda Windows installer. Double-click the installer and follow the instructions. When asked “Add Anaconda to my PATH environment variable”, answer “yes”. It will warn you not to, but it’s required for it to be found by git bash After it’s finished, close and reopen any open terminals to reload the updated PATH and allow the installed Python to be found.
Once the Anaconda installation is finished you will be asked if you want the installer to initialize Anaconda3 by running conda init? You should select yes. Alternatively/additionally you will need to run the following command in GitBash
conda init bash
Then close and reopen GitBash.
Please test the python install open GitBash (or your favorite terminal) and run the following command to verify that the installation was successful.
cd ~
python
You can then type the following to exit:
quit()
In some cases GitBash will hang on this command and not launch the Python interpreter.
In this case close and reopen git bash and issue the following commands:
cd ~
echo 'alias python="winpty python.exe"' >> .bashrc
source .bashrc
python
Mac OS X
Mac OS Intel
Download the latest Anaconda Mac OS X installer. Double-click the .pkg file and follow the instructions.
Mac OS M1
If you have a M1 Mac you need a specific version of Anaconda follow the link below.
Once the Anaconda installation is finished you will be asked if you want the installer to initialize Anaconda3 by running conda init? You should select yes.
Linux
Download the latest Anaconda Linux Installer.
Install via the terminal like this (you will need to change the version number to the latest version):
First move to the folder where you downloaded the installer, this is likely to be the Downloads folder e.g.
$ cd ~/Downloads
$ bash Anaconda3-2021.11-Linux-x86_64.sh
Answer ‘yes’ to allow the installer to initialize Anaconda3 in your .bashrc.
Download Data for Python Lesson
Now we are ready to download the code that we need for this lesson. Open a terminal on your machine, and enter:
$ cd
$ git clone https://github.com/Southampton-RSG-Training/python-novice
cd will move to your home directory, and git clone will download a copy of the materials.
Install R and RStudio
R is a programming language and software environment for statistical computing and graphics. The RStudio Integrated Development Environment (IDE) is a set of tools designed to help you be more productive with R.
We need to install R and RStudio: The latest links can be found on the RStudio downloads page
R
R can be found at https://cran.rstudio.com/, from here pick your OS and download the latest release, see below for direct links to your OS.
Windows
Mac OS
-
If prompted, choose to allow downloads from cran.rstudio.com.
-
https://cran.rstudio.com/bin/macosx/
- For intel based macs choose R-4...pkg
- For ARM based macs (M1 etc.) choose R-4..-arm64.pkg
Linux
- R is included on many linux distros check to see if it is already present. Else use your package manager (snap, apt, yum), or look here
RStudio
Your OS should be detected and a link provided under step 2 on this page RStudio downloads page. Else select your OS from the list under All Installers.
Windows
Download and run the .exe file and follow instructions given by your OS.
Mac OS
Download the .dmg file.
- If prompted, choose to allow downloads from rstudio.com.
- Open the downloaded dmg archive from the Downloads folder.
- Drag the RStudio icon to the Applications folder to install.
Linux
Download the appropriate install file (.rpm or .deb) for your distro.