Task-based Approach to Agentic Development
Last updated on 2026-05-13 | Edit this page
Estimated time: 0 minutes
Overview
Questions
- FIXME
Objectives
- Use the built-in planning agent to develop a basic Python application
- Create reusable Copilot agents automatically for specific development tasks
- Describe the format and basic configuration of an agents definition file
- Describe the purpose of a unit test
- Write and run a unit test to run within the pytest unit testing framework
- Interpret the output of running pytest
FIXME: clone example repo
Our Example Scenario
Using the Built-in Plan Agent
Creating a Plan
Instead of “one-shotting” the development of code using an AI coding tool, we’ve seen that a better approach is to plan and implement our code in a step-wise, incremental fashion. So how should we go about this?
One way would be to use the built-in VSCode plan agent that helps developers break down tasks into clear and actionable steps before writing code. Instead of jumping straight into implementation, it generates structured plans for features or for other code modification activities, improving clarity and efficiency. It aims to guide users through a thoughtful planning phase to reduce errors and encourage better design and implementation decisions.
Let’s try it out now.
Select
Planfrom the Copilot mode dropdown in the chat panel.-
Select
GPT-5.4 miniselected in the model dropdown:Create a command line tool written in Python that reads in a single CSV data file contained in the data directory passed as an argument, and creates graphical plots saved as PNG images to visualise the mean, minimum, maximum and standard deviation across each column. The tool should use Numpy for statistical analysis and Matplotlib for generating the plots Press
EnterAnswer any clarifying questions from the planning agent.
Observe the step-by-step thinking and actions undertaken by the agent.
When the planning agent concludes, select the option to open the plan in the editor, then save it.
You should find you end up with something similar to this, saved as a prompt file in the project folder:
MARKDOWN
## Plan: CSV Statistics Plotter

Build a small Python CLI that takes a directory argument, finds the single CSV inside it, loads the data as a NumPy array, computes column-wise mean, minimum, maximum, and standard deviation, and writes PNG plots with Matplotlib.
The sample file at [data/inflammation-01.csv](/Users/steve/Test/ai-plan-test/data/inflammation-01.csv) has 40 numeric columns and no header row, so the tool should synthesize column labels instead of expecting names in the file.

**Steps**
1. Set up a minimal Python project scaffold with a CLI entry point and dependencies for NumPy and Matplotlib.
2. Implement input discovery and validation so the tool accepts a directory path, confirms there is exactly one CSV file, and reads it into a numeric array.
3. Compute the four requested statistics per column with NumPy, keeping the output shape consistent for plotting.
4. Generate PNG visualizations with Matplotlib, using synthetic column labels like `1` through `40`, and write the images to a separate `output` directory.
5. Add argument handling for input and output locations plus clear error messages for missing files, multiple CSVs, or non-numeric data.
6. Validate the end-to-end flow against the provided sample dataset and confirm the PNGs are created successfully.

**Relevant files**
- `pyproject.toml` for project metadata, dependencies, and the console script.
- A new CLI module under `src/` for loading the CSV, computing stats, and generating plots.
- `README.md` for usage notes and output behavior.

**Verification**
1. Run the CLI against the sample data directory and confirm PNG files are generated without errors.
2. Inspect the images to verify the four statistics are plotted sensibly across all 40 columns.
3. Do not create any unit tests.

**Decisions**
- Assume the directory contains exactly one CSV file.
- Assume the CSV has no header row.
- Prefer separate plots per statistic unless a combined figure is clearer and still readable.
- Keep the scope focused on a single-file workflow rather than batch processing.
This now provides us with a planning document which we are able to review and amend as we wish. This is very reasonable approach:
- Importantly, we are now moving from ad-hoc development to intentional development, which forces us to consider ways forward and make decisions and capture these within a defined plan that we validate and refine before moving to implementation.
- We may extend this plan with other sections and further detail as needed.
- It has created a concrete document we can discuss and refine with colleagues before we proceed.
- It also provides a “checkpoint”: if the implementation is unsatisfactory we can remove the implementation, amend the plan, and ask Copilot to create the implementation again.
FIXME: expand on the benefits of externalising the agentic reasoning a bit
Review!
5 mins.
As we know, we should always review the output from generative AI. So with a skeptical mindset:
- Carefully review the generated plan and ensure it complies with the initial prompt.
- Does the plan match what you want from this tool?
- Refine the plan as needed.
- If you spot any references to creating unit tests, remove them for now - we’ll cover this later!
- Add a new line to the
Verificationsection:Do not create any unit tests.
When you’ve finished, add your thoughts about how well the built-in planning agent performed this task into the shared document, noting what it did well and what it could have done better.
Supplementary Implementation Agents
With the aid of Copilot’s planning agent we’ve created an initial plan, reviewed and refined it, and had Copilot implement the plan for us, which is a helpful start. However, there are other development tasks typically associated with
A Lint Agent
One way to create our agent is to use the built-in
/create-agent VSCode chat command.
The Anatomy of an Agent Definition File
For example, this prompt generated a file called
code-linter.agent.md that includes the following agent
definition:
MARKDOWN
Agent definitions tend to follow a common pattern of defining agent metadata, role, and aspects of its overall behaviour separated into subsections.
So at the top of this definition, there is YAML front matter that defines metadata about this agent, including a plain text description, whether this agent can be invoked by the user, and which tools this agent is allowed to use. This explicit declaration of allowable tools enables us to conform this agent to the Principle of Least Privilege, ensuring we only give it permissions that it needs to accomplish its role.
In this case:
-
read- the agent is allowed to read files in this VSCode workspace, such as source code and other files -
search- allows the agent to search across this workspace -
edit- the agent may edit and modify files within this workspace
If you select the Configure Tools... text above this
line, you’ll see a pop-up dropdown containing a complete set of
allowable permissions to select for this agent.
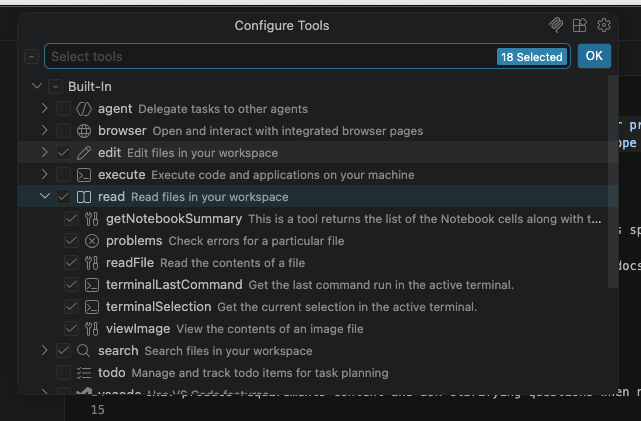
Note that these are arranged hierarchically, so we are able to assign
sub-permissions within a particular group
(e.g. read/readFile) if we want to be more specific.
Next, its behaviour starts with an initial declaration of the agent’s role, where it adopts a persona of a specialist writing a requirements specification.
Managing Expectations…
Importantly, note that in this case whilst the role is declared as a
requirements specialist to set the agent’s persona, we
should not consider the output as we would if its coming from a
real specialist or expert. This is a dangerous trap to fall
into with using generative AI, since this declaration only provides an
anchor for its behaviour, not a guarantee of its competence!
As with all things generative AI, we should treat any output with skepticism and use it to inform our own thinking and decisions through careful review, and not blindly accept its assertions.
Lastly, we have a set of subsections, each concisely describing an aspect of its behaviour. In this case, we can see we have the following:
- Section on Constraints - this is partiuclarly important to set guardrails and constrain the agent’s behaviour only to what we want. AI agents otherwise tend to wander outside of their defined scope. In this case, we see that the agent is instructed to not to do any design or implementation, although note given the probablistic nature of LLMs, this doesn’t guarantee that they won’t!
- Description of the Desired Approach - a set of clear and concise steps describing what the agent should do.
- Output format - which describes the output format of the document and the included contents as subsections
A Documentation Agent
/create-agent a documentation agent that writes documentation based on the contents of the repository, including sections on installation, API docs and basic usage. Use mkdocs to generate the documentation. Write documentation to `docs/` and never modify source code.A Standalone Test Agent
- FIXME