What is Version Control
Overview
Teaching: 5 min
Exercises: 0 minQuestions
What is version control and why should I use it?
Objectives
Understand the benefits of an automated version control system.
Understand the basics of how automated version control systems work.
What is Version Control?
Version control (or VC for short ) can also be called revision control or source control. The simplest description is that VC is a tool that tracks changes to files.
Why should I use it? - Three reasons
1. A More Efficient Backup
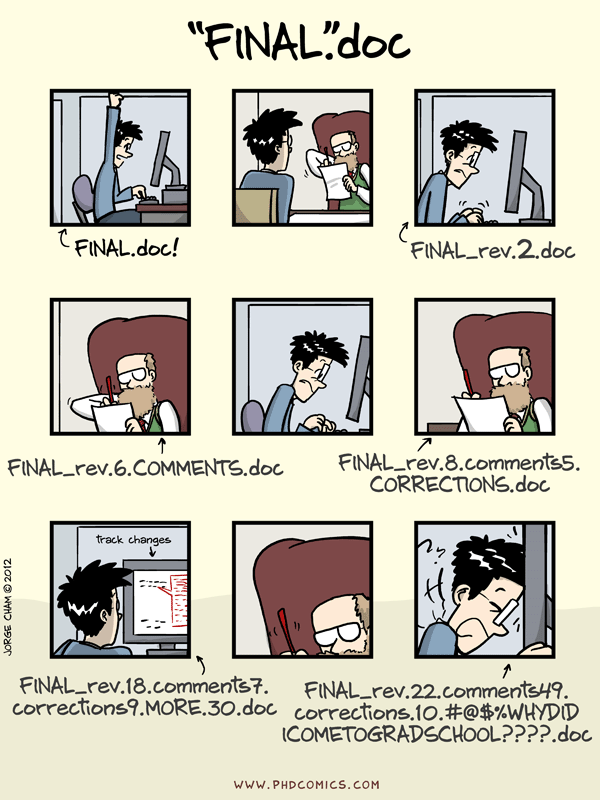
We’ve all been in this situation before - having multiple nearly-identical versions of the same file with no meaningful explanation of what the differences are, just incremental changes in filename (thesis.doc, thesis_final.doc, thesis_final2.doc…).
If we’re just dealing with text documents, some word processors let us deal with this a little better, like Microsoft Word’s “Track Changes” or Google Docs’ version history. However, research isn’t just Word docs, it’s code and data and diagrams too, and a single paper or project can involve a whole constellation of files, all of which need backing up!
Using version control means we don’t keep dozens of different versions of our files hanging about taking up space, and when we store a revision, we store an explanation of what changed.
2. Reproducibility
When you use version control, at any point in the future, you can retrieve the correct versions of your documents, scripts or code. So, for example, a year after publication, you can get hold of the precise combination of scripts and data that you used to assemble a paper.
Version control makes reproducibility simpler. Without using version control it’s very hard to say that your research is truly reproducible…
3. To Aid Collaboration
As well as maintaining a revison history, VC tools also help multiple authors collaborate on the same file or set of files.
Professional software developers use VC to work in large teams and to keep track of what they’ve done. If you know what changes have been made to each file, you can easily combine multiple people’s changes to a single file. You can also track down where and when (and by who!) bugs in the code were introduced.
Every large software development project relies on VC, and most programmers use it for their small jobs as well.
VC is not just for software: papers, small data sets - anything that changes over time, or needs to be shared can, and probably should be stored in a version control system.
We’ll look at both the backup and collaboration scenarios, but first it’s useful to understand what going on under the hood.
How do Version Control Tools Work?

Version control systems start by storing the base version of the file that you save and then store just the changes you made at each step on the way. You can think of it like storing Lego bricks and the instructions for putting them together - if you start with the first piece, then add each other in turn, you end up with your final document.

Once you think of changes as separate from the document itself, you can then think about taking the same document and adding different changes to it, getting different versions of the document. For example, two users can make independent sets of changes based on the same document.

If there aren’t conflicts, you can even try to combine two different sets of changes together onto the same base document, a process called merging.
Version Control Alternatives
Git is overwhelmingly the most popular version control system in academia, and beyond. It’s a distributed version control system, where every developer in a team has their own full copy of a repository, and can synchronise between them.
It’s partly become such a success thanks to sites like GitHub and GitLab, which make it easy to collaborate on a Git repository, and provide all kinds of extra tools to manage software projects. Plus, GitHub offers free upgraded membership to academics, students and educators - you can apply here.
If you’re working on old projects, or ones with very specific needs, you might use Mercurial, another distributed system, or possibly Subversion, a centralised system where there’s a single copy of the repository that everyone connects to.
Because Git is so popular, and making a GitHub account is so easy, we’re going to teach you how to use them.
Graphical User Interfaces
We’re going to teach you how to use Git on the command line, as that’s the only version that will be available on most HPC resources. This isn’t the only way to use it, however- there are many different graphical user interfaces for Git, like:
| SourceTree | Git Kraken | GitHub Desktop |
|---|---|---|
 |
 |
 |
Fundamentally, though, these are all just ‘wrappers’ around the command line version of Git. If you understand what they’re doing under the hood, you can easily switch between versions. You can, for example, manage your code on DIRAC using command-line git and GitHub Desktop on your desktop workstation.
Key Points
Version control is like an unlimited ‘undo’.
Version control also allows many people to work in parallel.
Setting Up
Overview
Teaching: 5 min
Exercises: 0 minQuestions
How do I get set up to use Git?
How do I set up my account on GitHub?
Objectives
Configure
gitthe first time it is used on a computerUnderstand the meaning of the
--globalconfiguration flagAdd an SSH key to a GitHub account
Prerequisites
In this lesson we use Git from the Bash Shell. Some previous experience with the shell is expected, but isn’t mandatory.
Setting Up Git
We’re going to use Git on the command line on our remote server, so we need to connect to it first, so using a terminal:
$ ssh username@servername
Don’t have a GitHub Account?
For this lesson you’ll need an account on GitHub, so if you don’t have an account on GitHub, please go and create one now.
The first time we use Git on a new machine, we need to configure it. We’re going to set some global options, so when Git starts tracking changes to files it records who made them and how to contact them.
$ git config --global user.name "Firstname Surname"
$ git config --global user.email "fsurname@university.ac.uk"
(Please use your own name and the email address you used to sign up to GitHub!)
We’re going to set Nano, a simple, minimal commaand-line text editor to be the default for when you need to edit messages.
$ git config --global core.editor "nano -w"`
If you’re already comfortable with another command-line editor, feel free to select that!
Git commands are written git action, where action is what we actually want it to do. In this case, we’re telling Git:
- our name and email address,
- what our favorite text editor is, and
- that we want to use these settings globally (i.e., for every project),
The three commands above only need to be run once:
the flag --global tells Git to use the settings for every project on this machine.
You can check your settings at any time:
$ git config --list
Git Help and Manual
If you forget a
gitcommand, you can access the list of commands by using-hand access the Git manual by using--help:$ git config -h $ git config --helpWhile viewing the manual, remember the
:is a prompt waiting for commands and you can press Q to exit the manual.
Key Points
Use
git configwith the--globaloption to configure a user name, email address, editor, and other preferences once per machine.GitHub needs an SSH key to allow access
Using a Repository
Overview
Teaching: 10 min
Exercises: 0 minQuestions
How do I create a version control repository?
Where does Git store information?
Objectives
Create a repository from a template.
Clone and use a Git repository.
Describe the purpose of the
.gitdirectory.
Creating a Repository
A repository is a directory that is under version control - it can track changes to files within it. Git also makes it easy to sync up a local repository on your computer (or DiRAC server) with a remote repository on the internet.
Setting up an SSH Key
In this episode we’ll be creating a new repository on GitHub then downloading and using that repository on DiRAC. In order to do that, we’ll need a way to gain access to our repository from the DiRAC server. Just as we needed an SSH key to connect from our computer to the DiRAC server, we need an SSH key to connect from the DiRAC server to GitHub, so let’s create a new one.
On our terminal connected to DiRAC, we can create one on the command line as before - just go with the defaults for every option:
$ ssh-keygen -t rsa
Generating public/private rsa key pair.
Enter file in which to save the key (/cosma/home/ds007/dc-mang1/.ssh/id_rsa):
Enter passphrase (empty for no passphrase):
Enter same passphrase again:
Your identification has been saved in /cosma/home/ds007/dc-mang1/.ssh/id_rsa.
Your public key has been saved in /cosma/home/ds007/dc-mang1/.ssh/id_rsa.pub.
The key fingerprint is:
SHA256:ltRWwH/GJxLDlndQLmtR4LbprhhVjjFbc5ZYoeYiFc8 dc-mang1@login6a.pri.cosma7.alces.network
The key's randomart image is:
+---[RSA 2048]----+
|         ..+..o*+|
|         ...X.=oo|
|        . o+oEOo+|
|       . o. =X=X.|
|        S. .+=*o |
|       .  ...o   |
|          .   .  |
|           o .   |
|          . ...  |
+----[SHA256]-----+
Now we’ve generated a key, we can add this to GitHub and register the key there. First, visit GitHub, and make sure you’ve signed in to your account. Once you’re signed in, go to GitHub > Settings > SSH and GPG keys > Add new, and you should see this:
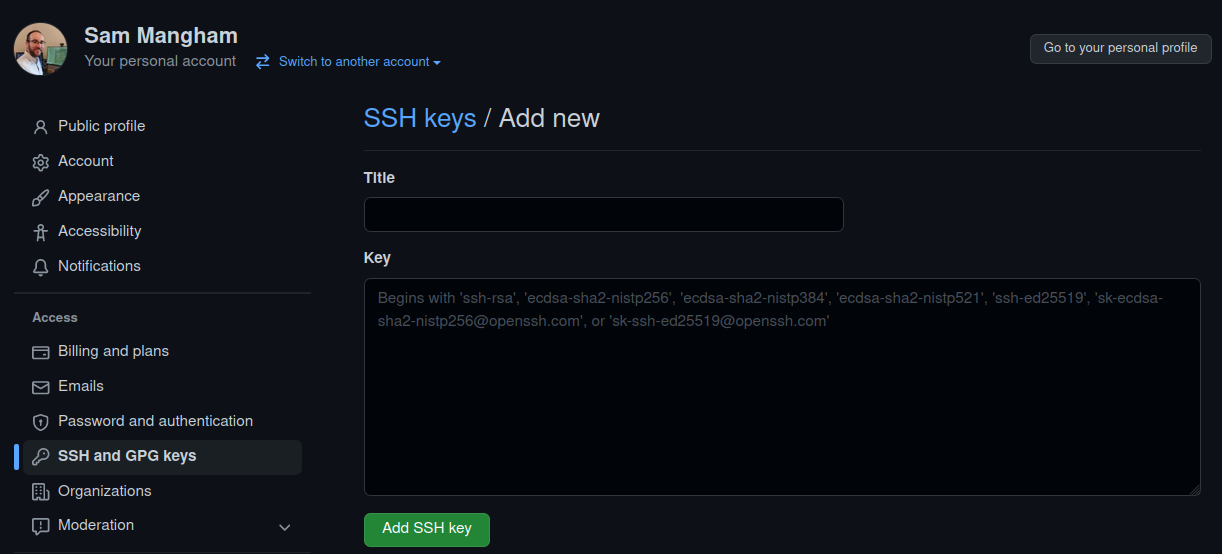
We need to fill in the details. Give the key a title like “DiRAC SSH key”, and then paste your public key into the key box - we can find it in our ~/.ssh folder:
$ ls ~/.ssh
id_rsa id_rsa.pub known_hosts
You want to copy the contents of the .pub file, which you can display with:
$ cat ~/.ssh/id_rsa.pub
ssh-rsa <SNIPPED FOR SECURITY> dc-mang1@login6a.pri.cosma7.alces.network
Make sure you copy the .pub file and not the private key! Your private key lives on your machine and is never shared with anyone else. Then click Add key.
Using a Template
Now let’s create a new repository for us to work on.
For convenience, we’re going to work with some pre-existing template code that’s already stored in a repository. The first thing we need to do is create our own copy of that template, which we can do on GitHub.
Go to our template repository and select Use this template:
We should get prompted to give details for what we’d like our copy of the template to be called. As this demo code is for analysing climate data, we’ll name our copy of it climate-analysis. We also want it to be public, so anyone can see and copy our code:
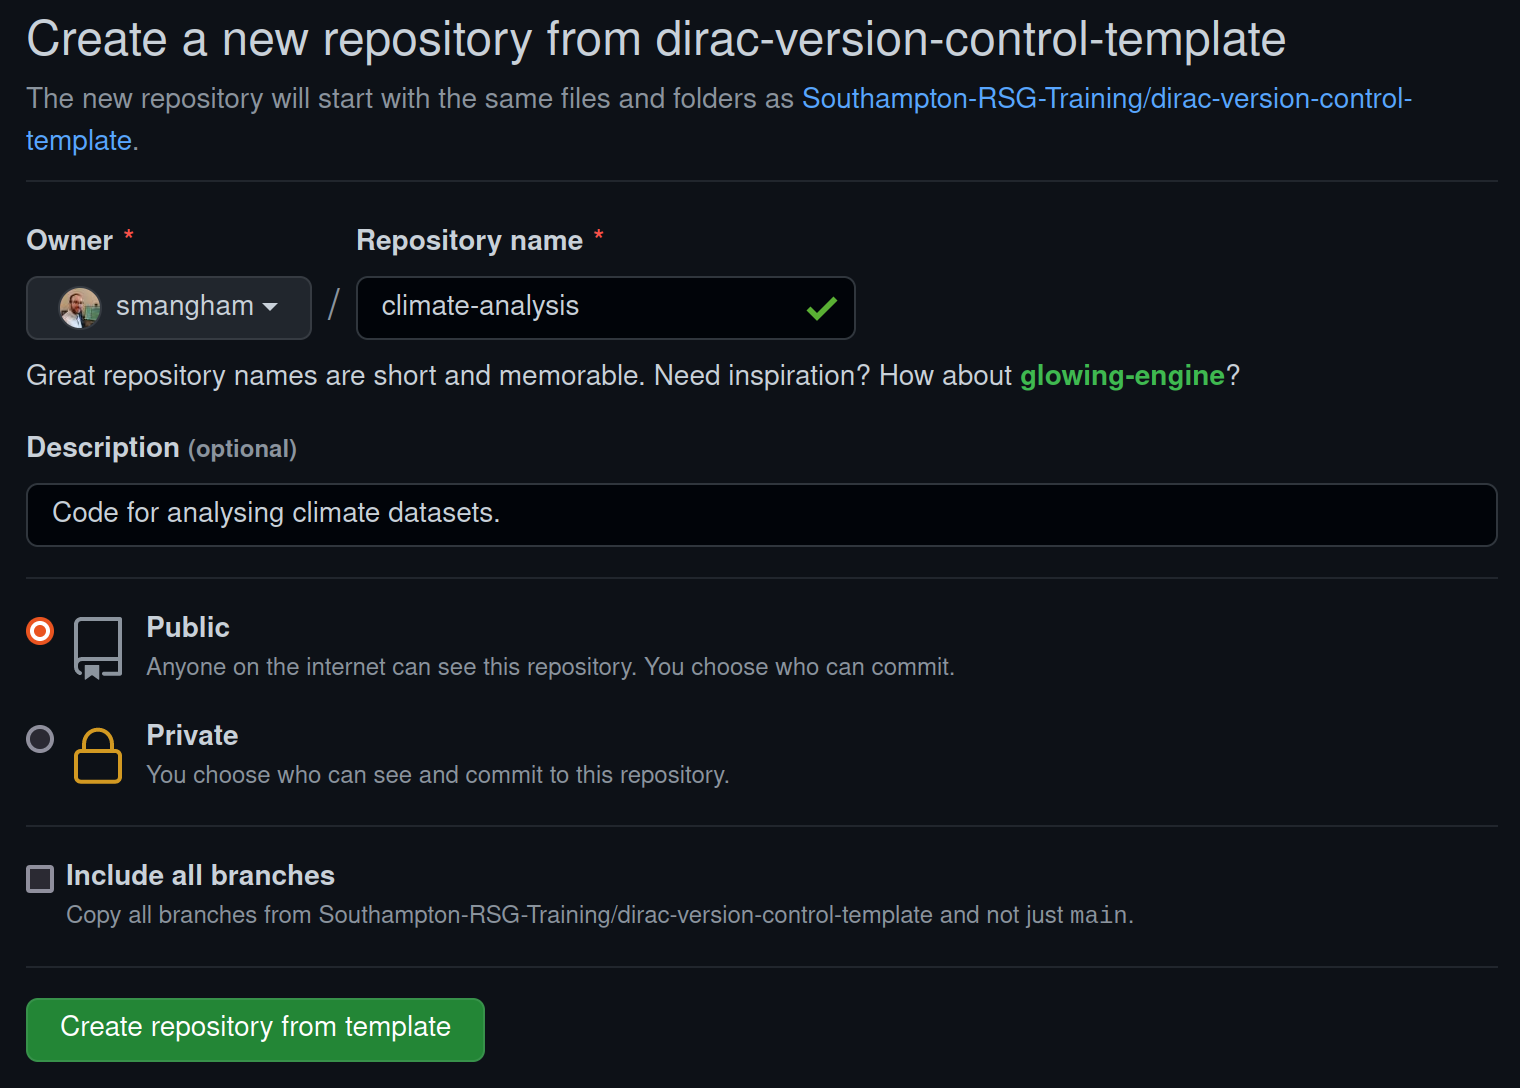
Public or Private?
GitHub will allow you to create private repositories, so only people you specify can access the code, but it’s always best to keep your code public - especially if you’re going to use it in a paper! Code that generates or analyses data is a fundamental part of your method, and if you don’t include your full method in papers your work can’t be reproduced, and reproducibility is key to the scientific process. Always keep your repositories public unless you’ve got a strong reason, like embargoes imposed by industrial partners.
A major advantage of this is if you leave academia, or you switch institution and forget to update the email on your GitHub account before you lose your old one, your work won’t be lost forever!
After a brief wait, GitHub will have created a remote repository - a copy of the files and their history stored on GitHub’s servers.
Cloning the Repository
Next, from the new GitHub repository click on the code button, and you should have a choice of ways to copy the code. Select SSH, then click the copy button to copy the repository’s URL:
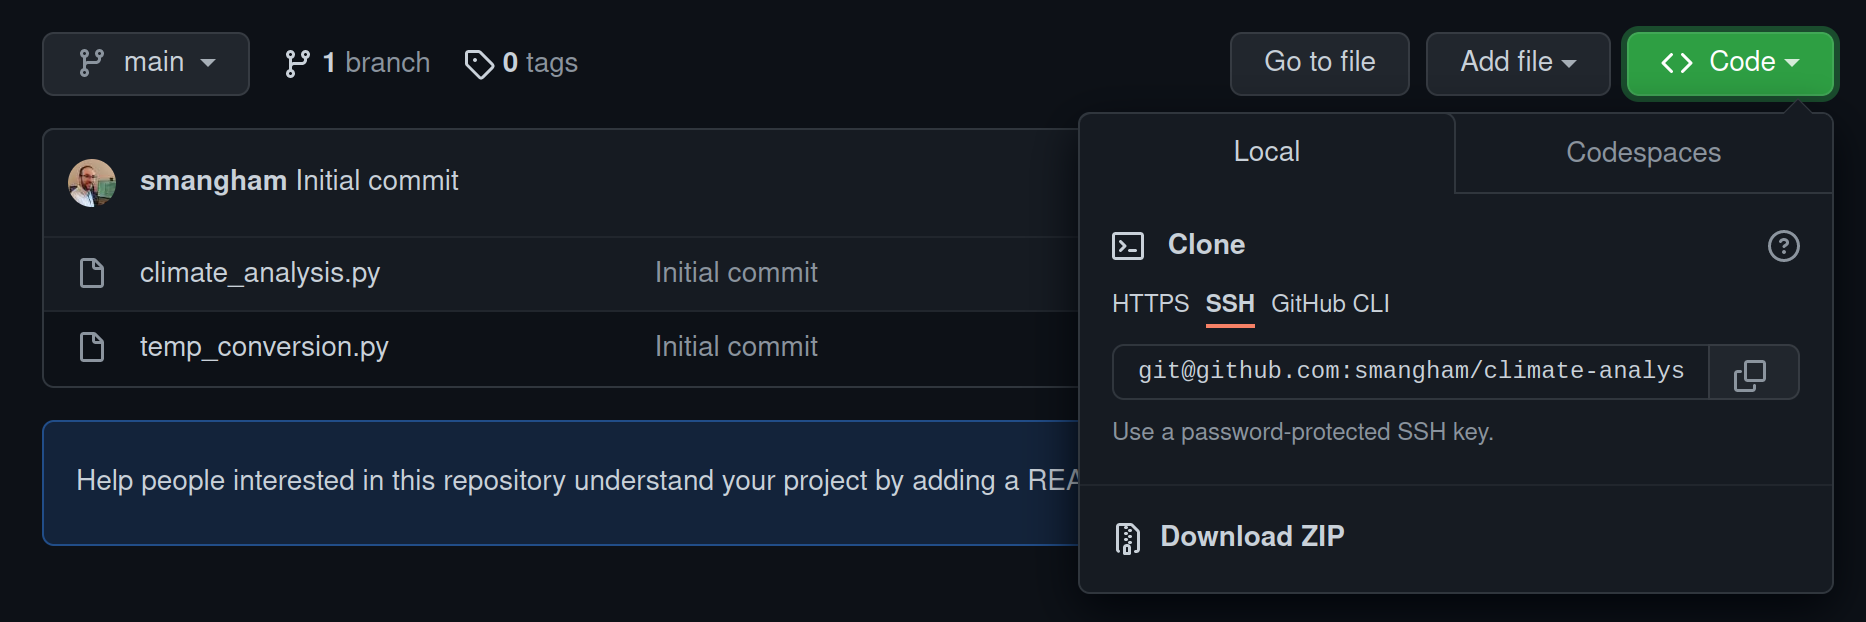
Now we’ll download a copy of the repository to our server.
SSH vs HTTPS
Make sure you select SSH! Whilst Git supports both HTTPS and SSH, GitHub will only let you download with HTTPS, as it’s less secure.
We have our SSH key in place and have created our new repository from the template, so we can finally clone the repository to the DiRAC server:
$ git clone git@github.com:yourname/climate-analysis.git
What if I Accidentally Cloned the Repository using HTTPS?
As a note, if you’ve already cloned a repository you can check if you selected HTTPS as the access method using, e.g.:
$ cd climate-analysis
$ git remote -v
origin git@github.com:yourname/climate-analysis (fetch) origin git@github.com:yourname/climate-analysis (push)In this case, we’re using SSH. If you see HTTPS, you can fix this with the following::
$ git remote set-url origin git@github.com:yourname/climate-analysis
After you enter the git clone command, you should see:
Cloning into 'climate-analysis'...
The authenticity of host 'github.com (140.82.121.4)' can't be established.
ECDSA key fingerprint is SHA256:p2QAMXNIC1TJYWeIOttrVc98/R1BUFWu3/LiyKgUfQM.
ECDSA key fingerprint is MD5:7b:99:81:1e:4c:91:a5:0d:5a:2e:2e:80:13:3f:24:ca.
Are you sure you want to continue connecting (yes/no)? yes
Then, when you’re prompted, continue the connection with yes and it will finish downloading:
remote: Enumerating objects: 4, done.
remote: Counting objects: 100% (4/4), done.
remote: Compressing objects: 100% (4/4), done.
remote: Total 4 (delta 0), reused 3 (delta 0), pack-reused 0
Receiving objects: 100% (4/4), done.
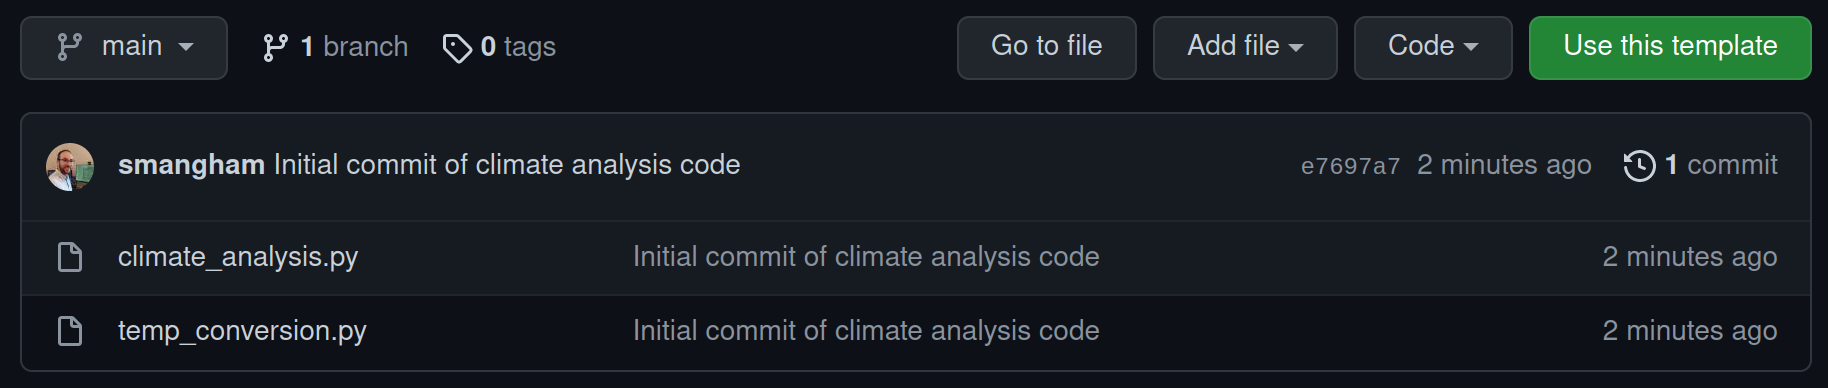
Now, if we use ls to list the contents of the directory, we should see we have a new directory, called climate-analysis, that’s a local repository containing the code from our remote repository. This is linked up automatically - making it easy for us to download updates to the remote repository, or to send our changes back up to it.
Creating Repositories Locally
You don’t have to create your repositories on GitHub first! If you want, you can create a repository locally by entering any directory and using
git init. From there, you can use the other commands we introduce in this section. You can connect a local repository to an empty remote one usinggit remote add origin URL_OF_REMOTE.
Exploring a Repository
Now, let’s change to our code directory and look at the files we just downloaded.
$ cd ~/climate-analysis
$ ls
climate_analysis.py temp_conversion.py
These are some Python files for analysing climate data- you’ll recognise them if you’ve done some of our earlier lessons. Don’t worry, you don’t need to know Python to follow along.
You’ll notice that even though this directory is a version control repository, nothing actually looks special about it. But, if we add the -a flag to show everything,
we can see that there’s a hidden directory called .git:
$ ls -a
. .. climate_analysis.py .git temp_conversion.py
Git stores information about the project in here. If we ever delete it, we will lose the project’s history.
Check Status
We can check that everything is set up correctly by asking Git to tell us the status of our project with the status command:
$ git status
# On branch main
nothing to commit, working tree clean
A branch is an independent line of development. We have only one, and the default name is main.
Our local repository is connected to a remote repository (called origin by default), and is currently up-to-date; we haven’t made any changes to the code yet.
Git works on commits - snapshots of the current state of the repository. “nothing to commit, working tree clean” means that the directory currently looks exactly the same as the last snapshot we took of it, with no changes or edits.
Branch names
In this workshop, we have a default branch called main. In older versions of Git, if you create a new repository on the command line, it’ll have a default branch called master, and a lot of examples online will show master instead of main. Don’t worry - branches work the same, regardless of what they’re called!
Key Points
git clonecreates a local copy of a repository from a URL.Git stores all of its repository data in the
.gitdirectory.
Tracking Changes
Overview
Teaching: 20 min
Exercises: 0 minQuestions
How do I track the changes I make to files using Git?
Objectives
Go through the modify-add-commit cycle for one or more files.
Describe where changes are stored at each stage in the modify-add-commit cycle.
Add to Version Control
We’ve got a repository now containing a few pre-existing files - so let’s add one more. You might remember seeing GitHub suggest we added a README.md to let people know what our code is about, so let’s do that on the command line. We’ll use the text editor nano, as:
$ nano README.md
Then type an example description:
# Climate Analysis Toolkit

This is a set of python scripts designed to analyse climate datafiles.
We can save our file using Control-O (Control and O at the same time), then Enter, and quit out of nano using Control-X.
Our description is a bit brief, but it’s enough for now!
Let’s try git status again:
$ git status
# On branch main
# Untracked files:
#   (use "git add <file>..." to include in what will be committed)
#
#	README.md
nothing added to commit but untracked files present (use "git add" to track)
Now, whilst our current snapshot of the repository is up-to-date, we’ve added a new file that we’re not tracking yet. We can tell Git to track the file we’ve just created using git add:
$ git add README.md
and then check that the right thing happened:
$ git status
# On branch main
# Changes to be committed:
#   (use "git reset HEAD <file>..." to unstage)
#
#	new file:   README.md
#
Git now knows that it’s supposed to keep track of README.md, just like climate_analysis.py and temp_conversion.py but it hasn’t recorded that as a commit yet. We dont have a snapshot of the repository with all the existing files and README.md.
Initial Commit
To get it to do that, we need to run one more command:
$ git commit -m "Added a basic readme file."
We use the -m flag (for “message”)
to record a short, descriptive comment that will help us remember later on what we did and why.
If we just run git commit without the -m option,
Git will launch nano (or whatever other editor we configured at the start)
so that we can write a longer message.
Good commit messages start with a brief (<50 characters) summary of changes made in the commit, NOT “Bug Fixes” or “Changes”!
If you want to go into more detail, add a blank line between the summary line and your additional notes.
[main fa90884] Added a basic readme file.
 1 file changed, 3 insertions(+)
 create mode 100644 README.md
When we run git commit,
Git takes everything we have told it to save by using git add
and stores a copy permanently inside the special .git directory.
This permanent copy is called a revision
and its short identifier is fa90884.
(Your revision will have different identifier.)
If we run git status now:
$ git status
# On branch main
# Your branch is ahead of 'origin/main' by 1 commit.
#   (use "git push" to publish your local commits)
#
nothing to commit, working directory clean
it tells us our local repository is up-to-date, although now we have edits to it that the remote version of it doesn’t (we’ll get to that later!).

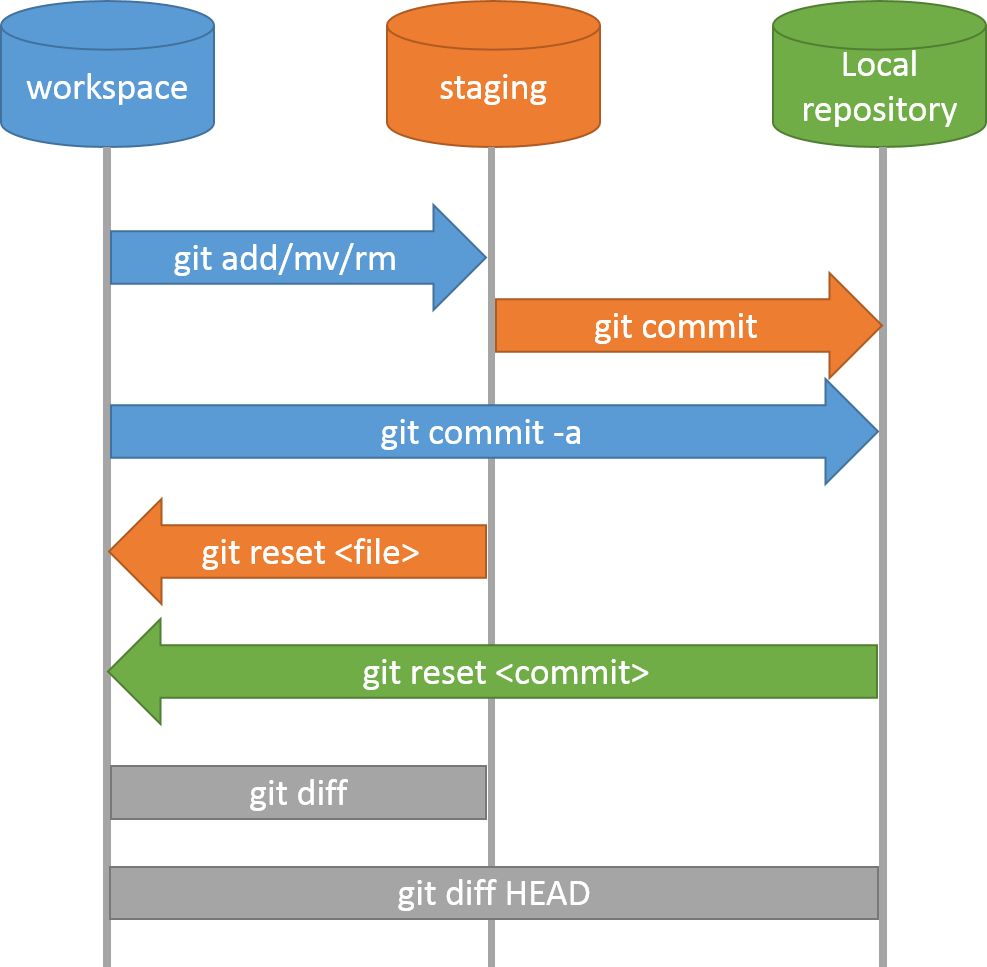
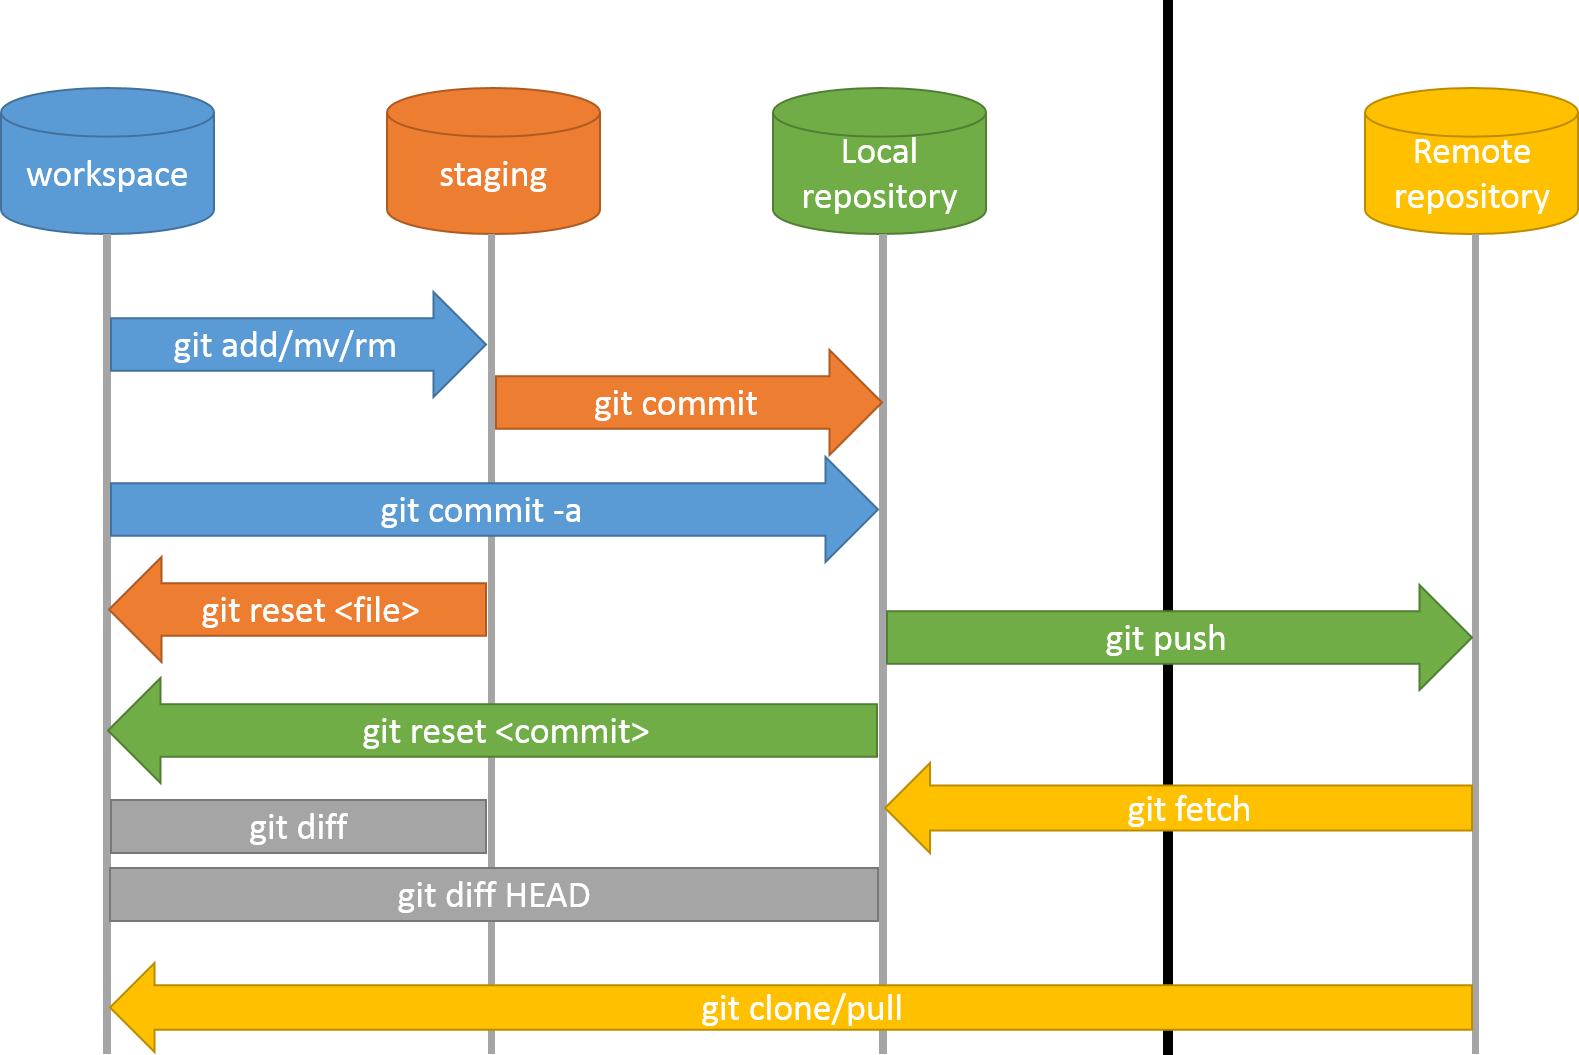
Git has a special staging area
where it keeps track of things that have been added to
the current change set
but not yet committed.
git add puts things in this area,
and git commit then copies them to long-term storage (as a commit)
What’s the Point of the Staging Area?
Why do we have this two-stage process, where we add files to the staging area, then create a commit from them?
Among other reasons, it allows you to easily bundle together a lot of changes in one go. If you changed the name of a variable used in multiple files (e.g. from
ttotemperature), you’d need to change it in all your files in one go in order for it to make sense. If you stored a copy of each file one-by-one you’d end up with a lot of versions of the code that didn’t work - variables with different names everywhere. The staging area lets you bundle together all those small changes that don’t work in isolation into one big change that’s coherent.Git does give you shortcuts to reduce add -> commit to a single step, but when you’re starting out it’s always better to make sure you know what’s going in to each commit!
Review the Log
If we want to know what we’ve done recently,
we can ask Git to show us the project’s history using git log:
$ git log --decorate
Adding --decorate ensures output will indicate, for each commit revision, whether it is up-to-date with its remote repository, if one exists (on some systems, you may find Git does not supply this information by default).
commit fa90884ca03dcefb97e415a374ac1aacaaa94c91 (HEAD -> main)
Author: Sam Mangham <mangham@gmail.com>
Date:   Wed Mar 16 15:22:29 2022 +0000

    Added a basic readme file.

commit 499b6d18b36a25d3f5ab9be1b708ea48fef1dd65 (origin/main, origin/HEAD)
Author: Sam Mangham <mangham@gmail.com>
Date:   Wed Mar 16 14:19:13 2022 +0000

    Initial commit
git log lists all revisions committed to a repository in reverse chronological order (most recent at the top).
The listing for each revision includes
- the revision’s full identifier (which starts with the same characters as the short identifier printed by the
git commitcommand earlier), - the branch it was created on (including whether or not it’s up-to-date with any remote versions of that branch - in this case, our last README commit hasn’t been pushed to the remote repo yet),
- the revision’s author,
- when it was created,
- the log message Git was given when the revision was committed.
Modify a file (1)
Now suppose we modify an existing file, for example by adding a Docstring to the top of one of the files:
$ nano climate_analysis.py
""" Climate Analysis Tools """
When we run git status now,
it tells us that a file it already knows about has been modified:
$ git status
# On branch main
# Your branch is ahead of 'origin/main' by 1 commit.
#   (use "git push" to publish your local commits)
#
# Changes not staged for commit:
#   (use "git add <file>..." to update what will be committed)
#   (use "git checkout -- <file>..." to discard changes in working directory)
#
#	modified:   climate_analysis.py
#
no changes added to commit (use "git add" and/or "git commit -a")
The last line is the key phrase: “no changes added to commit”.
So, while we have changed this file,
but we haven’t told Git we will want to save those changes
(which we do with git add)
much less actually saved them (which we do with git commit).
It’s important to remember that git only stores changes when you make a commit
Review Changes and Commit
It is good practice to always review
our changes before saving them. We do this using git diff.
This shows us the differences between the current state
of the file and the most recently commited version:
$ git diff
diff --git a/climate_analysis.py b/climate_analysis.py
index 277d6c7..d5b442d 100644
--- a/climate_analysis.py
+++ b/climate_analysis.py
@@ -1,3 +1,4 @@
+""" Climate Analysis Tools """
 import sys
 import temp_conversion
 import signal
The output is cryptic because
it is actually a series of commands for tools like editors and patch
telling them how to reconstruct one file given the other.
The key things to note are:
- Line 1: The files that are being compared (a/ and b/ are labels, not paths)
- Line 2: The two hex strings on the second line which parts of the hashes of the files being compares
- Line 5: The lines that have changed. (It’s complex)
- Below that, the changes - note the ‘+’ marker which shows an addtion
After reviewing our change, it’s time to commit it:
$ git commit -m "Add Docstring"
# On branch main
# Your branch is ahead of 'origin/main' by 1 commit.
#   (use "git push" to publish your local commits)
#
# Changes not staged for commit:
#   (use "git add <file>..." to update what will be committed)
#   (use "git checkout -- <file>..." to discard changes in working directory)
#
#	modified:   climate_analysis.py
#
no changes added to commit (use "git add" and/or "git commit -a")
Whoops:
Git won’t commit because we didn’t use git add first.
Let’s fix that:
$ git add climate_analysis.py
$ git commit -m "Add Docstring"
[main 55d3f56] Add Docstring
 1 file changed, 1 insertion(+)
Git insists that we add files to the set we want to commit before actually committing anything because we may not want to commit everything at once.
For example, suppose we might have fixed a bug in some existing code, but we might have added new code that’s not ready to share.
One more addition
What if we’ve made some edits, added them, and then forgotten what they were? Let’s add another line to the end of the file:
$ nano climate_analysis.py
# TODO(smangham): Add call to process rainfall
Check what’s changed with diff:
$ git diff
diff --git a/climate_analysis.py b/climate_analysis.py
index d5b442d..6f8ed8a 100644
--- a/climate_analysis.py
+++ b/climate_analysis.py
@@ -26,3 +26,5 @@ for line in climate_data:
             kelvin = temp_conversion.fahr_to_kelvin(fahr)

             print(str(celsius)+", "+str(kelvin))
+
+# TODO(smangham): Add call to process rainfall
So far, so good:
we’ve added one line to the end of the file
(shown with a + in the first column).
Now let’s put that change in the staging area (or add it to the change set), then go away for the weekend. When we come back, we can’t remember what we added, so we see what git diff reports:
$ git add climate_analysis.py
$ git diff
There is no output:
git diff shows us the differences between the working copy and what’s been added to the change set in staging area.
However, if we do this:
$ git diff --staged
diff --git a/climate_analysis.py b/climate_analysis.py
index d5b442d..6f8ed8a 100644
--- a/climate_analysis.py
+++ b/climate_analysis.py
@@ -26,3 +26,5 @@ for line in climate_data:
             kelvin = temp_conversion.fahr_to_kelvin(fahr)

             print(str(celsius)+", "+str(kelvin))
+
+# TODO(smangham): Add call to process rainfall
it shows us the difference between the last committed change and what’s in the staging area.
Let’s commit our changes:
$ git commit -m "Add rainfall processing placeholder"
[main 6f60ad6] Add rainfall processing placeholder
 1 file changed, 2 insertions(+)
check our status:
$ git status
# On branch main
# Your branch is ahead of 'origin/main' by 3 commits.
#   (use "git push" to publish your local commits)
#
nothing to commit, working directory clean
and now look at the history of what we’ve done so far:
$ git log
commit 6f60ad638f344fbb5fdf81f05a804f7417984eec (HEAD -> main)
Author: Sam Mangham <mangham@gmail.com>
Date:   Wed Mar 16 15:40:30 2022 +0000

    Add rainfall processing placeholder

commit 55d3f56c9f2d42919ffaff4fbaabd69fe99053eb
Author: Sam Mangham <mangham@gmail.com>
Date:   Wed Mar 16 15:35:42 2022 +0000

    Add Docstring

commit fa90884ca03dcefb97e415a374ac1aacaaa94c91
Author: Sam Mangham <mangham@gmail.com>
Date:   Wed Mar 16 15:22:29 2022 +0000

    Added a basic readme file.

commit 499b6d18b36a25d3f5ab9be1b708ea48fef1dd65 (origin/main, origin/HEAD)
Author: Sam Mangham <mangham@gmail.com>
Date:   Wed Mar 16 14:19:13 2022 +0000

    Initial commit

To recap, when we want to add changes to our repository,
we first need to add the changed files to the staging area
(git add) and then commit the staged changes to the
repository (git commit).
Key Points
git statusshows the status of a repository.Files can be stored in a project’s working directory (which users see), the staging area (where the next commit is being built up) and the local repository (where commits are permanently recorded).
git addputs files in the staging area.
git commitsaves the staged content as a new commit in the local repository.Write commit messages that accurately describe your changes.
git log --decoratelists the commits made to the local repository, along with whether or not they are up-to-date with any remote repository.
Exploring History
Overview
Teaching: 10 min
Exercises: 0 minQuestions
How can I review my changes?
How can I recover old versions of files?
Objectives
Identify and use Git revision numbers.
Compare files with previous versions of themselves.
Restore old versions of files.
Relative History
We’ve seen that git log gives us some information on what commits were made when, but let’s look a bit deeper at the specifics:
$ git log
commit f15ad111042cee7492f40ad6ff0ec18588fce753 (HEAD -> main)
Author: Sam Mangham <mangham@gmail.com>
Date:   Wed Mar 30 17:15:47 2022 +0100

    Add rainfall processing placeholder

commit 6aeaf44173344939e9994d7ccb5512fc5b26c211
Author: Sam Mangham <mangham@gmail.com>
Date:   Wed Mar 30 17:14:14 2022 +0100

    Add Docstring

commit 503f02b5f51d5622121e204494dfabc9b2ae7410
Author: Sam Mangham <mangham@gmail.com>
Date:   Wed Mar 30 17:12:02 2022 +0100

    Added a basic readme file

commit 499b6d18b36a25d3f5ab9be1b708ea48fef1dd65 (origin/main, origin/HEAD)
Author: Sam Mangham <mangham@gmail.com>
Date:   Wed Mar 16 14:19:13 2022 +0000

    Initial commit
We can see commits identified by long IDs, but also HEAD at the top of the log. HEAD is the name used to refer to the most recent end of the chain of commits to our local repository.
What if somehow we’ve introduced a bug, and we want to see what’s changed between our latest version of the code and the copy that was working last commit, or a few commits ago? Which lines did we edit, and what did we add?
We can use git diff again to look for differences between files, but refer to the versions of the files as saved in older commits using the notation HEAD~1, HEAD~2, and so on to refer to the commits.
We can refer to previous commits using the ~ notation,
so HEAD~1 (pronounced “head minus one”)
means “the previous commit”,
while HEAD~123 goes back 123 commits from the latest one.
$ git diff HEAD~1 climate_analysis.py
diff --git a/climate_analysis.py b/climate_analysis.py
index d5b442d..c463f71 100644
--- a/climate_analysis.py
+++ b/climate_analysis.py
@@ -26,3 +26,5 @@ for line in climate_data:
             kelvin = temp_conversion.fahr_to_kelvin(fahr)

             print(str(celsius)+", "+str(kelvin))
+
+# TODO(smangham): Add call to process rainfall
So we see the difference between the file as it is now, and as it was the commit before before the latest one.
$ git diff HEAD~2 climate_analysis.py
diff --git a/climate_analysis.py b/climate_analysis.py
index 277d6c7..c463f71 100644
--- a/climate_analysis.py
+++ b/climate_analysis.py
@@ -1,3 +1,4 @@
+""" Climate Analysis Tools """
 import sys
 import temp_conversion
 import signal
@@ -25,3 +26,5 @@ for line in climate_data:
             kelvin = temp_conversion.fahr_to_kelvin(fahr)

             print(str(celsius)+", "+str(kelvin))
+
+# TODO(smangham): Add call to process rainfall
And here we see the state before the last two commits, HEAD minus 2.
Absolute History
What about if we want to compare our version of the code to the version from last month, or from the version we used to make a paper last year?
Calculating the number of commits is wildly impractical.
Instead, we can refer to specific revisions using those long strings of digits and letters that git log displays.
These are unique IDs for the changes, and “unique” really does mean unique: every change to any set of files on any machine has a unique 40-character identifier. (A SHA-1 hash of the new, post-commit state of the repository).
If we scroll down to the bottom of the git log output, we can see the ID for our first commit - in the example above, it’s 499b6d18b36a25d3f5ab9be1b708ea48fef1dd65 (but yours will be different!). Try this, substituting your first commit’s ID:
$ git diff 499b6d18b36a25d3f5ab9be1b708ea48fef1dd65 climate_analysis.py
diff --git a/climate_analysis.py b/climate_analysis.py
index 277d6c7..6f8ed8a 100644
--- a/climate_analysis.py
+++ b/climate_analysis.py
@@ -1,3 +1,4 @@
+""" Climate Analysis Tools """
 import sys
 import temp_conversion
 import signal
@@ -25,3 +26,5 @@ for line in climate_data:
             kelvin = temp_conversion.fahr_to_kelvin(fahr)

             print(str(celsius)+", "+str(kelvin))
+
+# TODO(smangham): Add call to process rainfall
We can now see all the changes since a specific commit! However, typing random 40-character strings is annoying and incredibly easy to typo, so Git lets us use just the first seven:
$ git diff 499b6d1 climate_analysis.py
diff --git a/climate_analysis.py b/climate_analysis.py
index 277d6c7..6f8ed8a 100644
--- a/climate_analysis.py
+++ b/climate_analysis.py
@@ -1,3 +1,4 @@
+""" Climate Analysis Tools """
 import sys
 import temp_conversion
 import signal
@@ -25,3 +26,5 @@ for line in climate_data:
             kelvin = temp_conversion.fahr_to_kelvin(fahr)

             print(str(celsius)+", "+str(kelvin))
+
+# TODO(smangham): Add call to process rainfall
This is particularly handy as you can exactly identify specific versions of the code, for example the one you used to write your first paper, and the different, newer version you used to write your second paper.
Other Ways To Reference Commits
Newer versions of Git have some more advanced ways of referencing past commits. In place of
HEAD~1you can useHEAD~orHEAD@{1}, or you can even use text to ask more advanced questions, likegit diff HEAD@{"yesterday"}orgit diff HEAD@{"3 months ago"}!
Restoring Files
All right: we can save changes to files and see what we’ve changed — suppose we need to restore older versions of things?
Let’s suppose we accidentally overwrite or delete our file:
$ rm climate_analysis.py
$ ls
README.md
temp_conversion.py
Whoops!
git status now tells us that the file has been changed,
but those changes haven’t been staged:
$ git status
# On branch main
# Your branch is ahead of 'origin/main' by 3 commits.
#   (use "git push" to publish your local commits)
#
# Changes not staged for commit:
#   (use "git add/rm <file>..." to update what will be committed)
#   (use "git checkout -- <file>..." to discard changes in working directory)
#
#	deleted:    climate_analysis.py
#
no changes added to commit (use "git add" and/or "git commit -a")
Following the helpful hint in that output, we can put things back the way they were
by using git checkout --:
$ git checkout -- climate_analysis.py
$ cat climate_analysis.py
[SNIPPED - but changes rolled back]
By default, checkout -- replaces the file with the version of it in the staging area. If you haven’t used git add, that should be the same as the version in the last commit. But what if we already used git add on our incorrect version of a file, or we broke the file more than one commit ago?
We can use git checkout, e.g.:
$ git checkout <HEAD or commit ID> climate_analysis.py
Modern Git
Newer systems have the function
git restore, which is a shortcut forgit checkout --.checkouthas a lot of functions, and newer versions of Git simplify things by giving them new names.
Double Whoops
What if you accidentally did
git rm climate_analysis.py? That command tells Git to delete the file and remove it from the repository - so it will record that the file has been deleted, then stop tracking further changes. Even if you re-make the file, it won’t be tracked until you usegit addon it again.The file still exists in the history, though so if you want to undo this you can do
git checkout HEAD climate_analysis.py, to get the file back and start tracking it again. Since you can retrieve any file that existed in a previous commit, even if you removed it from future ones, this makes it important to not commit files containing passwords or sensitive information!

The fact that files can be reverted one by one tends to change the way people organize their work.
Consider a situation where all your code is in one file, and you fixed a bug in one section but accidentally introduced one elsewhere.
You can’t just roll back to fix one bug without un-fixing the other. However, if each section is in its own file, you can just roll back the section you broke!
Key Points
git diffdisplays differences between commits.
git checkoutrecovers old versions of files.
Remote Repositories
Overview
Teaching: 10 min
Exercises: 0 minQuestions
How do I work with a remote repository?
Objectives
Add an SSH key to a GitHub account
Understand
git pushandgit pull
We’ve learned how to use a local repository to store our code and view changes:
Now, however, we’d like to share the changes we’ve made to our code with others, as well as making sure we have an off-site backup in case things go wrong. We need to upload our changes in our local repository to a remote repository.
Why Have an Off-site Backup?
You might wonder why having an off-site backup (i.e. a copy not stored at your University) is so important. In 2005, a fire destroyed a building at the University of Southampton. Some people’s entire PhD projects were wiped out in the blaze. To ensure your PhD only involves a normal level of suffering, please make sure you have off-site backups of as much of your work as possible!
To do that, we’ll use the remote repository we set up on GitHub at the start of the workshop. It’s another repository, just like the local repository on the DIRAC server, that Git makes it easy to send and receive data from. Multiple local repositories can connect to the same remote repository, allowing you to collaborate with colleagues easily.

So we’re finally going to address all those “Your branch is ahead of ‘origin/main’ by 3 commits” messages we got from git status! However, GitHub doesn’t let just anyone push to your repository - you need to prove you’re the owner (or have been given access). Fortunately, we already set up an SSH key earlier.
Now we can synchronise our code to the remote repository, with git push:
$ git push
warning: push.default is unset; its implicit value is changing in
Git 2.0 from 'matching' to 'simple'. To squelch this message
and maintain the current behavior after the default changes, use:

  git config --global push.default matching

To squelch this message and adopt the new behavior now, use:

  git config --global push.default simple

See 'git help config' and search for 'push.default' for further information.
(the 'simple' mode was introduced in Git 1.7.11. Use the similar mode
'current' instead of 'simple' if you sometimes use older versions of Git)

Counting objects: 11, done.
Delta compression using up to 32 threads.
Compressing objects: 100% (9/9), done.
Writing objects: 100% (9/9), 1.11 KiB | 0 bytes/s, done.
Total 9 (delta 2), reused 0 (delta 0)
remote: Resolving deltas: 100% (2/2), completed with 1 local object.
To git@github.com:smangham/climate-analysis
   70bf8f3..501e88f  main -> main
And we’re done! This bit was easy as when we used git clone earlier, it set up our local repository to track the remote repository. The main -> main line shows we’re sending our local branch called main to the remote repository as a branch called main.
You’ll notice that, as this is an old version of Git, we’ve been given a warning - by default, old Git pushes all branches when you do git push, whilst newer versions only push your current branch. Whilst we don’t use branches in this material, let’s adopt the modern standard anyway just to remove the notification:
$ git config --global push.default simple
What is a Branch, Though?
We’re not covering them in this material, but they’re very useful. Branches allow you to have alternate versions of the code ‘branching off’ from another branch (e.g.
main). You can try out new features in these branches without disrupting yourmainversion of the code, then merge them in once you’ve finished. We have a Stretch Episode with a brief description of them.
If we go back to the repository on GitHub, we can refresh the page and see our updates to the code:
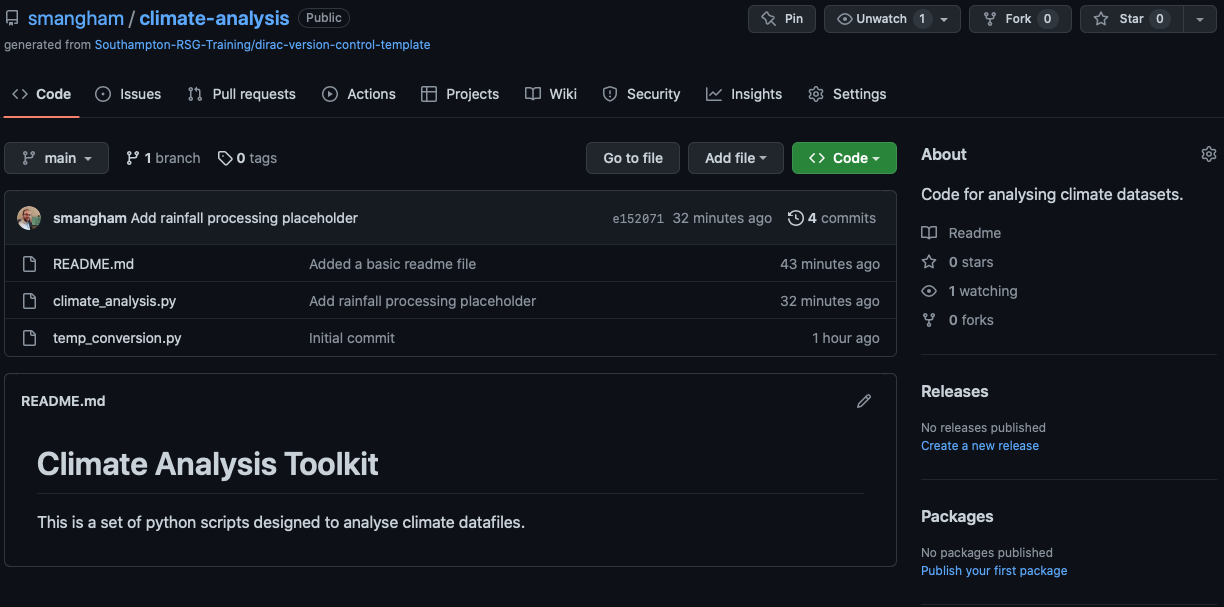
Conveniently, the contents of README.md are shown on the main page, with formatting. You can also add links, tables and more. Your code should always have a descriptive README.md file, so anyone visiting the repo can easily get started with it.
How often should I push?
Every day. You can never predict when your hard disk will fail or your building will be destroyed!
Credit: Mitch Altman, CC BY-SA 2.0
Collaborating on a Remote Repository
Now we know how to push our work from our local repository to a remote one, we need to know the reverse - how to pull updates to the code that someone else has made.
We want to invite other people to collaborate on our code, so we’ll update the README.md with a request for potential collaborators to email us at our University email address.
nano README.md
cat README.md
# Climate Analysis Toolkit

This is a set of python scripts designed to analyse climate datafiles.

If you're interested in collaborating, email me at s.w.mangham@soton.ac.uk.
git commit -am "Added collaboration info"
[main 39a2c8f] Added collaboration info
 1 file changed, 2 insertions(+)
In this case, we use git commit -am where the -a means commit all modified files we’ve previously used git add on, and the -m bit means ‘and here’s the commit message’ as usual. It’s a handy shortcut.
But don’t push to GitHub just yet! We’re going to set up a small conflict, of the kind you might see when working with a remote repository.
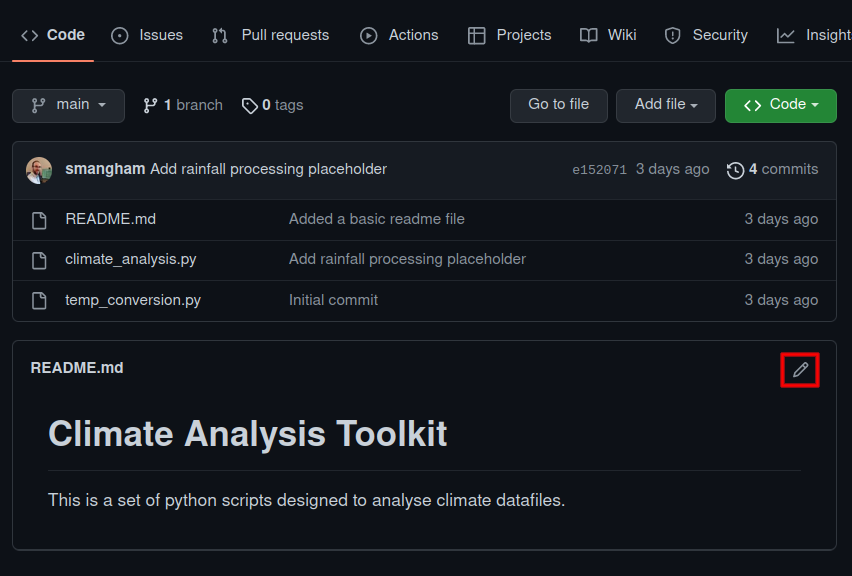
Now, pretending to be an existing collaborator, we’ll go and add those installation instructions by editing our README.md file directly on GitHub. This isn’t common, but if you want to quickly make some small changes to a single file it can be useful. We edit it as:
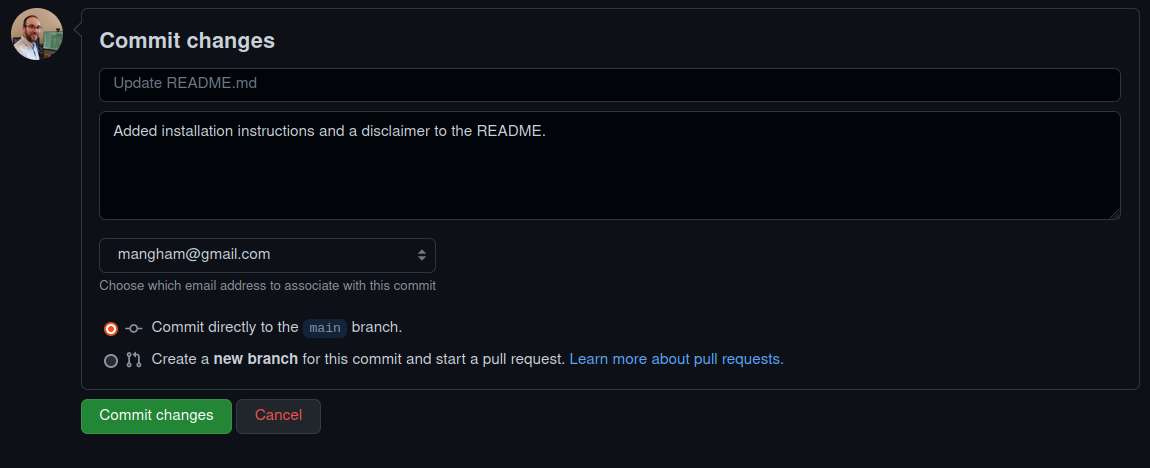
And just expand it a little, making more use of GitHub’s markdown formatting:

Then commit the changes directly to our main branch with a descriptive commit message:
Push Conflicts
Great. Now let’s go back to the terminal and try pushing our local changes to the remote repository. This is going to cause problems, however:
git push
To git@github.com:smangham/climate-analysis
 ! [rejected]        main -> main (fetch first)
error: failed to push some refs to 'git@github.com:smangham/climate-analysis'
hint: Updates were rejected because the remote contains work that you do
hint: not have locally. This is usually caused by another repository pushing
hint: to the same ref. You may want to first merge the remote changes (e.g.,
hint: 'git pull') before pushing again.
hint: See the 'Note about fast-forwards' in 'git push --help' for details.
Git helpfully tells us that actually, there are commits present in the remote repository that we don’t have in our local repository.
Merge Conflicts
We’ll need to pull those commits into our local repository before we can push our own updates back!
git pull
remote: Enumerating objects: 5, done.
remote: Counting objects: 100% (5/5), done.
remote: Compressing objects: 100% (3/3), done.
remote: Total 3 (delta 0), reused 0 (delta 0), pack-reused 0
Unpacking objects: 100% (3/3), done.
From github.com:smangham/climate-analysis
   501e88f..023f8f6  main       -> origin/main
Auto-merging README.md
CONFLICT (content): Merge conflict in README.md
Automatic merge failed; fix conflicts and then commit the result.
We have created a conflict! Both us, and our remote collaborator, both edited README.md. Let’s take a look at the file:
cat README.md
# Climate Analysis Toolkit

This is a set of python scripts designed to analyse climate datafiles.

<<<<<<< HEAD
If you're interested in collaborating, email me at s.w.mangham@soton.ac.uk.
=======
To install a copy of the toolkit, open a terminal and run:

    git clone git@github.com:smangham/climate-analysis.git


**This code is currently in development and not all features will work**
>>>>>>> 493dd81b5d5b34211ccff4b5d0daf8efb3147755
Git has tried to auto-merge the files, but unfortunately failed. It can handle most conflicts by itself, but if two commits edit the exact same part of a file it will need you to help it.
We can see the two different edits we made to the end of the README.md file, in a block defined by <<<, === and >>>. The top block is labelled HEAD (the changes in our latest local commit), whilst the bottom block is labelled with the commit ID of the commit we made on GitHub.
We can easily fix this using nano, by deleting all the markers and keeping the text we want:
nano README.md
cat README.md
# Climate Analysis Toolkit

This is a set of python scripts designed to analyse climate datafiles.

If you're interested in collaborating, email me at s.w.mangham@soton.ac.uk.

To install a copy of the toolkit, open a terminal and run:

   git clone git@github.com:smangham/climate-analysis.git


**This code is currently in development and not all features will work**
Now we’ve got a fixed and finished README.md file, we can commit our changes, and push them up to our remote repository:
git commit -am "Fixed merge conflict"
[main 6f4df16] Fixed merge conflict
git push
Counting objects: 10, done.
Delta compression using up to 32 threads.
Compressing objects: 100% (6/6), done.
Writing objects: 100% (6/6), 774 bytes | 0 bytes/s, done.
Total 6 (delta 2), reused 0 (delta 0)
remote: Resolving deltas: 100% (2/2), completed with 1 local object.
To git@github.com:smangham/climate-analysis
   023f8f6..09f5151  main -> main
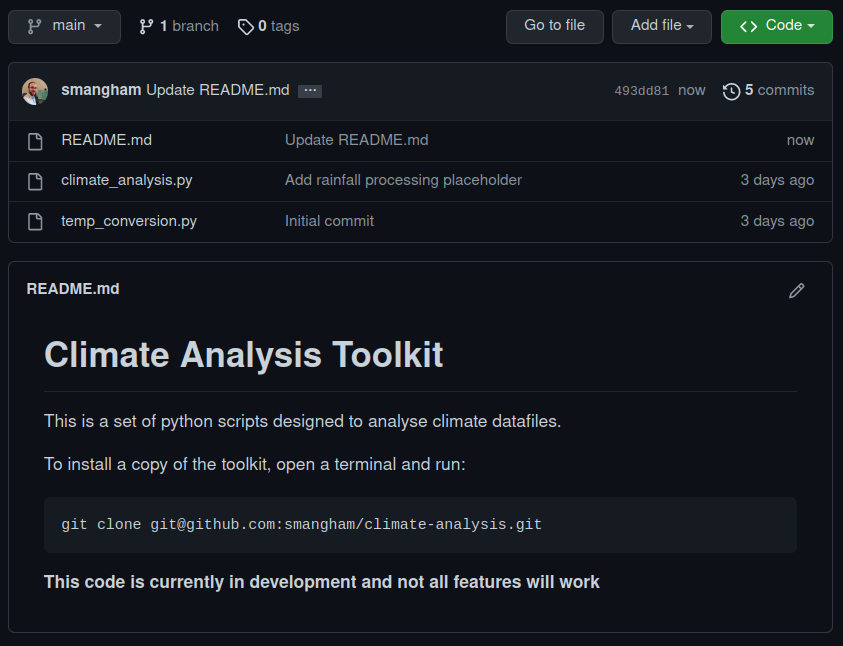
Now back on GitHub we can see that our README.md shows the text from both commits, and our conflict is resolved:
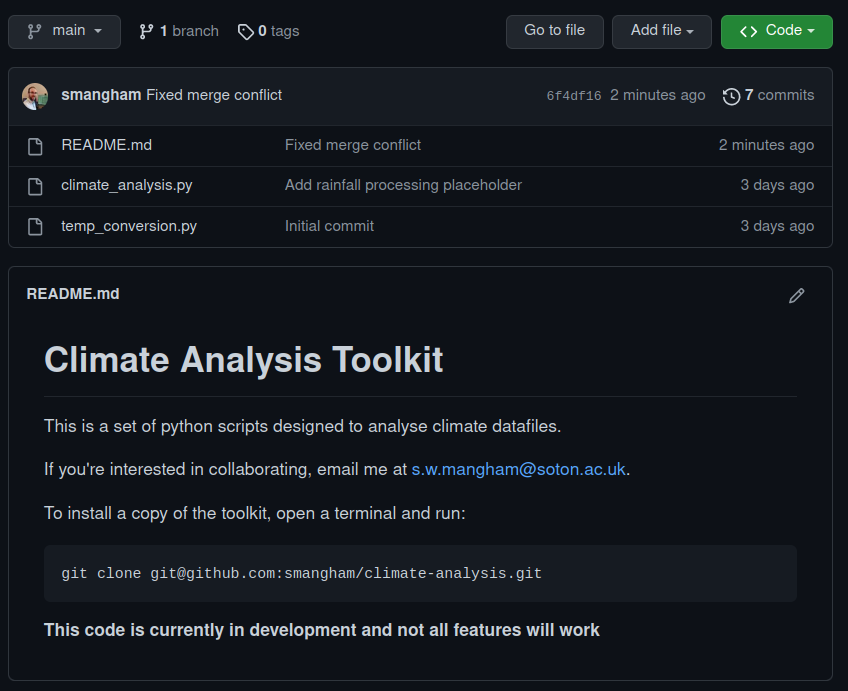
Now we can successfully collaboratively develop our research code with others.
Conflict Mitigation
If you’ve got multiple different people working on a code at once, then the branches we mentioned earlier can really help reduce conflicts. Each collaborator can work on their own branch, and only merge them back in once everything is finished - dramatically reducing the number of conflicts!
Key Points
Git can easily synchronise your local repository with a remote one
GitHub needs an SSH key to allow access
Branching
Overview
Teaching: 10 min
Exercises: 0 minQuestions
What are branches?
Objectives
Understand what a branch is
Understand when you would use a branch
Optional Episode
If you don’t want to do this section, just head straight to the survey!
We’ve seen branches mentioned a lot so far - mostly main. So what are they?
A branch is a parallel version of a repository. It can branch off from a commit, contain its own set of extra commits and edits to files, then easily merge back into the branch it came off (or even another!).

Why Use Branches?
If you’re a user of a code, and don’t plan to do any development, you might never have to interact with branches. You’ll download the main branch, containing the most recent, stable version of the code, and just use that. Likewise, if you create a new repository for a small code with only a single developer that you don’t expect to share, you can just do all your work on the main branch like we’ve been doing.
However, if you plan on making changes to an existing code, collaborating with others, or sharing your code, then you’ll definitely want to use branches - as they make your life a lot easier.
Sharing Your Code: main and dev branches
As mentioned, if you’re using an existing code written by somebody else, you’ll typically just download the main branch and use that. What if, though, the author(s) of the code want to continue working on it without the potential users downloading half-finished or untested code? They could keep all their changes local and only commit and push once a new feature has been completed and rigorously tested, but that’s not particularly sustainable for large features. It could potentially take months to add a new feature (a long time to go without a backup!), and you might want to share the work-in-progress version with others to test.
The traditional way to do this is to create a development branch (dev or develop) coming off the main branch (main or master). The main branch contains tested, finished code that can be shared with others, whilst the development branch contains work-in-progress code. Typically you merge your development branch into your master branch when your work on it has been tested and is ready to share - for example, when you release a paper using it. Then you can continue working on your development branch and sharing your development code with other other members of your group.
Making Changes to an Existing Code: feature branches
Once you have a working code, particularly one that’s being shared, you’ll inevitably want to add new features. You could add them directly to your development branch - however, what happens if, mid-way through, you need to pause the feature and switch to something else as you wait for simulations to finish, new data to arrive, or similar? Instead of ending up with a mess of multiple half-finished modifications, which are impossible to evaluate independently of the other, you can instead create a new feature branch coming off of your development branch for each new feature. You work on each new feature or bugfix in their own feature branch, and merge them back into your development branch once they’re tested and complete. Then, as before, once you’re ready to publish a paper using your new functionality you merge it all back into the main branch.
Collaborating With Others: feature branches
Feature branches also make collaborating with others far easier! Instead of stepping on each other’s toes by making conflicting edits to the same files, you can simply each work on your own branch. GitHub offers features to help manage collaborations too, by limiting who can merge their work into a branch without approval, allowing you to set up workflows where newer team members run their changes past those with experience.
Merging
We’ve mentioned merges repeatedly; as Git tracks the changes made to each file in each commit, it can easily determine whether or not the changes made in two branches conflict with each other. It can intelligently merge together two modified versions of a file where their changes don’t overlap, and highlight sections where they do for you to resolve, showing both versions of the code.
The Basics
You can check your current branch with:
git branch
main
then create a new branch with:
git branch dev
and switch to it with:
git checkout dev
Switched to branch 'dev'
Any commits you make on this branch will exist only on this branch - when you use git checkout main to switch back to your main branch, they won’t show up in your git log results! To merge the commits from another branch into your current one, you can use git pull <other branch>. There’s a lot more to branching, and we have worked examples of how to use them in our other material.
Key Points
Branches are parallel versions of a repository
You can easily switch between branches, and merge their changes
Branches help with code sharing and collaboration
Survey
Overview
Teaching: min
Exercises: minQuestions
Objectives
Key Points