Summary and Schedule
This new training course has been designed around the findings of a recent study into the skills most in demand, and most often missing, when software engineers enter industry.
Over the course of five intensive days, you’ll take part in sessions including:
- Agile software development
- Version control and testing
- Project management and communication
Alongside the taught sessions, you’ll work in a team on a simulated client project, giving you the chance to apply what you learn in a real-world context and present your work at the end of the week.
This is a new lesson built with The Carpentries Workbench.
| Setup Instructions | Download files required for the lesson | |
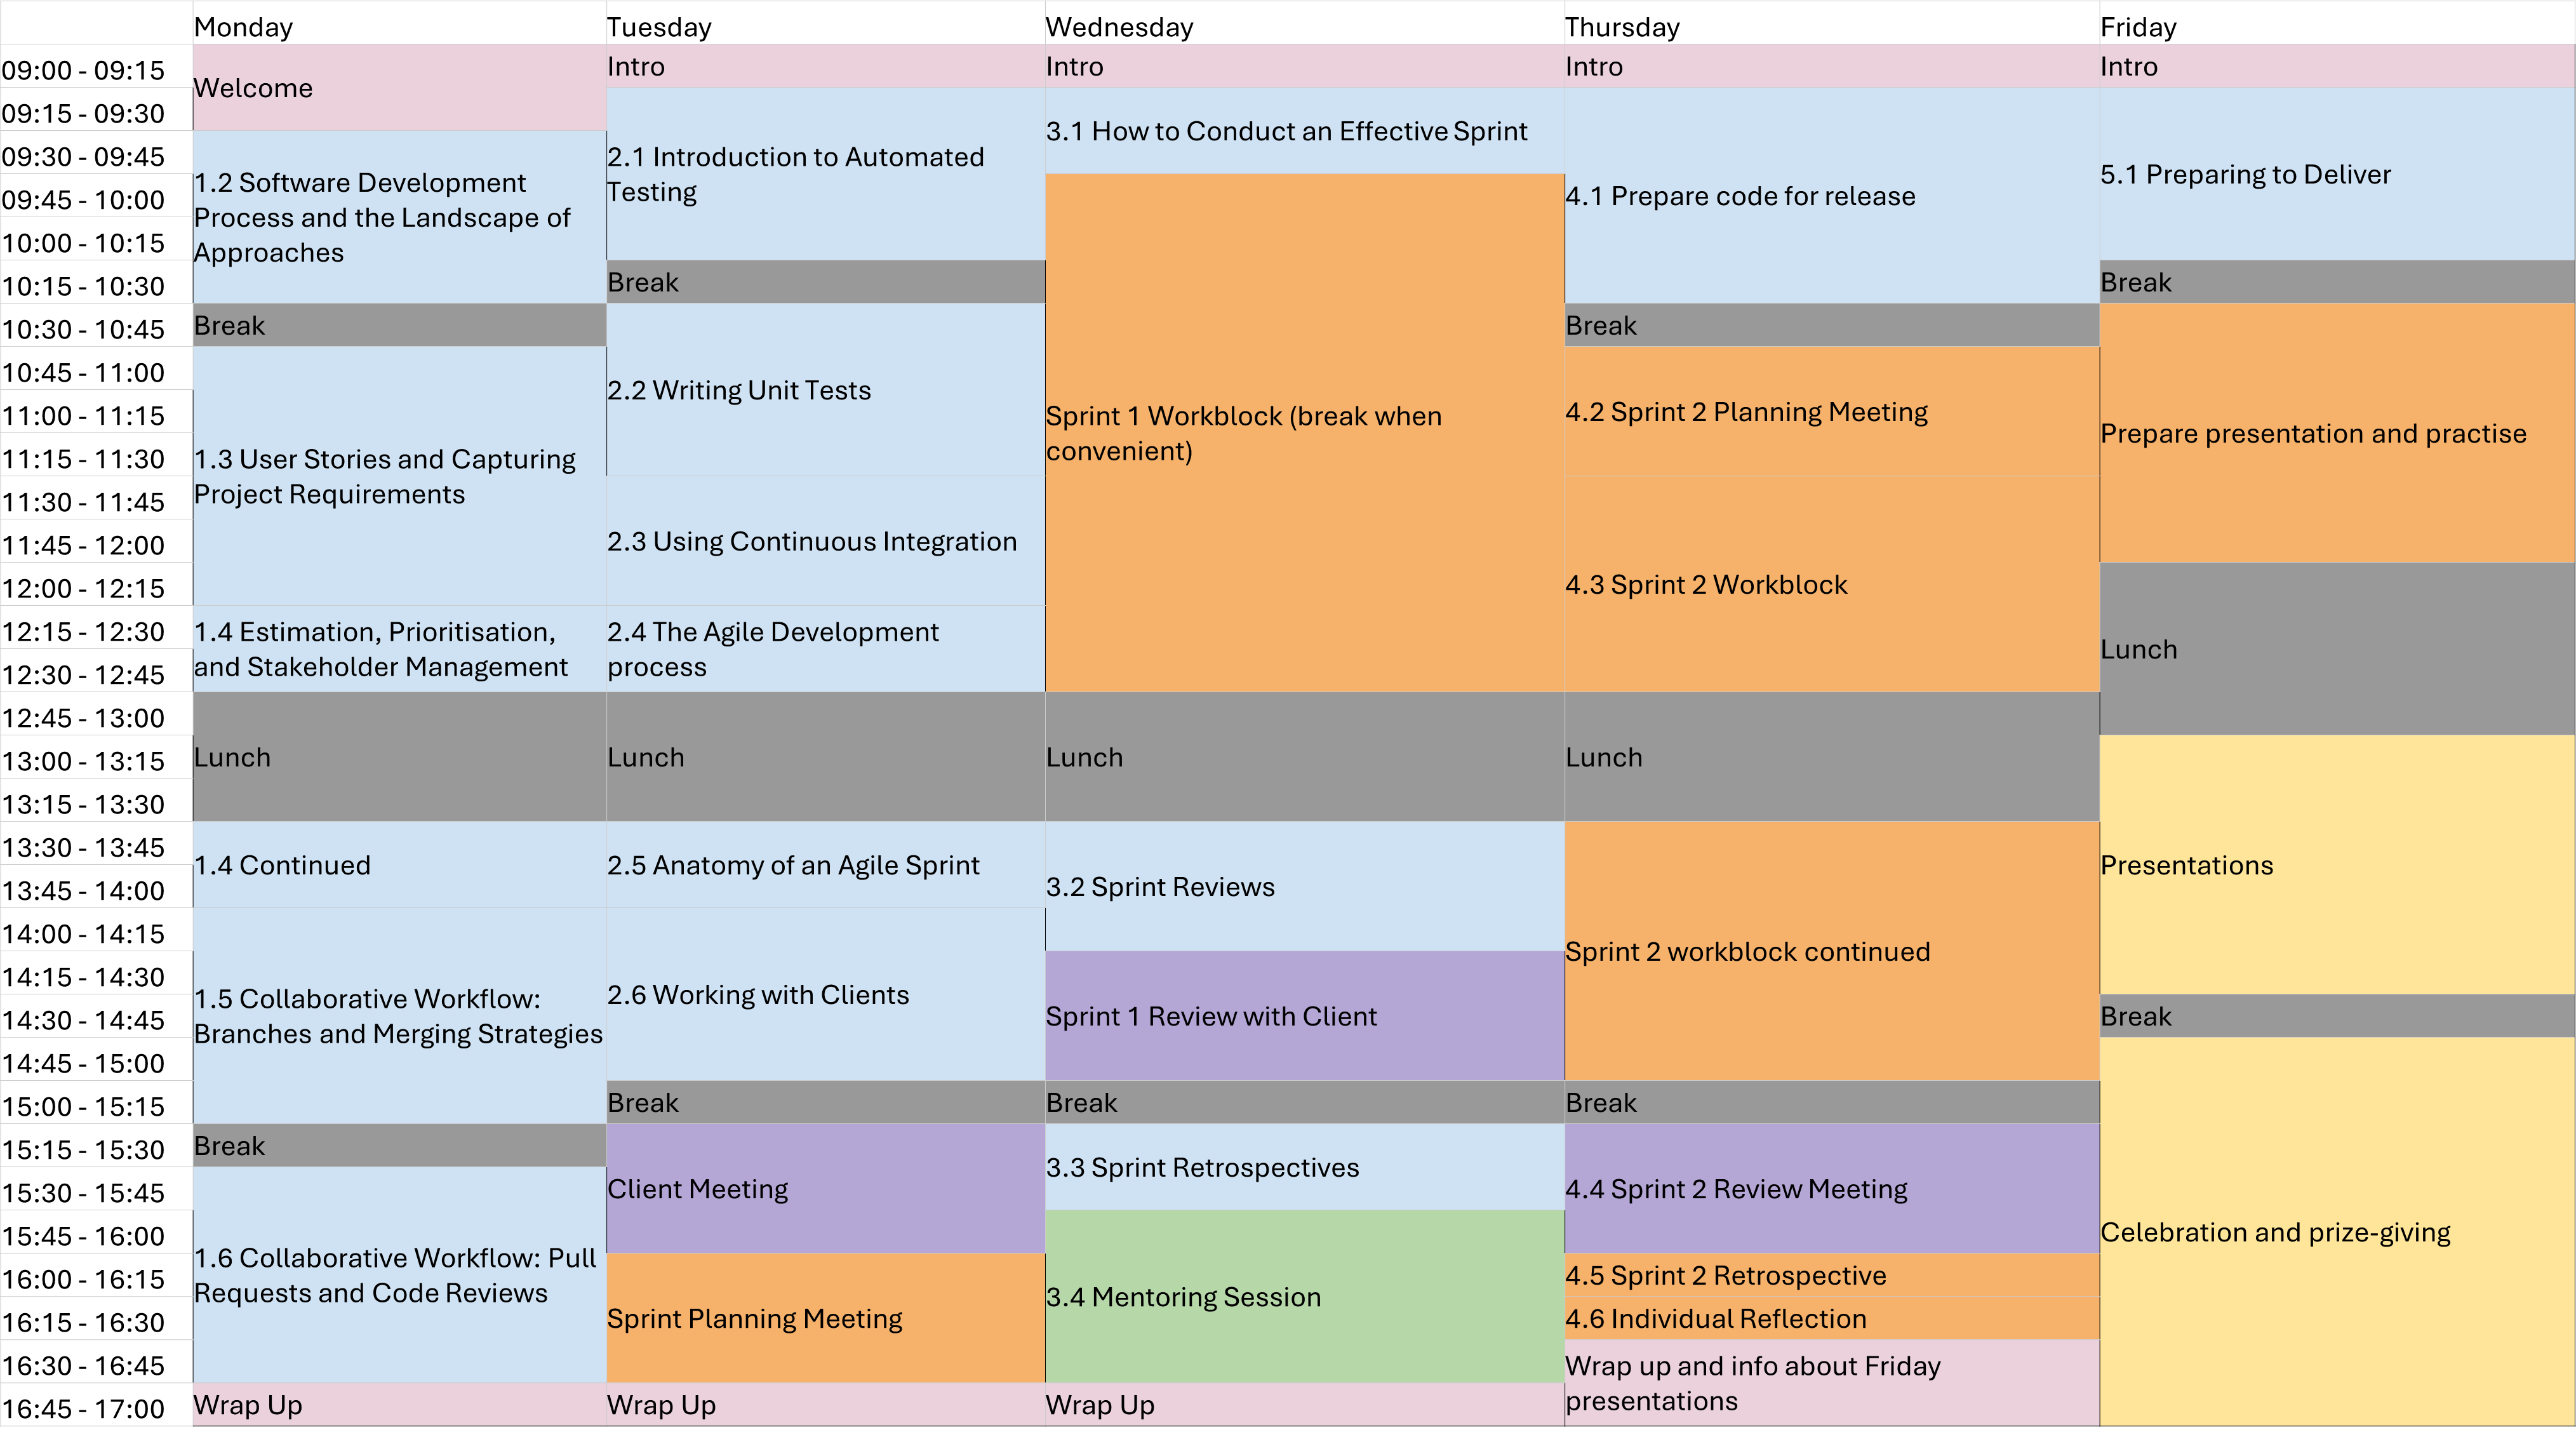
| Duration: 00h 00m | 1. Day 1: Landscape of approaches and undertaking an example project | FIXME |
| Duration: 00h 00m | 2. 1.1 Welcome to the Course |
What is this course all about? What topics will be covered throughout this course? How will each day run? How can I provide feedback? |
| Duration: 00h 00m | 3. 1.2 Software Development Process and the Landscape of Approaches |
What are the main stages in a typical software development
process? What are waterfall, iterative, and V-Model approaches to software development? What is Agile and how does it compare to project management? How do software development models compare and relate to project management frameworks? ::: |
| Duration: 00h 00m | 4. 1.3 User Stories and Capturing Project Requirements |
What types of requirements should be captured for a project? What is a non-functional requirement? How do I describe and ensure how desired features will provide value to the end user? How should I capture and manage requirements for change? |
| Duration: 00h 00m | 5. 1.4 Estimation, Prioritisation, and Stakeholder Management |
How should I estimate how long fulfilling a requirement will
take? How should I prioritise requirements? What methods help to clarify requirements with stakeholders? |
| Duration: 00h 00m | 6. 1.5 Collaborative Workflow: Branches and Merging Strategies |
What’s the relationship between development infrastructure and
process? What is a feature branch, and why are they used? Describe the benefits and risks of using feature branches What are the options for merging branch commits into a baseline branch? What are the risks with merging code from feature branches? |
| Duration: 00h 10m | 7. 1.6 Collaborative Workflow: Pull Requests and Code Reviews |
How can infrastructure support collaborative development of code across
a team? What is a pull request and why are they useful? How do I submit a pull request on GitHub? How are code reviews useful? What are the different types of code review? How do I review a pull request on GitHub? What’s the process for merging a pull request? |
| Duration: 00h 25m | 8. Day 2: Technical Skills and Best Practices within an Agile Way of Working | FIXME |
| Duration: 00h 25m | 9. 2.1 Introduction to Automated Testing |
Why should I test my code? What is the role of automated testing? What are the different types of automated tests? What is the structure of a unit test? What is test “mocking”? How can I run unit tests? |
| Duration: 00h 25m | 10. 2.2 Writing Unit Tests |
How do I write a unit test? When should I use a regression test? When should I write and re-run unit tests throughout development? What makes a good test? |
| Duration: 00h 25m | 11. 2.3 Using Continuous Integration |
What is automation in the context of software development, and why is it
beneficial? How does Continuous Integration (CI) enhance the software development process? What tasks can be automated using CI? How do I define a CI workflow to automate running a set of unit tests when a change is made to a code repository? How do I monitor the progress of a running or completed workflow? |
| Duration: 00h 25m | 12. 2.4 The Agile Development Process |
What are the two key principles of Scrum Theory? What are the five Scrum Values? How do the Scrum Pillars relate to each other? What are the responsibilities of each of the Scrum Team roles? What are the commitments for each of the three Scrum Artifacts? ::: |
| Duration: 00h 25m | 13. 2.5 Anatomy of an Agile Sprint |
What three questions would you ask during a Sprint Planning
Meeting? What should be the outcome of a Sprint Planning Meeting? What are the three main points that a developer would cover during the Daily Scrum Meeting? |
| Duration: 00h 25m | 14. 2.6 Working with Clients |
How can I communicate technical ideas clearly to non-technical
clients? What should I do when the client’s needs or requests are vague or unclear? How do I help the client decide what features to prioritise? How do I manage client expectations around time, budget, and quality? What makes a good client kickoff meeting, and how should I lead it? What should be included in an agenda for a kickoff meeting? |
| Duration: 00h 25m | 15. Day 3: Undertaking our First Sprint | FIXME |
| Duration: 00h 25m | 16. 3.1 How to Conduct an Effective Sprint |
What is the purpose of a Daily Scrum Meeting? How can teams work effectively during a Sprint? |
| Duration: 03h 55m | 17. 3.2 Sprint Review |
How do you conduct a Sprint Review? What are some strategies for communicating effectively with clients during a Sprint Review? How can you effectively manage change in a software project? How can you convert feedback from clients into product backlog items? |
| Duration: 05h 40m | 18. 3.3 Sprint Retrospective |
What is the primary purpose of a Sprint Retrospective? Who participates in a Sprint Retrospective? How can reflecting on estimates of effort improve future sprint planning? Why is it important to identify assumptions that affected the Sprint |
| Duration: 06h 10m | 19. 3.4 Mentoring Session |
Why is mentoring useful? Who leads a mentorship? How is mentorship typically structured? What are the responsibilities of the mentor and mentee during a mentorship? How can we improve how we function as a team? |
| Duration: 07h 10m | 20. Day 4: Our Second Sprint: Preparing to Deliver | FIXME |
| Duration: 07h 10m | 21. 4.1 Preparing Code for Release |
What preparation should be considered prior to releasing
software? How should I document my code? What tools help teams write and generate documentation? Why is licensing software important? How do I apply a software licence to code? What is the typical process to create a release on GitHub? |
| Duration: 08h 25m | 22. 4.2 Sprint 2 Planning Meeting |
What methods exist to help a team reach a consensus on
estimates? What is planning (or Scrum) poker? |
| Duration: 08h 25m | 23. 4.3 Sprint 2 Work Block | How do we run Daily Scrum meetings again? |
| Duration: 08h 25m | 24. 4.4 Sprint 2 Review Meeting |
How to choose a product name? How do we run Sprint Review meetings again? |
| Duration: 08h 25m | 25. 4.5 Sprint 2 Retrospective | How do we run Sprint Retrospectives again? |
| Duration: 08h 25m | 26. 4.6 Personal Reflection |
How can personal reflection support my growth as a software
engineer? ::: ::: objectives Understand why personal reflection is a valuable professional habit Reflect honestly on your own experience across the week Identify specific skills or areas you want to develop further Set intentions for taking your learning into your career ::: |
| Duration: 08h 40m | 27. Day 5: Deliver to Clients | FIXME |
| Duration: 08h 40m | 28. 5.1 Prepare to Deliver |
What should you do (and not do) when presenting to others? How should you communicate with a non-technical audience? What should be included in the project presentation? What are the scoring criteria for the presentation? |
| Duration: 09h 40m | 29. 5.2 Delivery Meeting | FIXME |
| Duration: 09h 40m | 30. 5.3 Reflection | FIXME |
| Duration: 09h 40m | Finish |
The actual schedule may vary slightly depending on the topics and exercises chosen by the instructor.
Data Sets
We will use the ‘Coffee Ratings Dataset’ throughout this training course.
You can download this dataset in csv format from here: full_dataset_coffee_ratings.csv
This dataset was obtained from the TidyTuesday GitHub. TidyTuesday is a weekly social data project and is organised by the Data Science Learning Community.
The data comes from the Coffee Quality Database courtesy of Data Scientist James LeDoux. These data were collected from the Coffee Quality Institute’s review pages in January 2018.
There is data for both Arabica and Robusta beans, across many countries and professionally rated on a 0-100 scale. There are ratings for lots of different variables such as acidity, sweetness, fragrance, balance, etc.
Software Setup
To participate in this course you will need the following installed on your machine:
- Bash shell (Linux, Mac) or Git Bash for Windows
- Git version control (available from the Bash shell or Git Bash for Windows)
- Python version 3.8 or above (accessible from your terminal)
- Microsoft Visual Studio Code version 1.98 or above (or another IDE if you’re already comfortable working with it)
If you do not have these installed, see below for installation instructions. Please open the tab for your operating system and follow the setup instructions. Then, look below the tab and follow the ‘Visual Studio Code’ and ‘Additional Git Setup’ instructions too.
Open a Terminal
We’ll be using Git Bash. If you’ve already installed Git Bash then go to the next section. Otherwise, go to git for windows and click Download, then install it. Most of the options can be left on default, but be sure you check these:
- Choosing the default editor used by Git: Make sure Nano is selected from the drop-down. If you’re comfortable with other editors, feel free to change it, but we recommend Nano - we use it as it’s present on Windows, Mac and Linux. If you change it, you might not quite match what we’re doing on-screen.
- Adjusting your PATH environment: Make sure Git from the command line and also from 3rd-party software is selected.
- Choosing HTTPS transport backend: Make sure Use the native Windows Secure Channel Library is selected.
- Configuring the terminal emulator to use with Git Bash: Make sure Use Windows’ default console window is selected.
Python
The “Anaconda3” package provides everything Python-related you will need for the workshop. To install Anaconda, follow the instructions below.
Download the latest Anaconda Windows installer from Anaconda, you may need click ‘Get Started’ and register first.
Double-click the installer and follow the instructions. When asked “Add Anaconda to my PATH environment variable”, answer “yes”. It will warn you not to, but it’s required for it to be found by git bash. After it’s finished, close and reopen any open terminals to reload the updated PATH and allow the installed Python to be found.
Once the Anaconda installation is finished you will be asked if you want the installer to initialize Anaconda3 by running conda init? You should select yes. Alternatively/additionally you will need to run the following command in Git Bash
Then close and reopen GitBash.
Please test the python install open GitBash (or your favorite terminal) and run the following command to verify that the installation was successful.
You can then type the following to exit:
Git Bash might hang on this command and not launch the Python interpreter. In this case close and reopen git bash and issue the following commands:
Note: for older versions of git bash you will need to use .bashrc rather than .bash_profile
Open a Terminal
You can open a terminal by opening the “Terminal” application, which can be found in the “Utilities” folder which is in your “Applications” folder.
Git Setup
To use Git you must install the Apple Command Line Tools, this may take a few minutes.
You can obtain these from Apple (requires your Apple ID)
- Select Command Line Tools for Xcode 12 (or higher) and click the link to download the dmg archive.
- If prompted, choose to allow downloads from developer.apple.com
- Open the downloaded dmg archive from the Downloads folder
- Double-click the Command Line Tools.pkg icon to install
Alternatively, you can install the tools from the command line:
Python
- Mac OS Intel: Download the latest Anaconda Mac OS X installer from Anaconda. Double-click the .pkg file and follow the instructions.
- Mac OS M1: If you have a M1 Mac you need a specific version of Anaconda follow this link: M1 Compatible Anaconda. Once the Anaconda installation is finished you will be asked if you want the installer to initialize Anaconda3 by running conda init? You should select yes.
Open a Terminal
This will depend on the Linux distribution you are running, but you should be able to find a “Terminal” application in your desktop’s application menu.
Git Setup
Git comes pre-installed on most Linux distributions. You can test if
it’s installed by running git --version. If it’s not
installed, you can install it by running
sudo apt-get install git or
sudo yum install git, depending on your distribution.
Python
Download the latest Anaconda Linux Installer from Anaconda.
Install via the terminal like this (you will need to change the version number to the latest version):
First move to the folder where you downloaded the installer, this is likely to be the Downloads folder e.g.
Answer ‘yes’ to allow the installer to initialize Anaconda3 in your .bashrc.
Visual Studio Code
Note: If you’re comfortable working in a different IDE, you’re welcome to use this instead.
We will use Microsoft Visual Studio Code (VS Code) as an Integrated Development Environment (IDE) to type and execute Python code and run command line terminal and Git commands (through its integrations with the tools we have installed separately so far).
Make sure to download VS Code for your platform.
Additional Git Setup
Setting up Git
The first time we use Git on a new machine, we need to configure it. We’re going to set some global options, so when Git starts tracking changes to files it records who made them and how to contact them.
(Please use your own name and the email address you used to sign up to GitHub!)
BASH
git config --global user.name "Firstname Surname"
git config --global user.email "fsurname@university.ac.uk"
We’re going to set Nano, a simple, minimal command-line text editor to be the default for when you need to edit messages. If you’re already comfortable with another command-line editor, feel free to select that!
The three commands above only need to be run once: the flag –global tells Git to use the settings for every project on this machine.
You can check your settings at any time:
GitHub
We’ll be using the website GitHub to host, back up, and distribute our code. You’ll need to create an account there. As your GitHub username will appear in the URLs of your projects there, it’s best to use a short, clear version of your name if you can.
SSH Key Setup
We’ll need to set up SSH access to GitHub from your computer. This is how GitHub checks your identity when you try to access it - and is more secure than a password. To set up SSH access, we generate a pair of keys - one public, one private. We want to add the public key to GitHub, whilst the private one stays on our computer.
We can run a simple command to generate a new SSH key. It’ll ask you for some settings, but you should just hit enter to use the defaults for everything:
OUTPUT
Generating public/private ed25519 key pair.
Enter file in which to save the key (/home/smangham/.ssh/id_ed25519):
Enter passphrase (empty for no passphrase):
Enter same passphrase again:
Your identification has been saved in id_ed25519
Your public key has been saved in id_ed25519.pub
The key fingerprint is:
SHA256:tm2lRVXqWdkwiu+fvOF8WxRaf6peAqZHKSaWDO8jjjs user-name@computer-name
The key's randomart image is:
+--[ED25519 256]--+
|              +..|
|           . o +o|
|    .     . o .+o|
|     + .   + .ooo|
|      * S = +.o +|
|     o + B *   o.|
|    . o o = o + .|
|  Eo . . o   O oo|
|  oo.      .o B+.|
+----[SHA256]-----+
Now we’ve generated a key, we can add this to GitHub and register the key there. First, visit GitHub, and make sure you’ve signed in to your account. Once you’re signed in, go to GitHub > Settings > SSH and GPG keys > Add new, and you should see this:
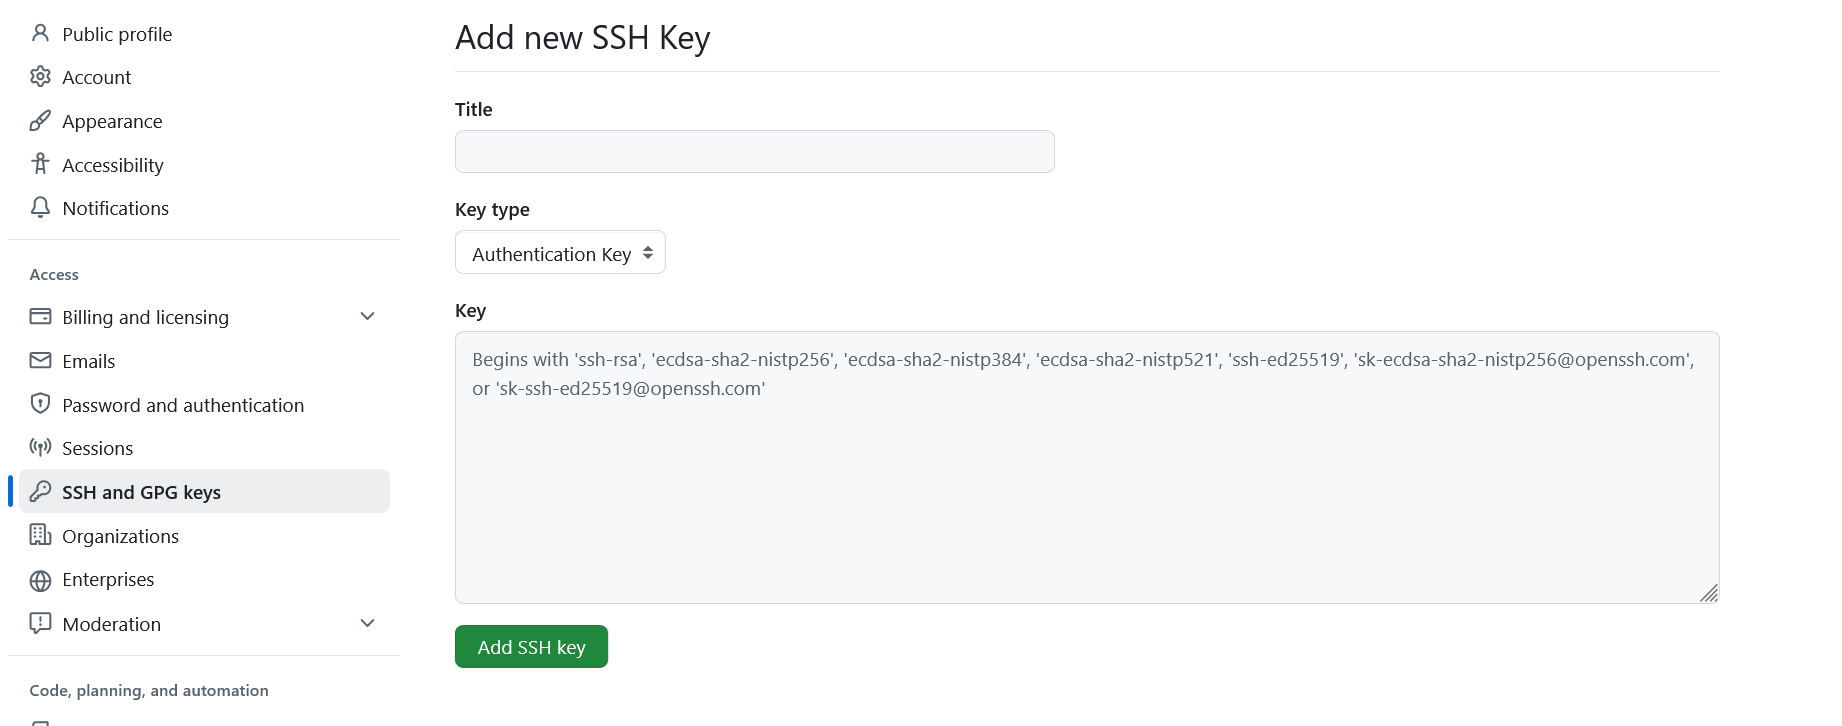
We need to fill in the details. Give the key a title like “Laptop SSH key”, and then paste your public key into the key box - we can find it in our ~/.ssh folder:
OUTPUT
id_ed25519 id_ed25519.pub known_hostsYou want to copy the contents of the .pub file, which you can display with:
OUTPUT
ssh-ed25519 <SNIPPED FOR SECURITY> user-name@computer-nameMake sure you copy the .pub file and not the private key! Your private key lives on your machine and is never shared with anyone else. Then click Add key, and you’re done!