
All in One View
Content from Introduction
Last updated on 2026-05-31 | Edit this page
Estimated time: 10 minutes
Overview
Questions
- Why should I manage my software development?
Objectives
- Explain why academic software development requires management. keypoints:
- Well-made software is easier to expand and reuse
- You need to produce reproducible research.
- You are a user of your own code.
There’s a lot of guidance out there on how to develop industrial software, but developing academic software can be an unusual exercise.
Academic Software
It can be difficult to provide guidance for academic software because the category is so broad. Anything developed within the framework of academic research qualifies, and most intensive examples include:
- Writing drivers and firmware for cutting-edge equipment (e.g. exploratory submersibles)
- Developing and managing databases of research data (e.g. chemical test results)
- Machine-learning pipelines consuming GB of data (e.g. genome analysis pipelines)
- High-performance simulation codes that run on supercomputers (e.g. radiation physics modelling)
But the majority of academic software is less intensive - collections of smaller scripts, for purposes like:
- Testing hypotheses on toy models developing full-scale codes
- Cleaning data files for analysis (e.g. anonymising survey results)
- Building pipelines from existing software
- Plotting figures for use in papers
Some disciplines lean more heavily towards one end or the other, but there’s people working on all scales of software within all domains.
Commonalities
The one thing that unites academic software is that unlike in traditional development, the software itself isn’t the end goal - it’s the papers it enables that are. The software is instrumental, just a tool to accomplish your research. In addition, it’s experimental - your understanding of what the software needs to do, or the exact data that will be available for it, is likely to evolve throughout the project. You aren’t just writing a piece of software, you’re trying to find out what software could be written (and if it would be any use!).
Plus, academic software is almost always developed by a small team, in many cases just a single PhD student or postdoc. Even for research groups where multiple people work on the same code, there’s very rarely processes or standards that define how code should be written.
Caveats
In Computer Science and Engineering, you’re more likely to have research projects focused on the actual development of software to meet a clearly defined goal. However, they still take place within the framework of academia as a whole, and suffer from the same problems.
Issues
The lack of firm goals and structured development often means that when you’re writing academic code the focus is entirely on how to get the results needed for the latest paper, without considering how this works in the long run. As a result, a large proportion of academic software is paperware - ad-hoc, poorly-written code made without any real plans, and a common set of issues:
- Unplanned: Whilst you can’t produce rigorous plans for exploratory and experimental code, much academic software is just made up on the fly without any real consideration for what it might need to do in future.
- Undocumented: Often, how academic software works and how to run it lives entirely within the heads of those who wrote it, often just a single researcher. It’s impossible for anyone else to know how it works without investing a huge amount of effort trying to understand it line-by-line.
- Unmaintainable: With no plan and no documentation, academic software becomes increasingly hard to maintain. Bugs go unfixed because they’d require fundamental overhauls of the code to address, and the code becomes a rickety stack of twigs that collapses if you poke it wrong - but only the developers know where the limits are.
- Unshareable: New researchers can’t just pick up and use the code or work on it, without a huge amount of support from the handful of people who do know how it works.
- Disposable: Fundamentally, paperware is disposable - it has to be thrown away after a couple of uses.
Problems
These common issues end up causing serious problems for the whole of academia:
- Poor Reproducibility: Research should be reproducible, and if the code used to generate it is an incomprehensible mess, that’s just bad science. Increasingly, journals are pushing back on this by requiring the code for the software used in a paper to be shared.
- Wasted Effort: It’s tragically routine for a new PhD student joining a group to be handed the previous student’s work, spend months trying to understand it, then have to throw it away and start from scratch because nobody actually knows how it works.
- Limited Collaboration: Whilst sharing software helps the field by advancing the rate of research, and individual academics by generating citations, with so much software being unclear and requiring detailed help to use collaboration is often slow and difficult.
- Knowledge Decay: If running a code depends entirely on the knowledge in the developer’s head, it’s vulnerable to knowledge decay. Returning to previous projects for new collaborations becomes increasingly hard as the researchers involved inevitably forget the quirks, limits and edge-cases for their code.
- Low Bus Factor: The ‘Bus Factor’ is a software engineering term for “The number of people who have to be hit by a bus for a project to be impossible to continue”. For most academic software projects, the bus factor is 1. This leads to a huge amount of promising research projects ending up stuck in limbo or shelved entirely when that one person takes sick leave, runs out of time due to other commitments, or ends up leaving academia.
Writing Sustainable Software
We really want to avoid these problems, because better software makes better research - organisations like the Software Sustainability Institute exist to make this point.
If you plan your project out clearly in advance, openly list your future goals and the limitations of your software, and write code that’s well-documented, consistent and designed to be easy-to-interpret, you’ll find it to be much more sustainable. Sustainable software is easier to keep maintained, to expand to cover new problems, and to bring in new collaborators on. The benefits to your research from this will rapidly outweigh the time you spend on software project management.
Project Management Tools
Fortunately, a lot of tools exist to help manage the development of your academic software. You should already be familiar with Git and GitHub, already a great way to keep track of how your code evolves and share it with others. GitHub and other repository hosting sites (for example, GitLab or Codeberg) have a whole range of project management tools that we can use - and we’re going to start with them.
Content from Issues
Last updated on 2026-05-31 | Edit this page
Estimated time: 15 minutes
Overview
Questions
- How can I keep track of bugs and problems?
- How can I communicate them to users?
Objectives
- Learn what issues are and how to use them.
- Create an issue on GitHub.
As a piece of software is used, then bugs will inevitably come to light - nothing is perfect! If you work on your code with collaborators, or have non-developer users, it can be helpful to have a single shared record of all the problems people have found with the code - not only to keep track of them for you to work on later, but to avoid the annoyance of people emailing you to report a bug that you already know about!
Issues
GitHub provides a framework (as does GitLab!) for managing bug reports, feature requests, and lists of future work - Issues.
We’ll run through an example of how to create and use them. As part
of our setup we created a repository from the
climate-analysis template. It’s a mock repository for a
code that analyses climate data files.
Setup
If you didn’t make a copy of it earlier, go
to this link and create a new repository on your account called
climate-analysis. If you’ve already got a
climate-analysis repository from completing earlier
training with us, then you can use that one!
Go back to the home page for your climate-analysis
repository, and click on the Issues tab. You should see a page listing
the open issues on your repository, currently none.
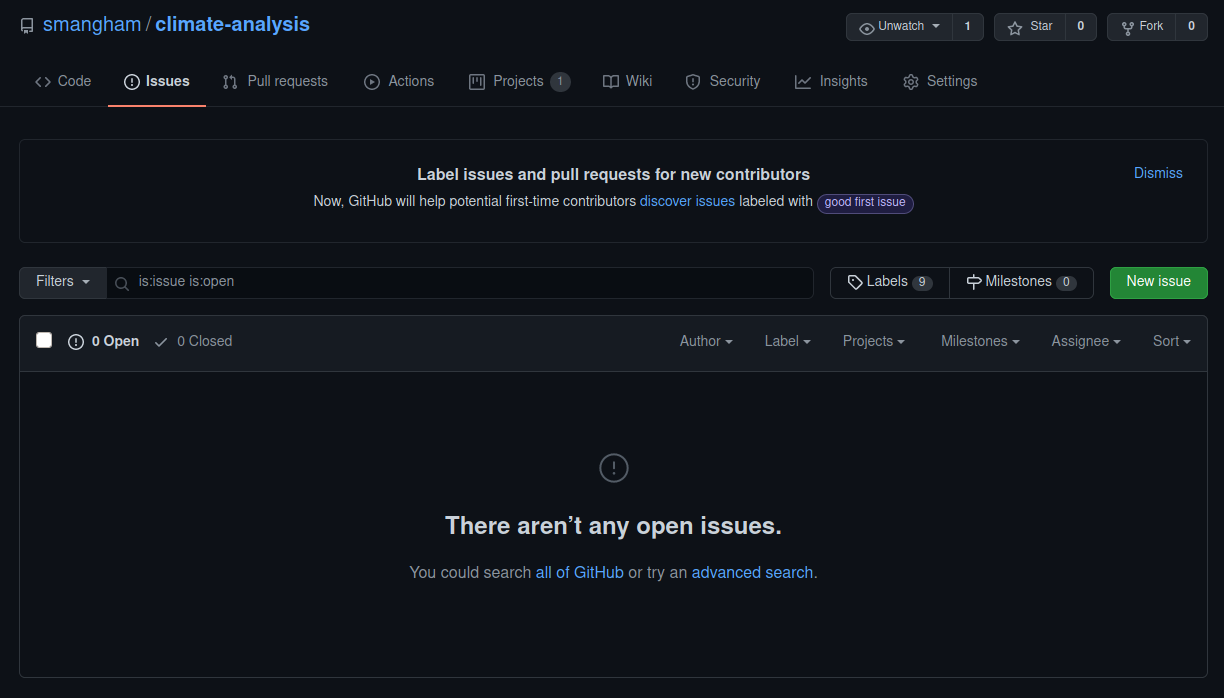
If we look at the climate_analysis.py file in our
repository, we can see that it’s got a comment describing work that
needs to be done (a.k.a. a “To Do note”):
This is an easy way to record information about your code, but it’s not very accessible - if the code is in multiple files, you have to read all of them to know what the state of it is. It’s just not a very practical solution and makes it harder for new developers and users to understand your code. Instead, we’re going to create a new issue, raising the problem that the rainfall processing functionality isn’t yet working.
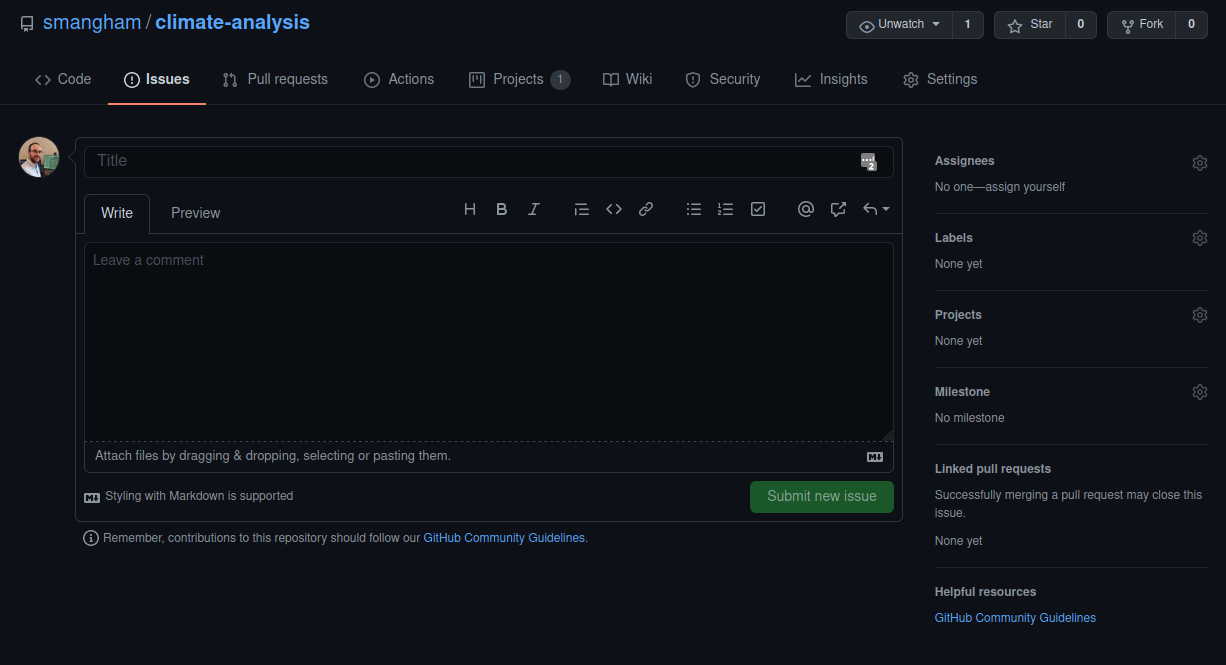
When you create an issue, you can add some extra details to it. Issues can be assigned to a specific developer - this can be a helpful way to know who, if anyone, is currently working to fix an issue (or a way to assign responsibility to someone to deal with it!). We’ll dodge responsibility for now.
You can also label an issue to describe what type of thing it is. We’re going to assign this issue the label Bug, by clicking on the cogwheel by the Labels section on the right hand column, then submit the issue.
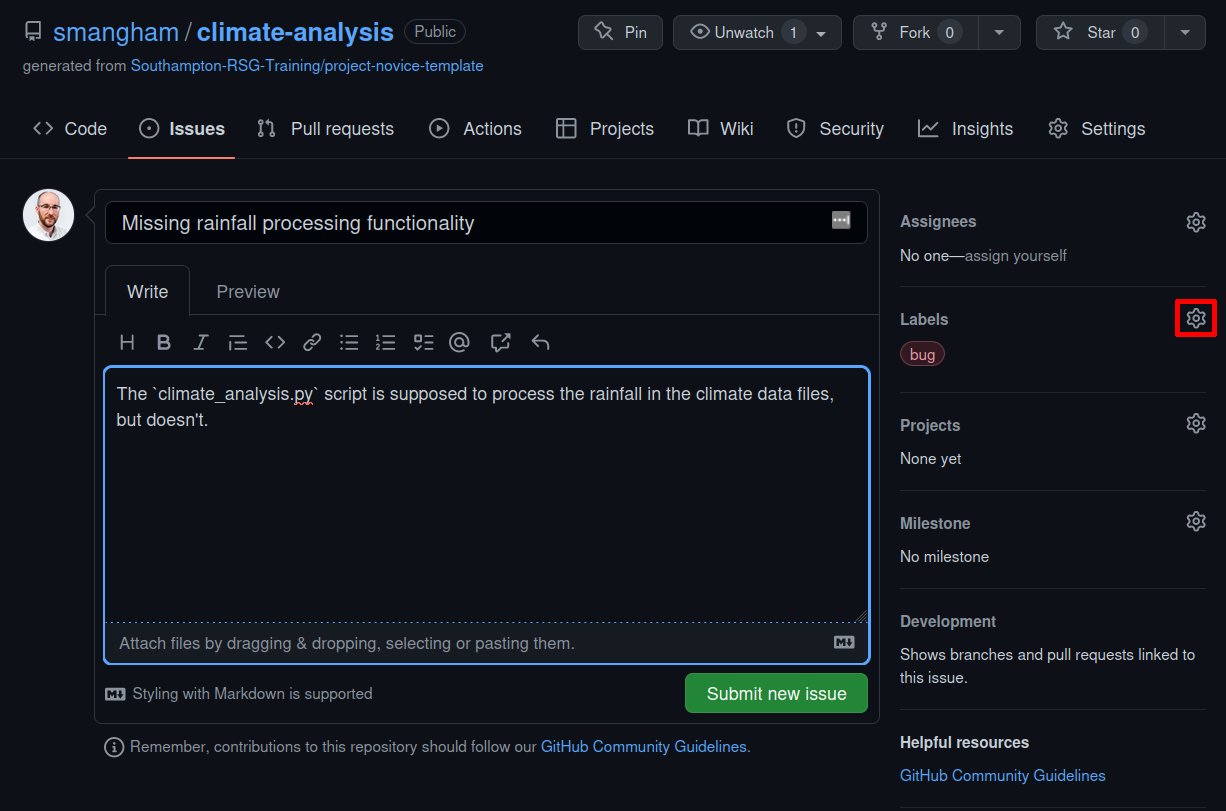
The labels available for issues can be customised, and given a colour, allowing you to see at a glance from the Issues page the state of your code. The default labels include:
- Bug
- Documentation
- Enhancement
- Help Wanted
- Question
The Enhancement label can be used to create issues that request new features, or if they’re created by a developer, indicate planned new features. The Bug label makes the code much more usable, by allowing users to find out if anyone has had the same problem before, and how to fix (or work around) it on their end. Enabling users to solve their own problems can save you a lot of time and stress!
The Enhancement label is a great way to communicate your future priorities to your collaborators, and also your future self - it’s far too easy to leave a software project for a few months to write a paper, then come back and have forgotten the improvements you were going to make. If you have other users for your code, they can use the label to request new features, or changes to the way the code operates. It’s generally worth paying attention to these suggestions, especially if you spend more time developing than running the code. It can be very easy to end up with quirky behaviour because of off-the-cuff choices during development. Extra pairs of eyes can point out ways the code can be made more accessible, and the easier a code is to use, then the more widely it will be adopted and the greater its impact will be.
Bug or Enhancement
Is the issue we just added really a bug? In this case we could call it an Enhancement - it depends on whether we think this is missing functionality that should be there (a bug), or new functionality we want to add to an existing code. If it doesn’t suit either, we could just leave it unlabelled - labels just exist to make things clearer, after all.
Having open, publicly-visible lists of the the limitations and problems with your code is incredibly helpful. Even if some issues end up languishing unfixed for years, letting users know about them can save them a huge amount of work attempting to fix what turns out to be an unfixable problem from their end. It can also help you see at a glance what state your code is in, making it easier to prioritise future work!
It also helps give users more confidence that your code is actively used and developed - it’s much better to see an open discussion about the use of a tool or library than silence.
You Are A User
This section focuses a lot on how issues can help communicate the current state of the code to users. As a developer, and possibly also the only user of the code too, you might be tempted to not bother with recording issues and features as you don’t need to communicate the information to anyone else.
Unfortunately, human memory isn’t infallible! After spending six months writing your thesis, or a year working on a different sub-topic, it’s inevitable you’ll forget some of the plans you had and problems you faced. Not documenting these things can lead to you having to re-learn things you already put the effort into discovering before.
Should Old Issues Be Forgot
Information decays very quickly. Try and remember all of the problems you had with a code you worked on a few years ago, for example your undergraduate final project. Were there any combinations of input settings that it couldn’t cope with, for example?
To give some examples from real PhD projects:
- A simulation code designed to run on a supercomputer could be restarted if it stopped mid-way through a simulation, but not all the outputs would be valid after restarting.
- An astrophysics simulation code would take multiple times times longer to run and give less-accurate answers if the density of gas was raised too high.
Wontfix
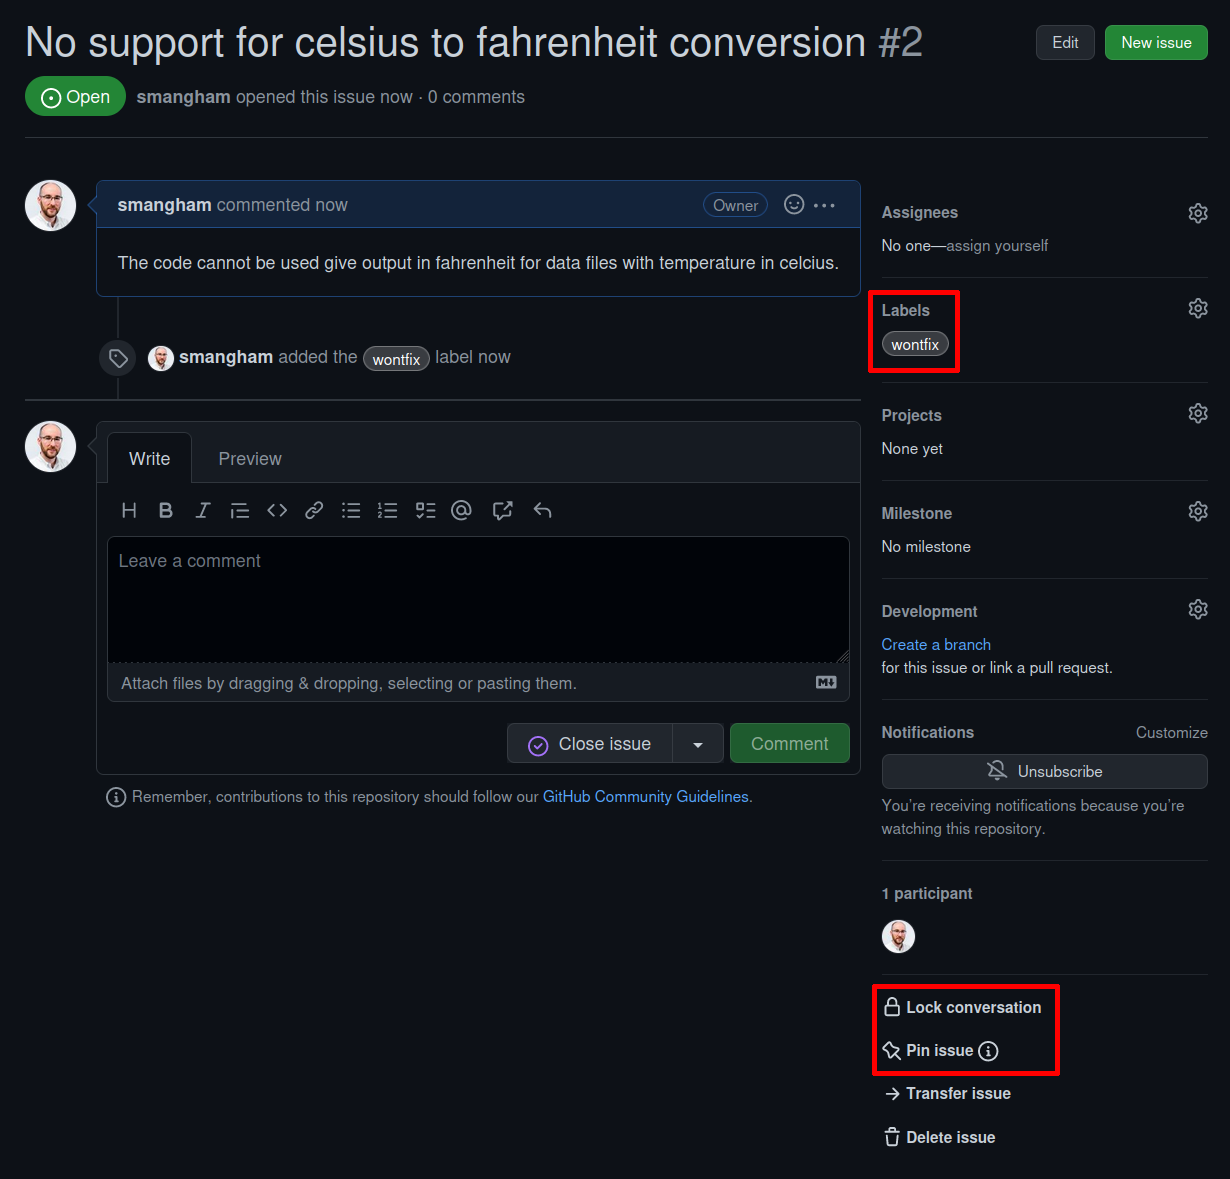
One interesting label is Wontfix, which indicates that an issue simply won’t be worked on for whatever reason - maybe the bug it reports is outside of the use case of the software, or the feature it requests simply isn’t a priority.
The Lock issue and Pin issue buttons allow you to block future comments on an issue, and pin it to the top of the issues page. This can make it clear you’ve thought about an issue and dismissed it!
Issue Templates
Whilst many academic software projects have only user-developers, for others many of the users will not have any experience working on the code, and in some cases not even have any software development experience at all.
Getting them to raise issues in a way that’s clear, helpful and provides enough information for you to act on (without going back and forth to extract it) can be hard. Fortunately, GitHub provides Issue templates. These allow you to set a template that anyone raising an issue is prompted to fill in. GitHub provides a range of default templates, but you can also write your own.
If you have a project with a large number of user-submitted issues, consider setting up issue templates. For more information on them, check out the GitHub documentation here.
Mentions
As lots of bugs will have similar roots, GitHub lets you reference one issue from another. Whilst writing the description of an issue, or commenting on one, if you type # you should see a list of the issues and pull requests on the repository. They are coloured green if they’re open, or white if they’re closed. Continue typing the issue number, and the list will narrow, then you can hit **Return to select the entry and link the two. You can also navigate the list with the ↑ and ↓ arrow keys.
If you realise that several of your bugs have common roots, or that one Enhancement can’t be implemented before you’ve finished another, you can use the mention system to indicate which. This is a simple way to add much more information to your issues.
You can also use the mention system to link GitHub accounts. Instead of #, typing @ will bring up a list of accounts linked to the repository. Users will receive notifications when somebody else references them- you can use this to notify people when you want to check a detail with them, or let them know something has been fixed (much easier than writing out all the same information again in an email!).
Linking Issues
We’ve documented that we’ve not implemented any rainfall processing
in climate_analysis.py, but the rainfall code we’d want to
use is completely undocumented. We need to fix that first!
Create a new issue, labelled Documentation, that mentions your previous issue and links to your GitHub account to reference that you’ll be fixing this issue as it’s a pre-requisite for the first one.
Then, check out the first issue you raised and see if anything has happened.
You should get a pop-up box looking like this when you enter the
# key: 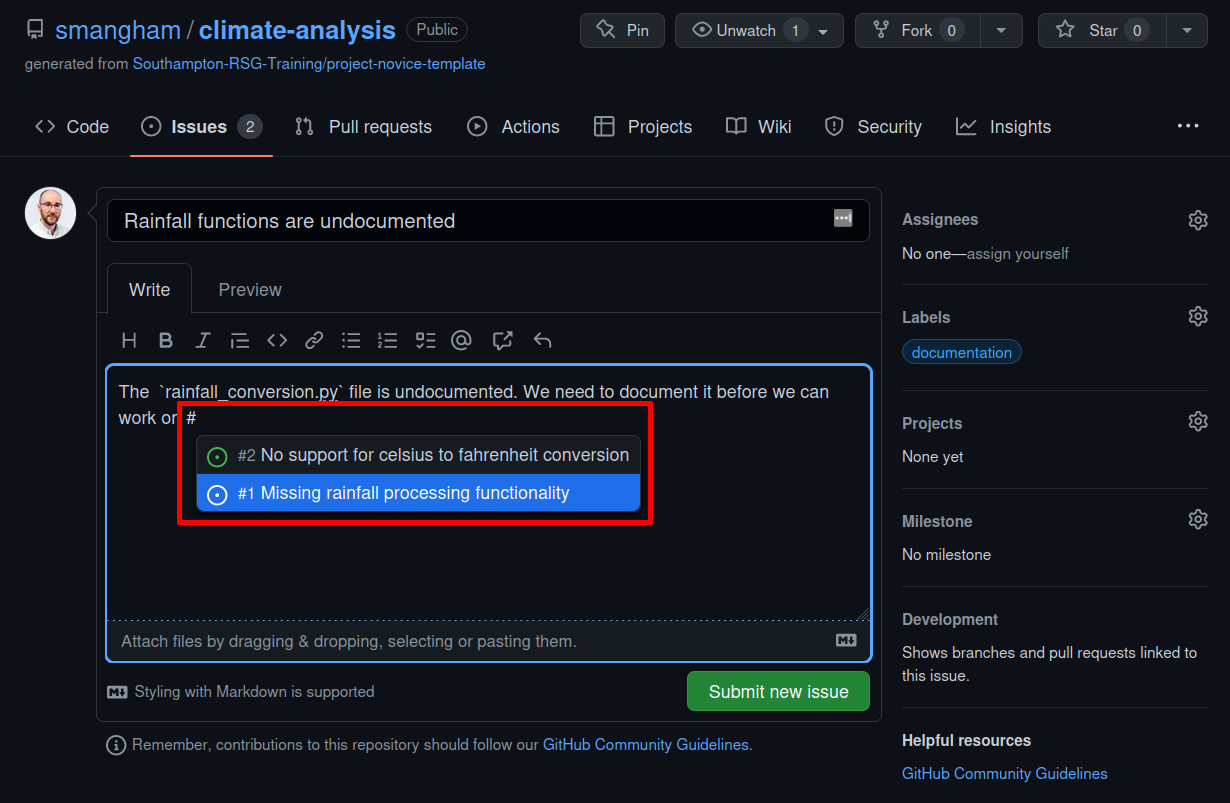 Once you’ve selected the existing issue,
and created your new one, you’ll get a link to the previous one:
Once you’ve selected the existing issue,
and created your new one, you’ll get a link to the previous one: 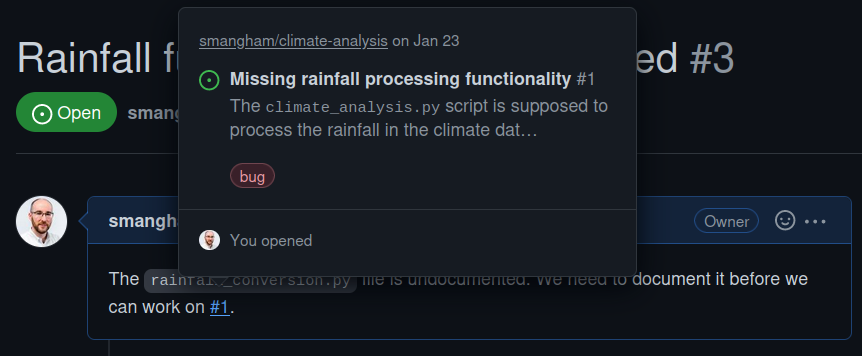
Commits
Mentions also work in commit messages! If you reference issue numbers
in your commits (e.g. git commit -m "Fixes issue #65") then
GitHub can automatically close issues, and will link
the commit to the issue. This makes it easy for you to keep track of the
changes to the code that were made in order to fix any given issue,
should a similar bug crop up again in future.
- Issues are a way of recording bugs or feature requests.
- Issues can be categorised by type.
- Issues can reference other issues, and be referenced by commits.
Content from Project Management
Last updated on 2026-05-31 | Edit this page
Estimated time: 30 minutes
Overview
Questions
- How can I manage the development of my code?
Objectives
- Explain how project boards work.
- Explain how to set up a Kanban board on GitHub.
- Discuss strategies for using a Kanban board.
- Explain what a fork is, and how to fork a repository.
Developing academic software is a project, and most projects (software and non-software alike!) consist of multiple tasks. Keeping track of the list of tasks you have to do, and how far you are through each, quickly becomes a non-trivial task itself. Without a good framework, it can be hard to keep track of what’s done, or what needs doing, and particularly hard to convey that to others or share the responsibilities out.
Project boards
A project board (or kanban board, from the japanese for a card) is a tool for keeping track of all the different components of a project, and what their current status is. They do this using columns and cards - you break your project down into tasks which you write on cards, then move them between columns that describe the status of each task. Cards are usually small, descriptive and self-contained tasks that build on each other - think “Add reader for .csv files” instead of “Get input working”. Breaking a project down into clearly-defined tasks makes it a lot easier.
In industry, they often use formal project management styles for their boards with specific columns and usages, but we’re going to use a simple, flexible format - not least because the more complicated your project board gets, the harder it is for you to get your collaborators to use it…
To GitHub
There’s a lot of sites that host project boards. For non-software projects like thesis-writing or organising conferences, you might use Trello, but repository hosting sites like GitHub and GitLab have built-in project boards that interact with the other features of the site, so we’re going to use them (though other tools like Jira also offer this functionality). This episode will use GitHub as an example, but GitLab has almost identical functionality.
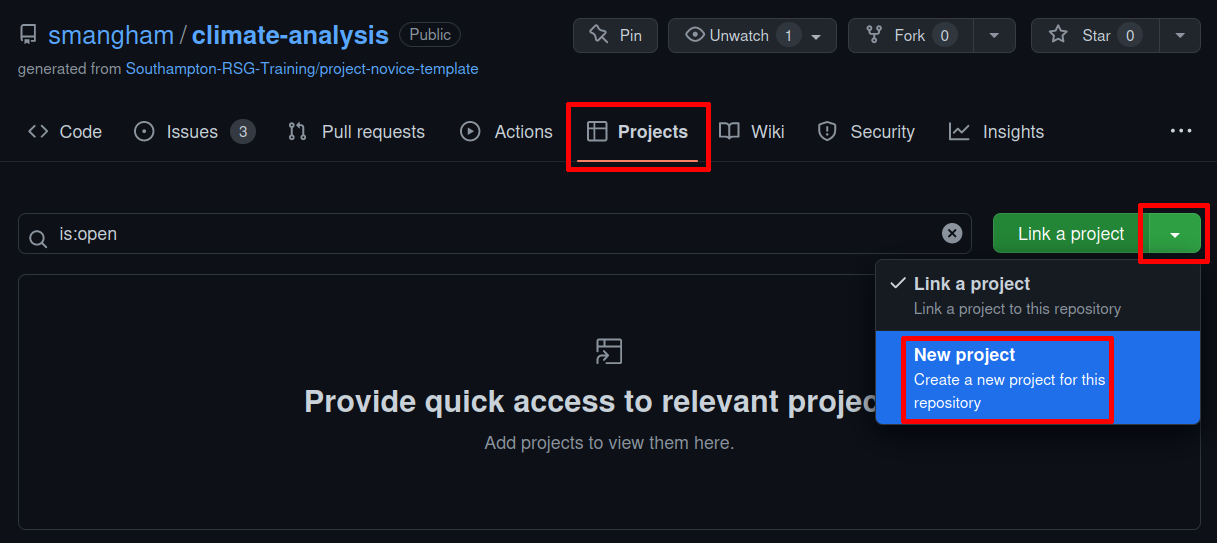
Let’s go to our climate-analysis repository, go to the
Projects tab, then select click on the green
Link a project dropdown and select New
Project. Then, click the New Project
button.
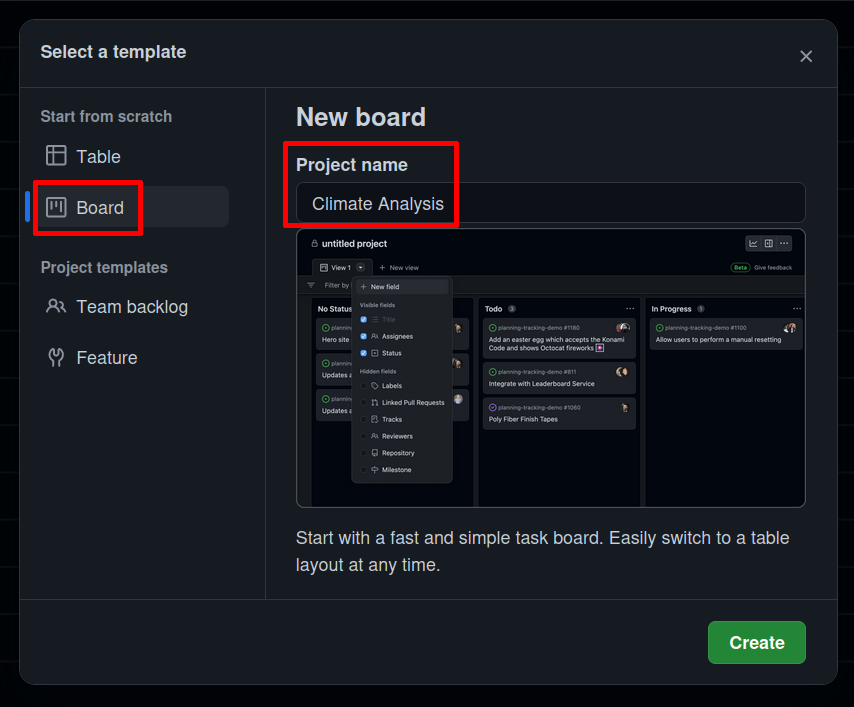
Then just name it “Climate Analysis”, and select Board from the list on the left. Then we’ve got our new Project Board! A repository can have any number of project boards linked to it - for example, each PhD student in a collaboration can have their own project board, or you can create a new project board for each paper you’re writing.
Columns
Almost all styles of board have three ‘basic’ columns, with pretty self-explanatory names: - To Do - In Progress - Done
GitHub’s default project boards that automatically have those columns - and more it automates them. If you add a pull request to the board, it can automatically move it to Done for you when you merge it.
One common extra column is On hold or Waiting. If you have tasks that get held up by waiting on other people (e.g. to provide you with data or respond to your questions) then moving them to a separate column makes their current state clearer. We’re going to click on the + button (you might have to scroll over a bit to see it!):
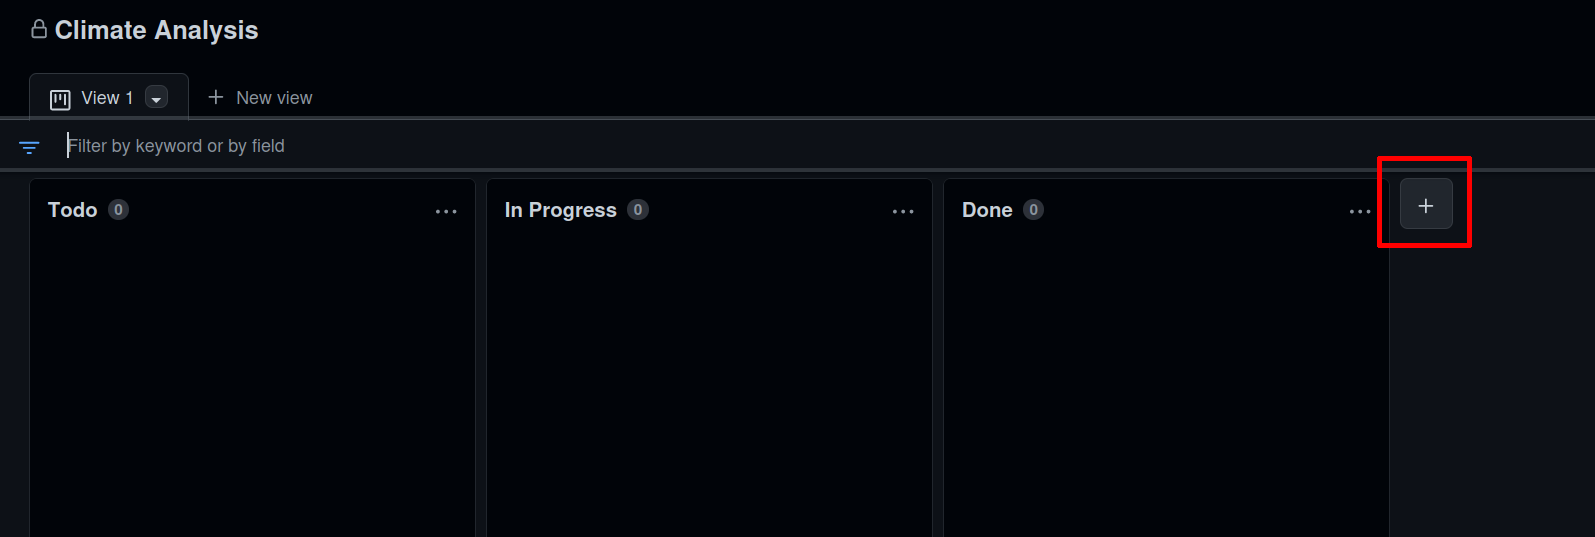
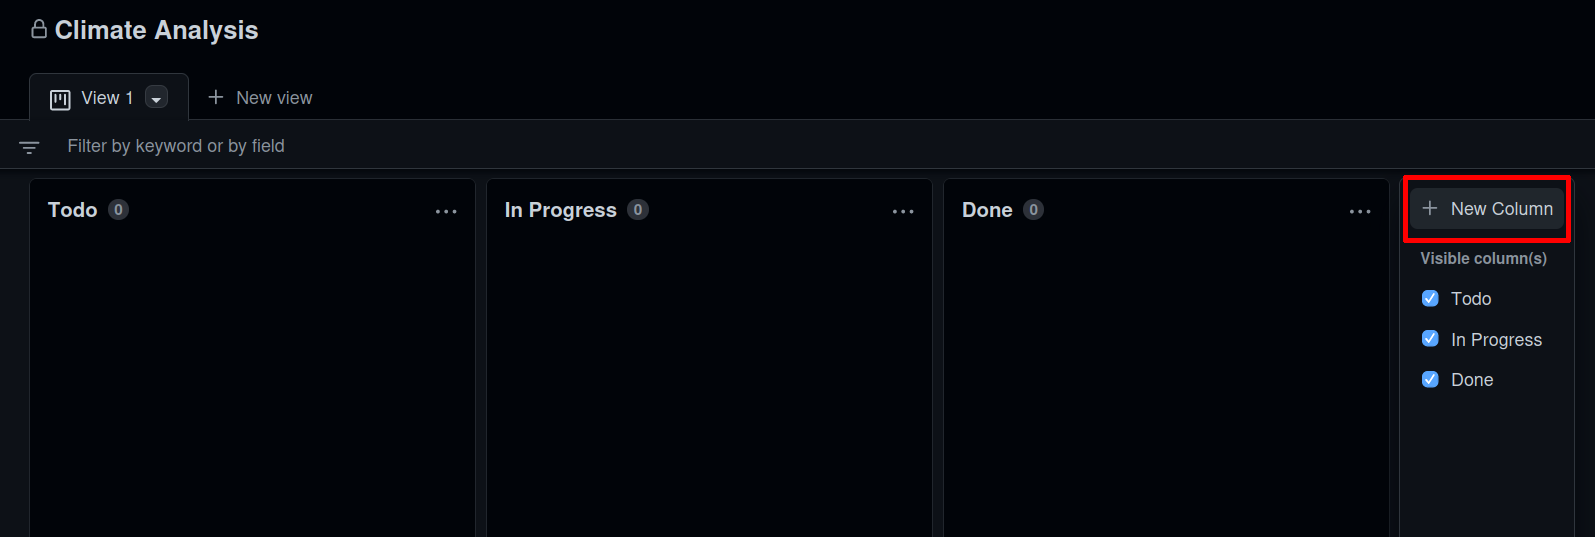
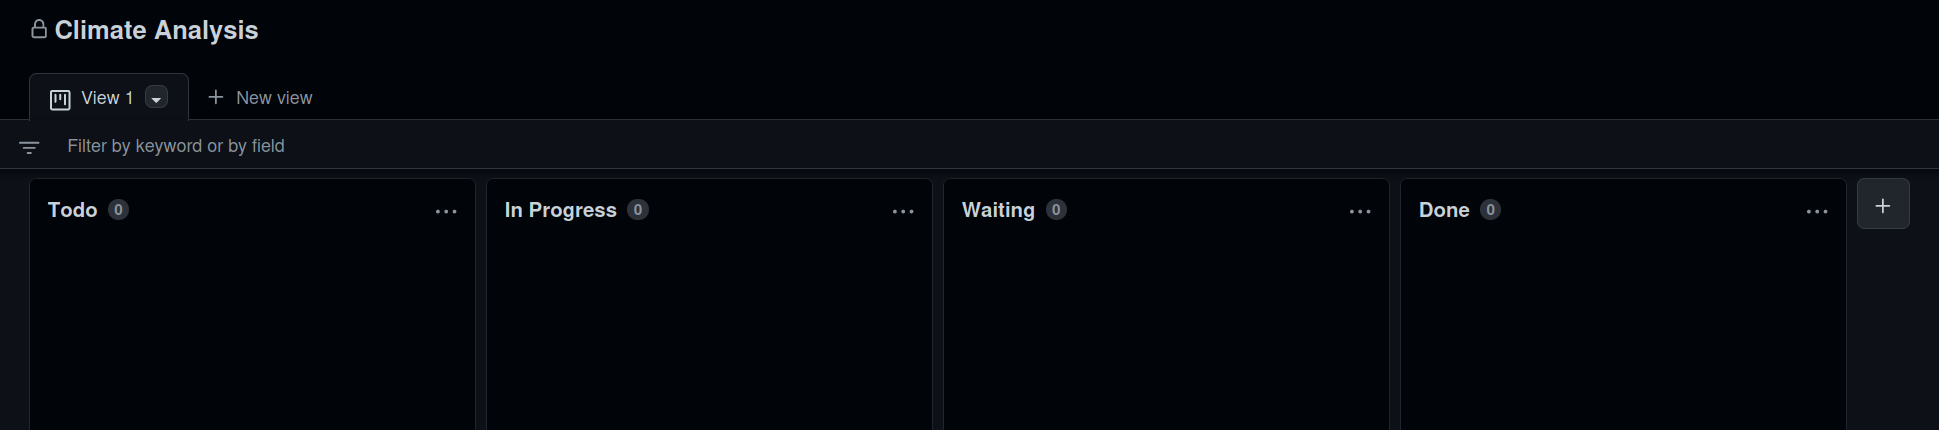
Then click the New Column button, add a Waiting column, and drag it in-between In Progress and Done:
Now we’ve got our board fully set up:
Cards
One of the advantages of using GitHub or GitLab to host your project board is the integration with issues. You can easily add issues to your project board, to keep track of how they’re progressing.
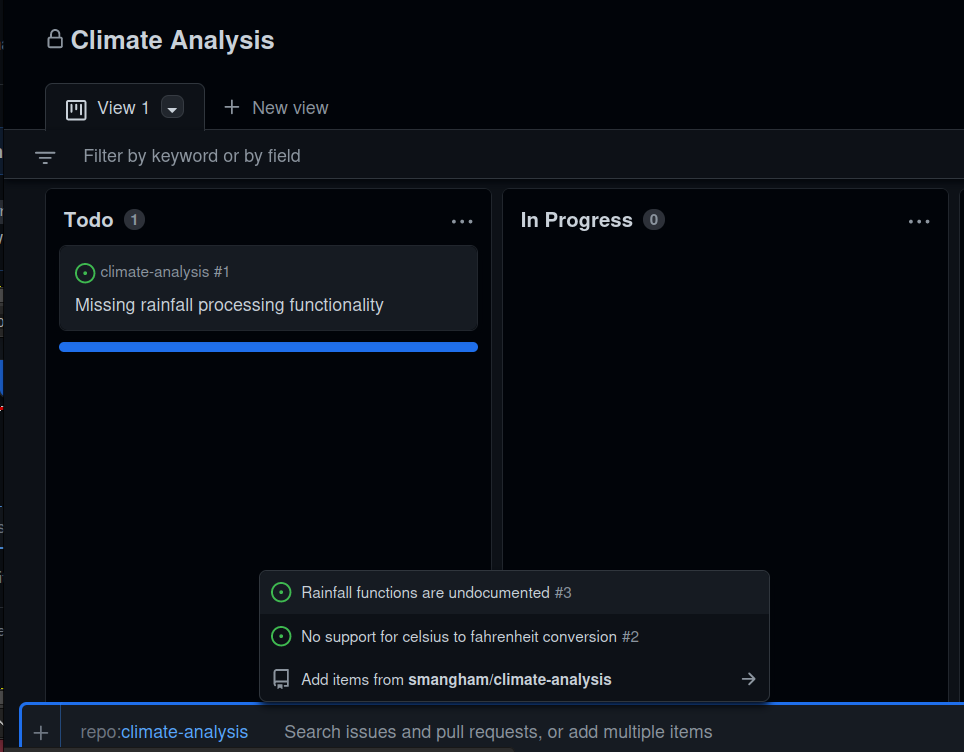
You can create cards on the project board, or you can import existing issues. Scroll down to the bottom of the To Do column and select the + box:

If we start typing #, it’ll show us a list of the
repositories we could link, and then once we select
climate-analysis it’ll list the issues on that repository.
We can click on them one-by-one, or select Add items from
yourname/climate-analysis and import them in a batch:
We can also create a card without an issue. The repo currently doesn’t tell people how to use the code - it needs an example. So let’s create a card about it, that we can promote to a full issue later!
Click + box at the bottom of the To
Do column, delete the climate-analysis link, and
start typing a title like “Add example of use” then hit
Return:
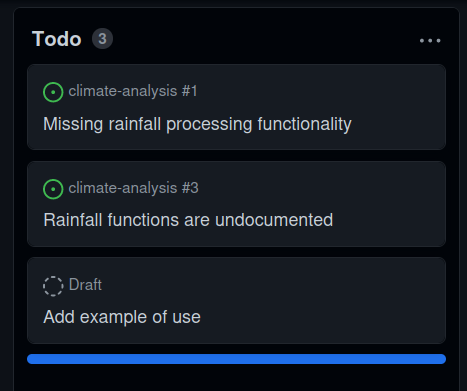
Then double-click on the card, and you can add more detail:
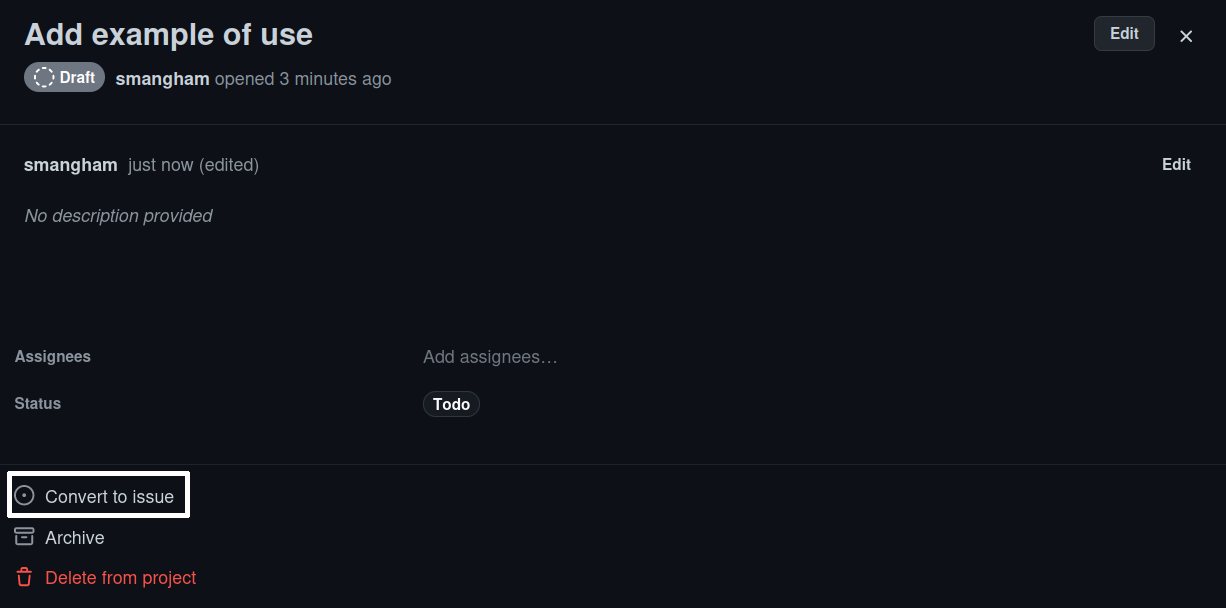
Cards can have detailed content like checklists, but that only goes so far. Later on you might want to convert the card to an issue so you can add labels or write detailed comments. Fortunately, you can click Convert to issue at the bottom of the expanded card, and selecting the repository for it.
It’s often a good idea as you can use the comments section on the issue to write everything you tried - and, importantly, everything that failed for future reference. Sometimes, an issue you thought was simple and self-contained might turn out to be a bigger task than you thought. In that case, it’s sensible to create new cards or issues that reference the one they broke off from.
Our project board is looking a little thin, but for an example full one check out the data science library Scikit Learn.
Issue Labels
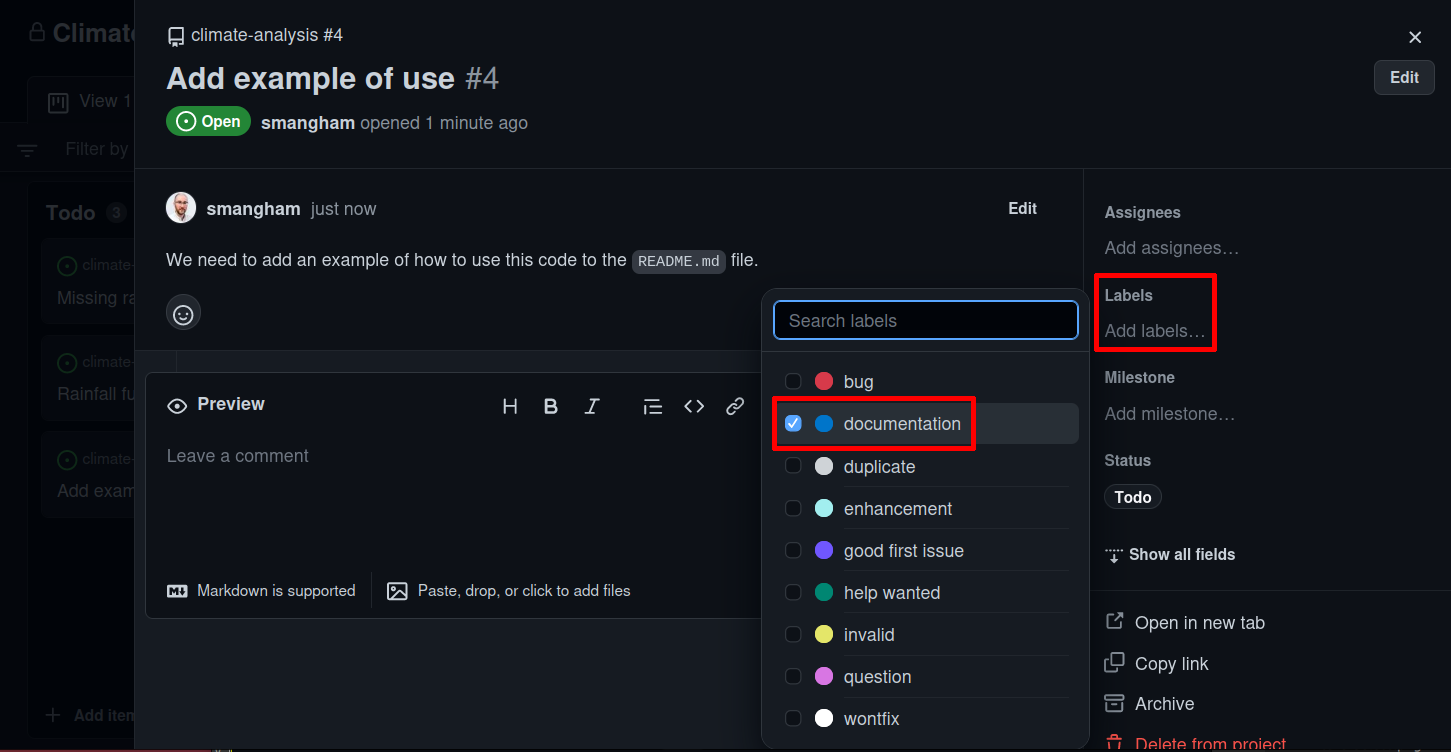
You can see that your issue card has a ‘bug’ label, but the one you made has no labels. Convert your new card to an issue, and add the Documentation label to it.
We convert the card to an issue, and add a quick description, then
click Convert to issue and select
climate-analysis from the dropdown: 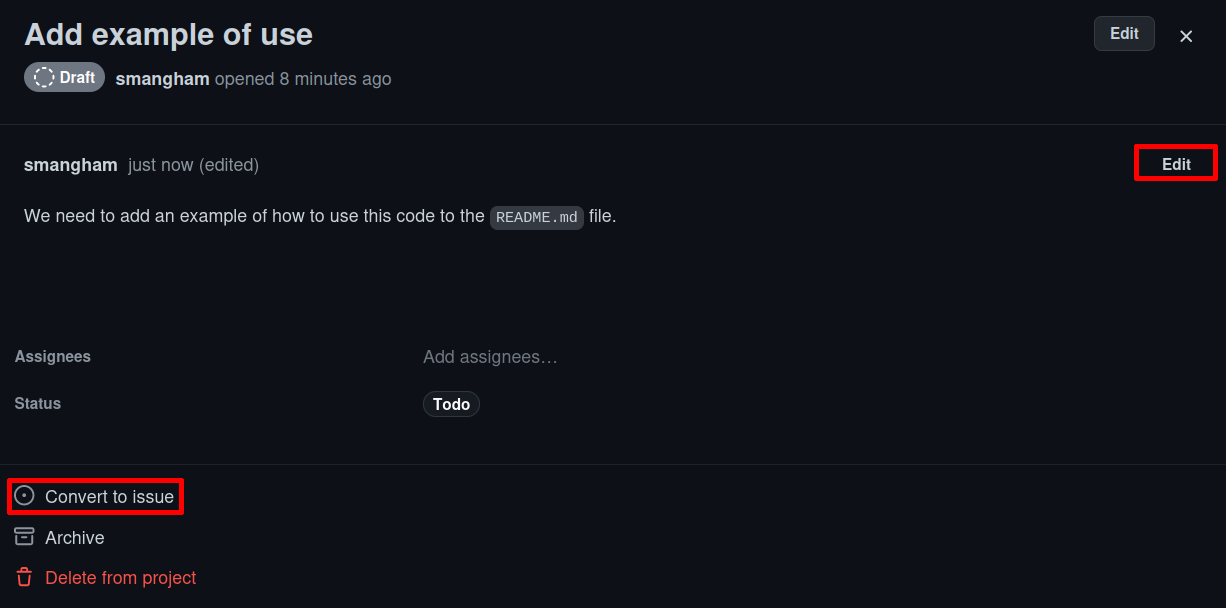 Once we’ve made the issue, we can follow
the link to see it and add the Documentation label:
Once we’ve made the issue, we can follow
the link to see it and add the Documentation label:
Board Details
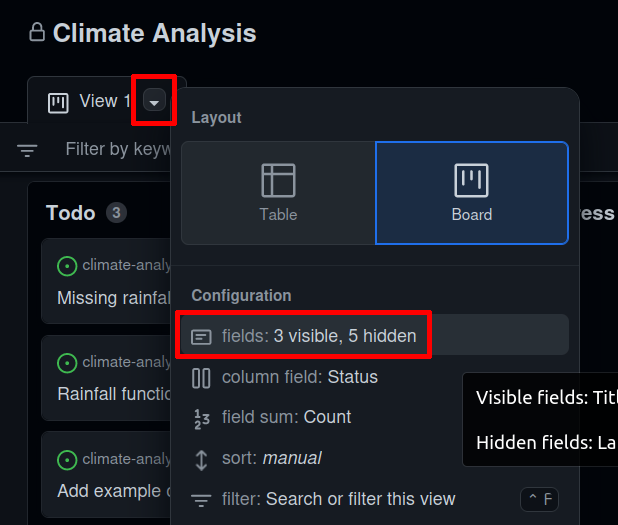
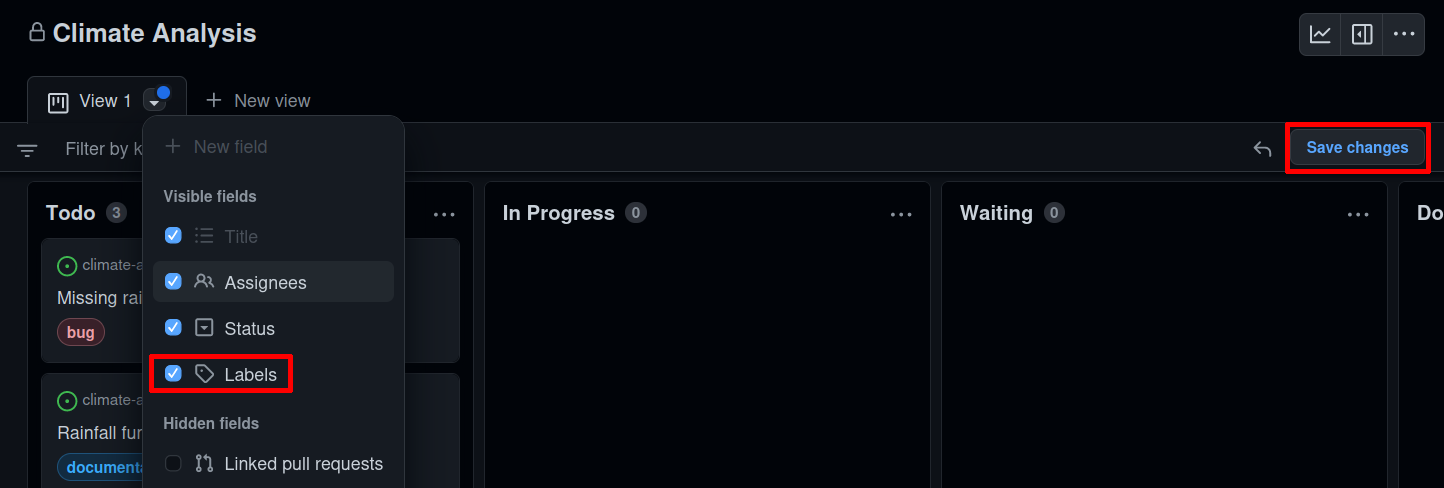
By default, the board only shows the status of each issue, and who’s working on it. If we want to see a little bit more info (like the Documentation label we just applied!) we need to change that.
Go to the View 1 tab at the top, click the Down arrow, and select Fields:
Then we can tick the Labels field and use the Save changes button on the right-hand side:
Prioritisation
Once your project board has a large number of cards on it, you might want to begin priorisiting them. Not all tasks are going to be equally important, and some will require others to be completed before they can even be begun. Common methods of prioritisation include:
- Vertical position: The vertical arrangement of cards in a column represents their importance. High-priority bugs go to the top of To Do, whilst tasks that depend on others go beneath them. This is the easiest one to implement, though you have to remember to correctly place cards when you add them.
- Priority columns: Instead of a single To Do column, you have two or more- a To Do: Low Priority and a To Do: High Priority. When adding a card, you pick which is the appropriate column for it. You can even add a Triage column for newly-added issues that you’ve not yet had time to classify. This format works well for project boards devoted to bugs.
- Labels: If you convert each card into an issue, then you can label them with their priority- GitHub lets you create new labels and set their colour. Green low, orange medium and red high priority labels make for a very visually clear indication, but require the most admin as each card has to be an issue to receive a label.
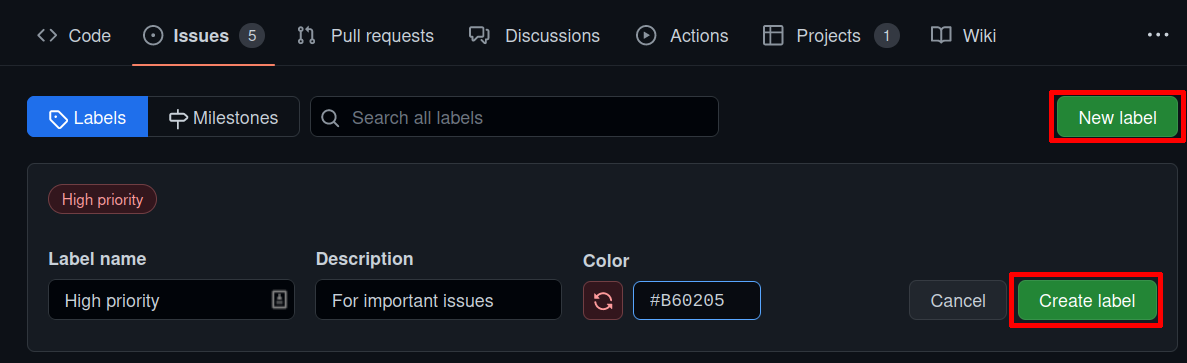
Making a new label is a little more involved: You have to go back to your repository, go to the Issues tab, and select Labels:

Then you can pick New label on the right, and in the dialog give your new label a name, description, and then pick its colour:
Prioritisation
Currently, we don’t really have enough cards to prioritise. Create a new card named “High priority”, and using one of the prioritisation schemes arrange your board so it’s the most important.
We type High priority into the box at the bottom of the
Todo column: 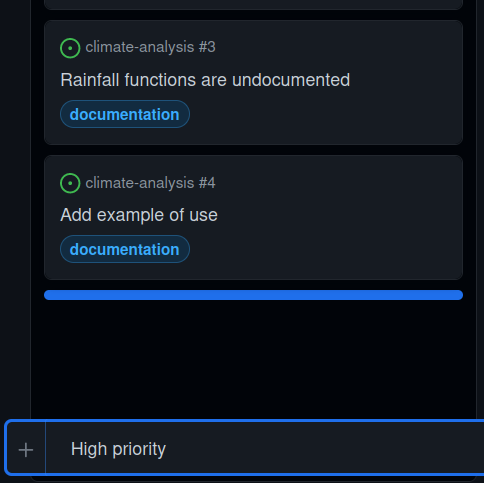 Then we can click and drag to move it to
the top of the column:
Then we can click and drag to move it to
the top of the column: 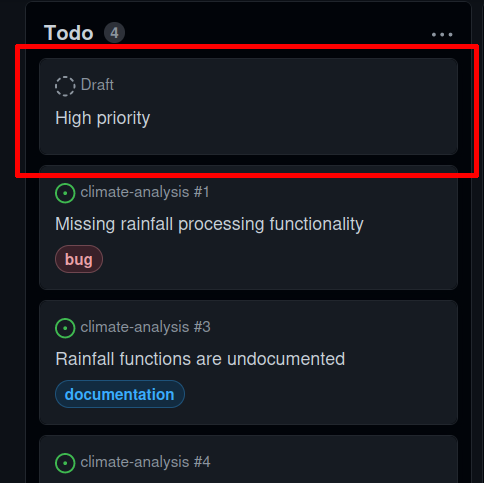
Or, we can convert the card to an issue as we did before, then select
the High priority label we made earlier: 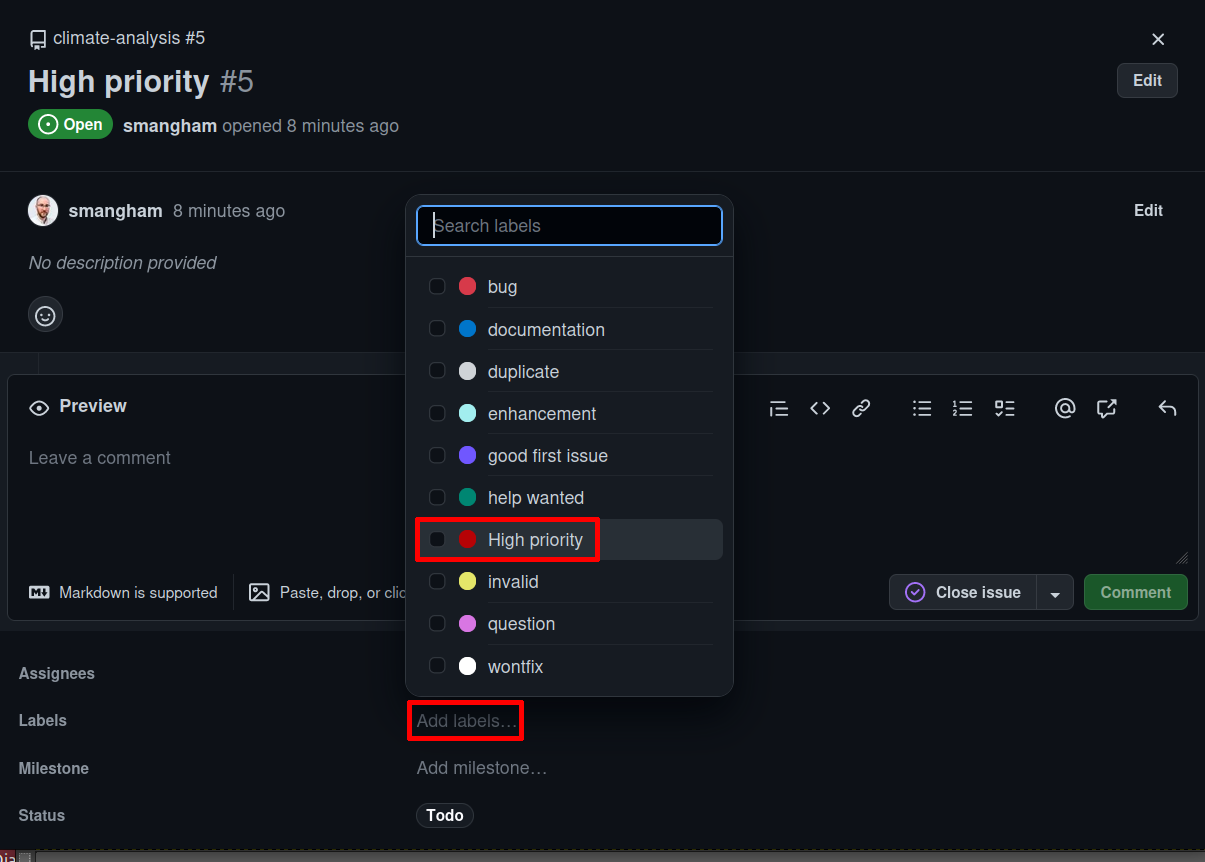 Then we have prioritisation by label:
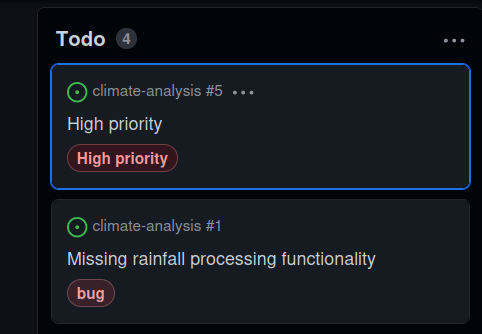
Advanced Schemes
Whilst you can prioritise your tasks using simple schemes, more advanced ones exist in industry. MoSCoW (Must, Should, Could, Won’t) is one such scheme, which splits your tasks up into no more than 60% must-have features, and no less than 20% could-have features.
If your must-have features take longer than expected to implement, you have a pre-made list of what you can cut to complete the project on-time. If you have a relatively well-defined project that needs to be completed to a strict deadline, consider looking into MoSCoW. {: .callout}
Feature-branch workflows
The Feature-branch workflow is a common way of structuring how you develop your code using version control, that sites like GitHub make easy to apply.
In the feature-branch workflow, you make use of the ease of creating new ‘branches’ with Git, parallel versions of your code that you can modify independently and easily merge back together.
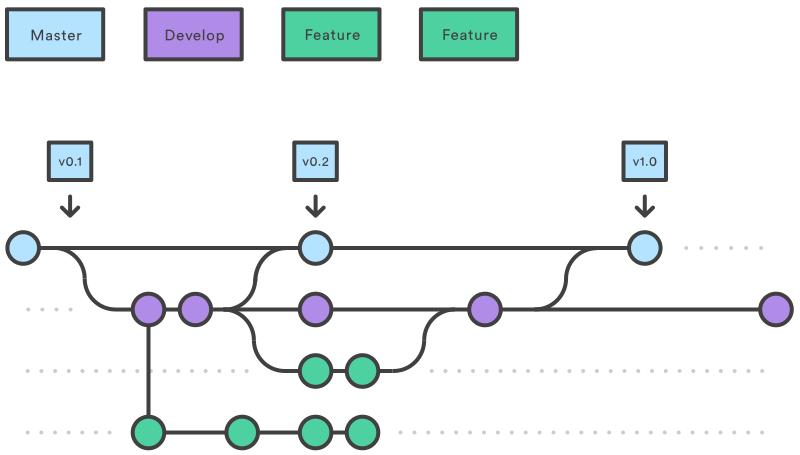
You have a main branch, that contains the stable version
of the code you want to share with other people, and create new
branches to add features to your code. When you’re happy with a
new feature, it’s fully-tested, and you want to share it with others,
you can make a Pull Request to merge your
feature branch in.
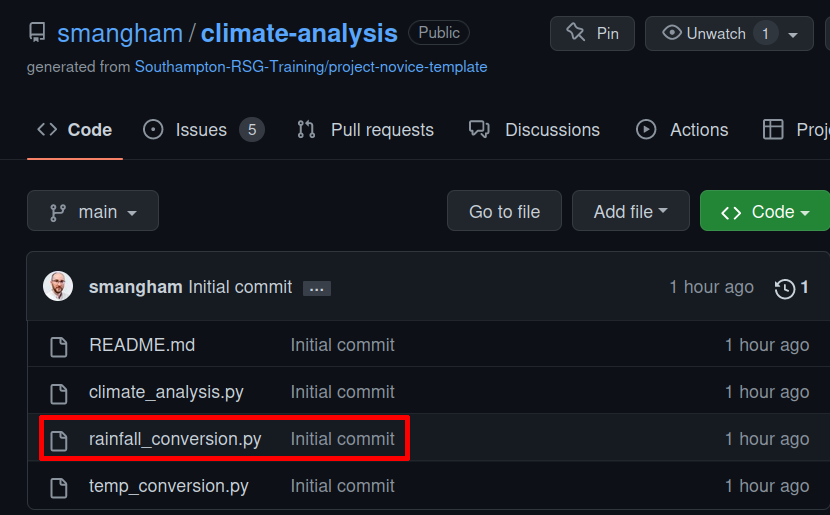
Let’s go back to our repository and select the
rainfall_conversion.py file:
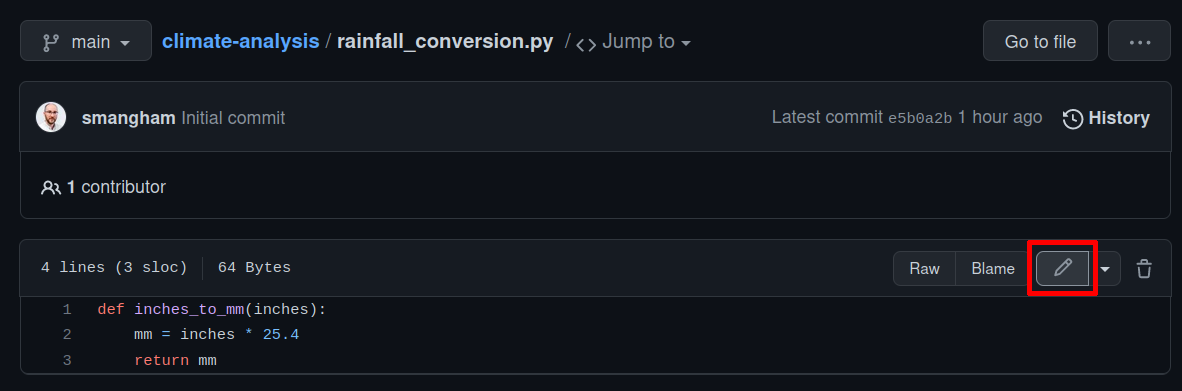
Now, click the Edit button (that looks like a pencil, on the right side of the text):
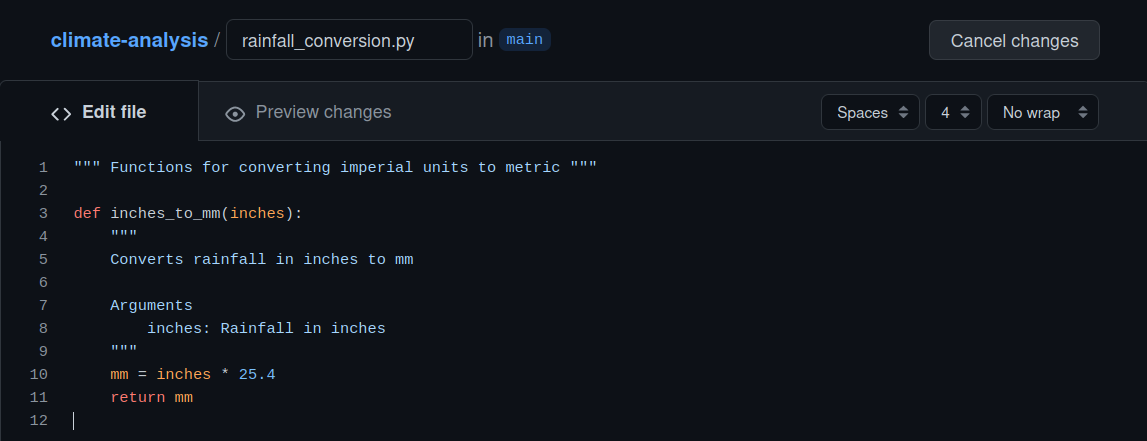
Then, add some comments to document the code in the file. Don’t worry if you don’t know Python - just write anything!:
We have to commit these changes to our repository. We’ll write a commit message - in this case, we can use the issue linking features we described earlier to connect it to issue #3. In case we want to keep working on this file and not just commit straight away, we’re going to select Create a new branch. Let’s name it after the issue that it solves, then click Propose changes:
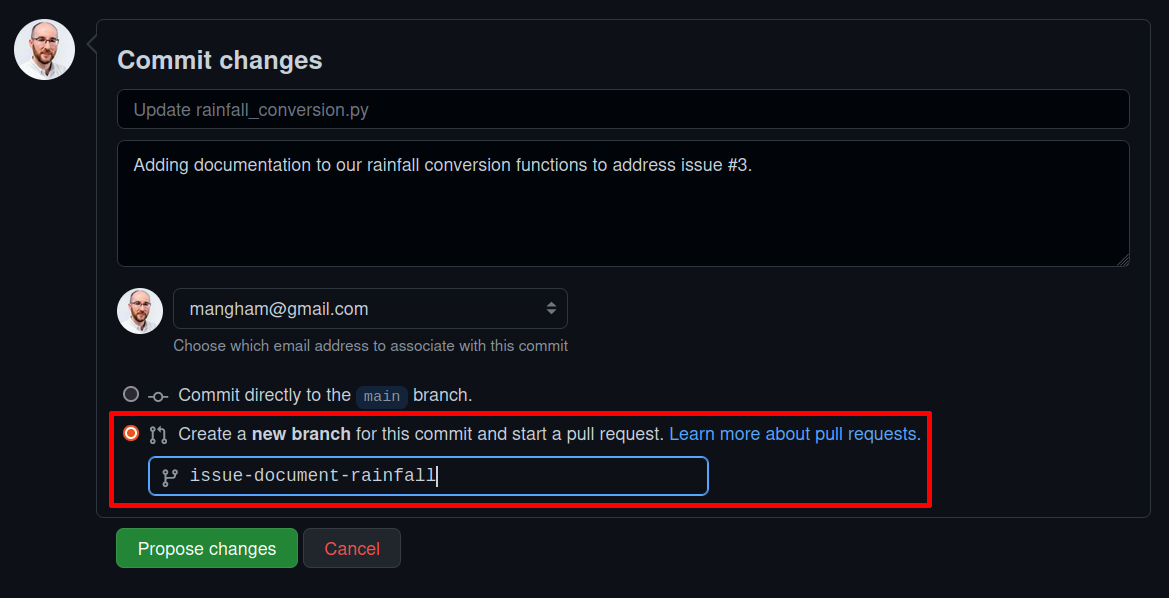
Now we have a Pull Request! We can keep our stable
version of the code on our main branch, and work on our
issue-document-rainfall branch until we’re happy, and then
action the pull request to merge it in. Until then, our changes don’t
affect the version on our main branch that our
collaborators are using. We can also see a summary of the changes we’ve
made in our pull request, and even request that others review them!
This makes it easy to work on multiple things at once - even if we’re
half-way through adding a new feature on one branch, we can deal with a
bug that a collaborator has run into by creating a new branch, fixing
the bug in that branch, and then doing a pull request to merge the fixes
in. If we weren’t using the feature-branch method and were working
directly on main, we’d have to finish and test our work on
adding a new feature before we could fix the bug!
Plus, we can easily add new developers to our code, and test new features in isolation to avoid confounding effects.
Best Practise
If we’re plan to use our code in publications, we can take this one
step further and add a dev branch. We update the
main branch whenever we publish a new paper - it contains
all the code and methods we’ve used in it, readily accessible for anyone
to reproduce our results.
The dev branch is the version we keep within
our collaboration, and it’s where we build up our work between
papers. Instead of making new feature branches off of
main, we work off of dev, and make pull
requests from our finished features back into dev too. Then
when we’re sure that all our features work well together, and we’re
using the code to make published results, we make a pull request from
dev back to main.
There’s some best practise associated with this workflow:
- When adding a new feature, use a feature branch, and test the feature in your feature branch.
- It’s OK to commit broken, work-in-progress code to a feature branch as it’s not expected to be ‘finished’ until you submit a pull request.
- Once your feature is tested and it’s ready to merge, submit a pull
request to
dev. - Don’t commit broken, work-in-progress code to
dev! If someone wants to make a new branch, or fix a bug, they’ll be usingdevas a base, so it needs to work fine. - Only pull from
devtomainwhen you thinkdevis stable. This is the version people will be downloading to verify the results from your papers.
In industry, there’s normally strict testing criteria for when you
merge in feature branches or merge dev into
main. That’s a lot harder to apply in academia - in an
experimental code, there is often no known ideal behaviour to test
against, and you expect your code’s output to change as you alter the
equations and assumptions.
Forks
‘Forking’ a repository is similar to creating a new branch, but on a much larger scale - you create your own copy of the whole repository, that is linked back to the original.
For some large projects, or open-source projects, it’s not practical to have all the collaborators working on the same repository. Multiple different developers might both create branches with the same name, leading to conflicts, and developers can end up with access to dozens of work-in-progress branches they don’t know anything about. Others limit the ability of unauthorised users to push to the repository to prevent abuse, or accidental uploads of sensitive or restricted material. In these contexts, it makes more sense for every collaborator to have their own fork. Then, once they finish work on a feature branch, they can submit a pull request back to the original.
We’re going to create a fork of an existing repository -
project-novice-demo. Go
to the repository on GitHub, and click Fork. You
can fork a repository to your own account, or any Team
you have access to. For now, we’ll make a personal copy:

As you can see, the fork looks and works just like a normal repository, but handily tells you how far you are behind the original.
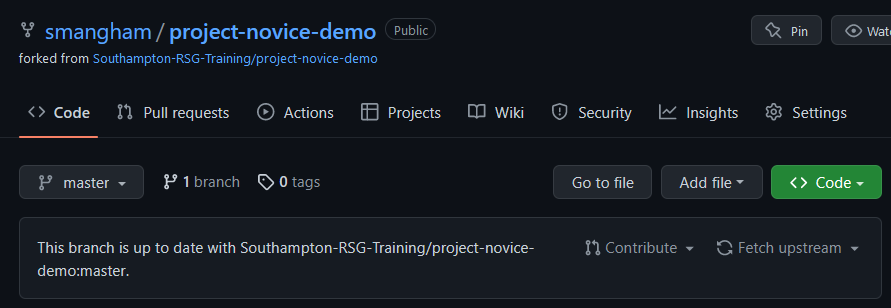
You may also be able to use forks to create modified versions of existing codes that better suit your needs, depending on their software license. It is good practise to submit your modifications and improvements back to the original, though.
- Projects are broken-down into self-contained tasks.
- Tasks are represented as cards on a board.
- Cards are arranged to show their status.
- Issues can be added to project boards and labelled.
- Project boards can show the priority of their tasks.
- Forks are copies of entire repositories that can be synced up with the original.
Content from Release Management
Last updated on 2026-05-31 | Edit this page
Estimated time: 20 minutes
Overview
Questions
- How can I manage the release of my code?
Objectives
- Explain how to create stable releases for software
- Explain how to generate a DOI for your software
- Explain software licenses, and how to apply them
Whilst managing the development of software is essential to produce good code, managing the distribution and release of the software is essential to produce impact. If your code can’t easily be found, used or worked on by collaborators, then the impact of your development work will be dramatically limited. Fortunately, repository hosting sites like GitHub and GitLab offer a wide range of tools to help.
Clarify Contributions
Maintaining a transparent record of who contributed what is essential
for collaboration and recognition. Tools such as git blame,
commit histories, and pull requests make it more straightforward to
identify individual roles in software and data development. Clear
attribution not only supports accountability within the team but also
provides verifiable evidence of individual input, which is valuable for
REF panels and other research assessments.
Releases
It is vitally important to cite your software. Software represents a huge expenditure of research time and energy, that is often invisible due to lack of citation. Many large software projects that underpin whole research communities are run by volunteers, because with no citations the work of the developers behind them is invisible to funders and institutions.
However, when software is cited, it’s often done poorly, creating a barrier to reproducibility. Often, as a software project evolves, the needs change- input files are expanded to take extra data, or output files are rearranged. Techniques are refined, and bugs are fixed. The end result of this is that frequently research done with older versions of the code cannot be reproduced with newer versions. Just referencing your software in your paper is equivalent to referencing a methods section that’s constantly being rewritten.
Fortunately, git commits provide you with a snapshot of the state of your software at a single point in time. We can avoid these problems by specifying which commit we used for a paper. Actual commit IDs, though, are a bit clunky to work with and commit messages are normally more focused on specific code changes than the scientific state of the code. Fortunately, GitHub and GitLab make it easy to create releases. A release is just a label for a specific version of the code.
If we create a new release when we arrive on the final version of the code we’re using in a paper, we can cite that specific version of the code - and anyone who wants to reproduce our work can easily get access to the version we used. We should make releases whenever we have a version of the code that’s stable and reliable enough we would be happy to share it with others.
Releases fit into the feature-branch workflow we discussed earlier. In this you have two key branches, main and development. You create branches off your development branch to work on new features, then when they’re relatively stable, you merge them back into the development branch. Then, after you’re happy the development branch is stable and reliable, you merge it back to the main branch. It’s those commits to the master branch that can become your releases.
To GitHub
If you go back to your climate-analysis repository
homepage, you can use the Create a new release
link:
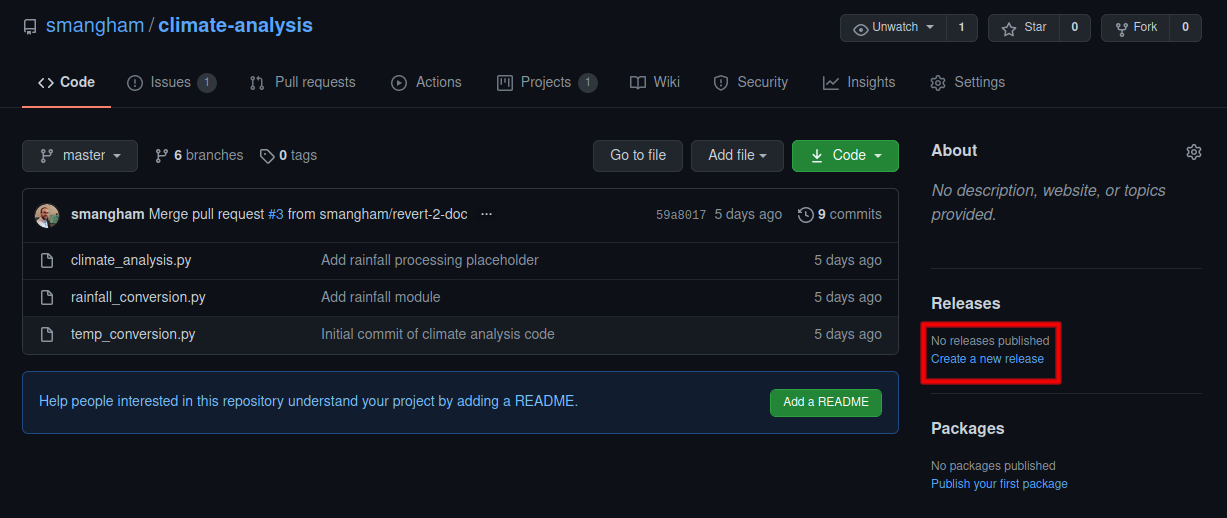
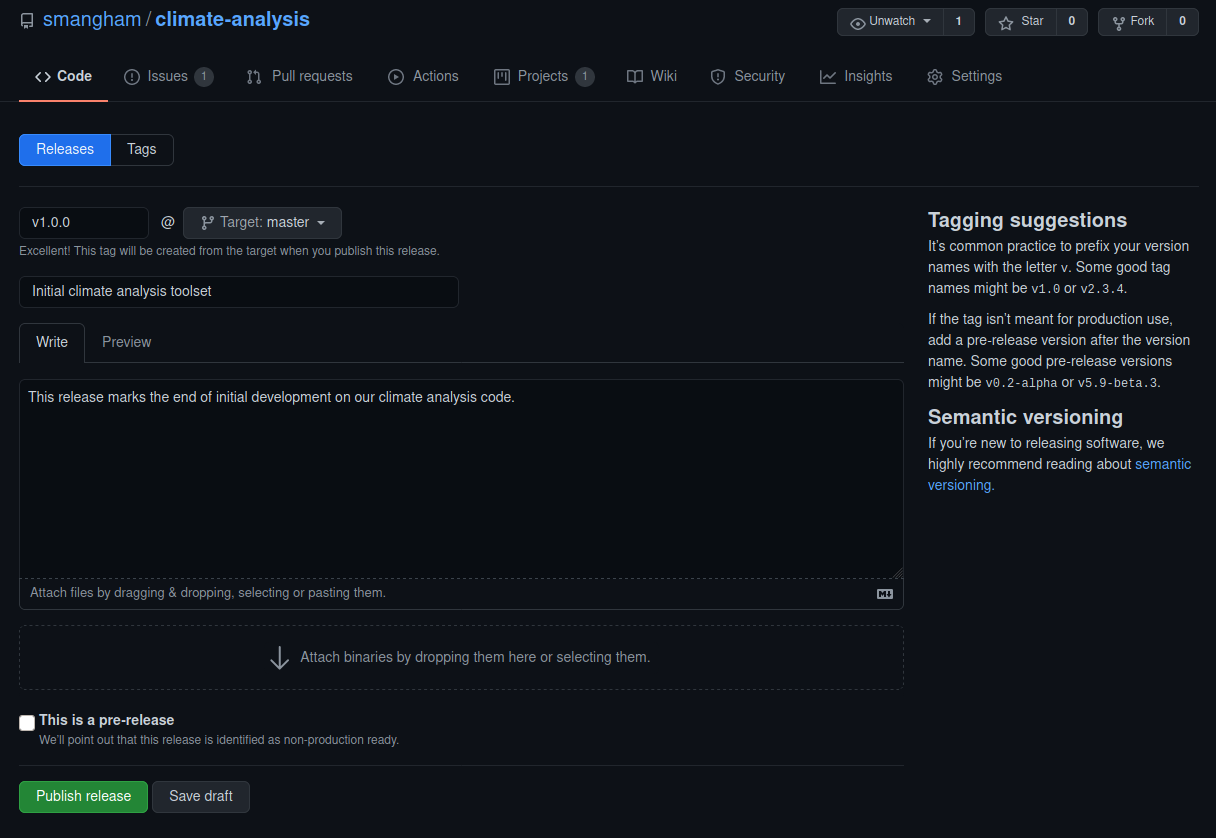
We just need to give the release a name, description, and a tag:
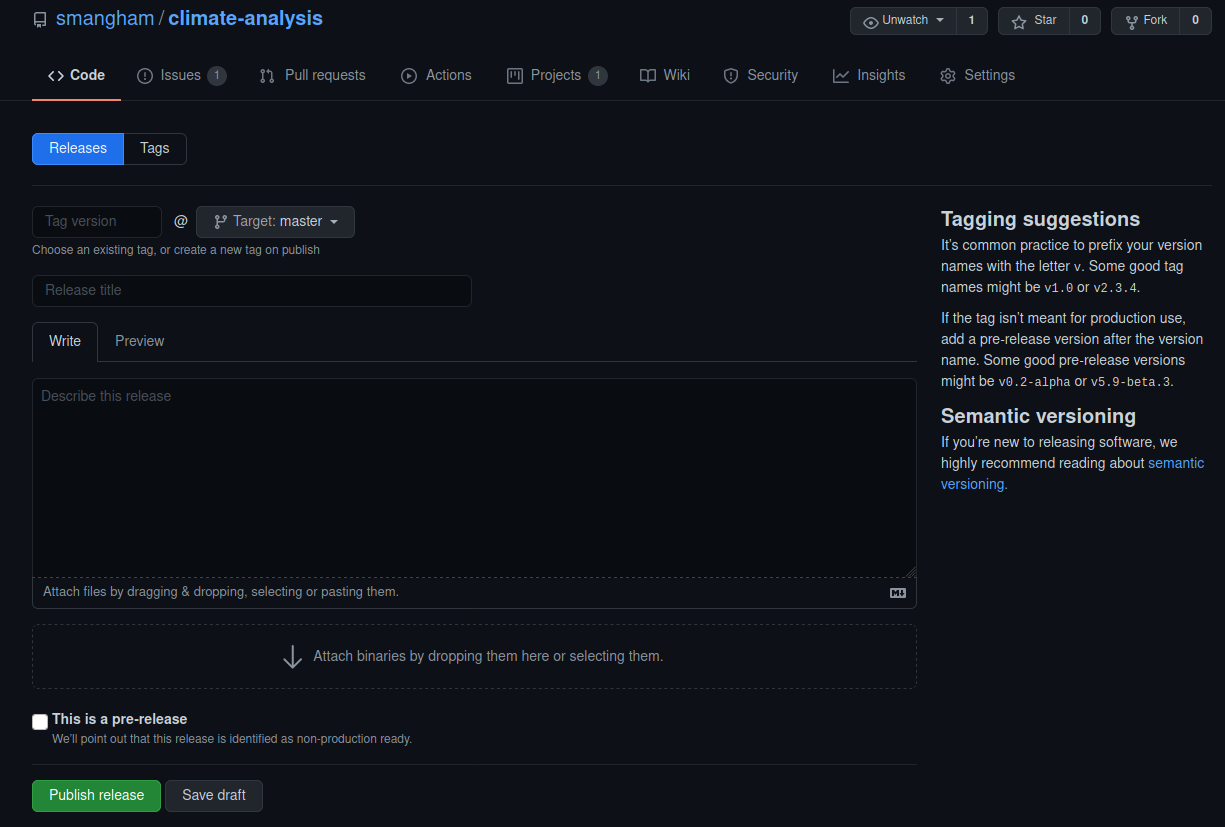
Whilst the name is often descriptive or a project-specific codename, the tag is usually a sequence of numbers. There are a range of strategies for tagging releases, but the most common is semantic versioning, where you tag a release in the format of v1.0.0. Then:
- If you fix some bugs and perform a release, increment the
last number, e.g.
v1.0.0tov1.0.1. - If you add some new functionality in a backwards-compatible
way, then increment the second-to-last number
and reset the last number, e.g.
v1.0.1tov1.1.0. - If you change your code so much it’s no longer backwards
compatible (for example, your input files require a new
variable so it can no longer run older ones), then increment the
first number and reset the others, e.g.
v1.1.0tov2.0.0.
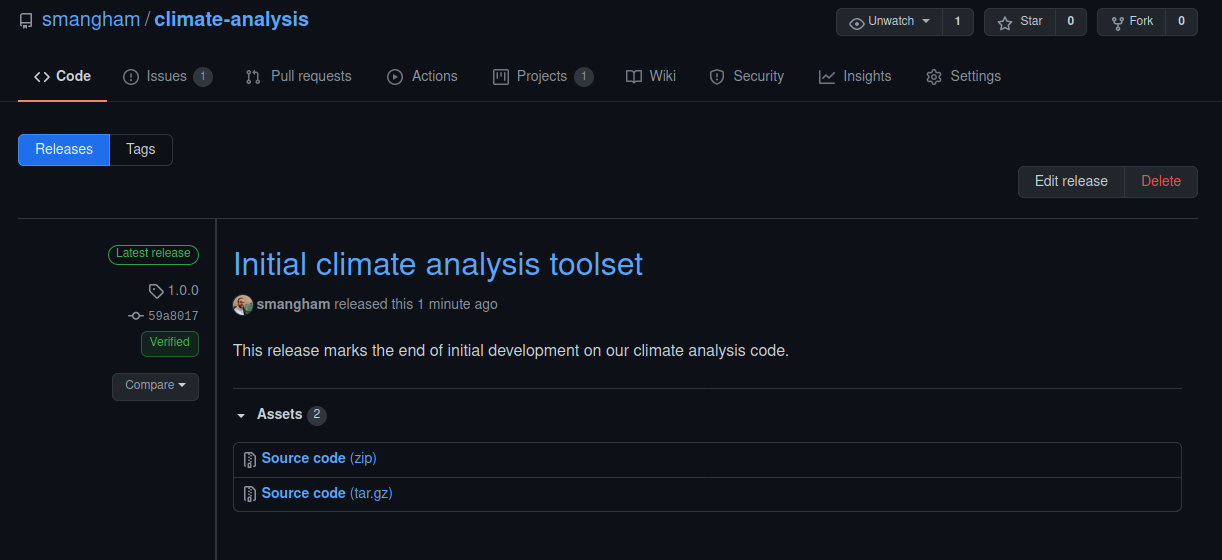
This lets your collaborators know when they can safely update without breaking their ongoing work! Once we’ve decided on a tag, we can click Publish release and get a page with our description of our release, links to the git commit uses to generate it, and easy-to-download copies of the source code too:
Limitations of releases
If our code has dependencies like Python modules, we need to make
sure that we include information on the specific versions of the
dependencies too when creating a release. Python is well set-up to deal
with this, as it can use pip freeze to produce a
requirements.txt file with the current version of all the
modules you’re using.
For more complicated dependencies, there are a range of approaches.
The simplest is to list the versions of your dependencies in your
README.md. Depending on the software
licences of your code and its dependencies, you may be able to
package them in your repository.
For low-level codes, you’ll also need to list the compiler
versions and architectures used. High-performance codes can be
very dependent on compiler and library versions, so simply
listing “GCC and OpenMPI” can cause a lot of pain.
Instead, use the output of calling the compilers with the
-v or --version flag to make sure you’re
getting the correct information,
e.g. gcc version 9.3.0.
Bear in mind, though, that you will need to keep this information up to date if your dependencies change. ‘Stale’ documentation can be almost as bad as no documentation.
Issuing DOIs
Releases make it easy for others to reference a specific version of your code. However, if you want to track those citations, and to add the work to your academic profile on sites like ORCID, you’ll want a digital object identifier (DOI) for your release. Many Universities have internal systems for issuing DOIs for software, managed by libraries or research output administrative teams. Alternatively, Zenodo allows you to upload datasets, presentations or other files to get a cached version with a specific DOI, and automatically links the DOIs to your ORCID account.
Zenodo has great integration with GitHub, allowing you to automatically generate a DOI for any new releases on a repository. GitHub provide a very clear guide on how to do this: Citable code. Note, however, that Zenodo can only issue DOIs for publicly-visible repositories. This can be a problem if you need to keep your code private due to industrial collaborations.
Zenodo offers a ‘sandbox’, where you can test the process for
creating a new DOI (as creating a DOI on their proper website is
irreversible!). We’ll use the sandbox at sandbox.zenodo.org to create a DOI
for our climate-analysis repository by registering it via
Zenodo’s GitHub link and creating a new release on GitHub.
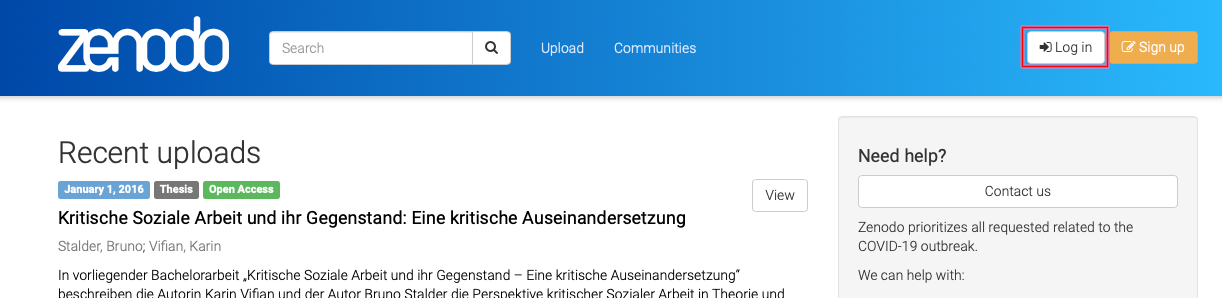
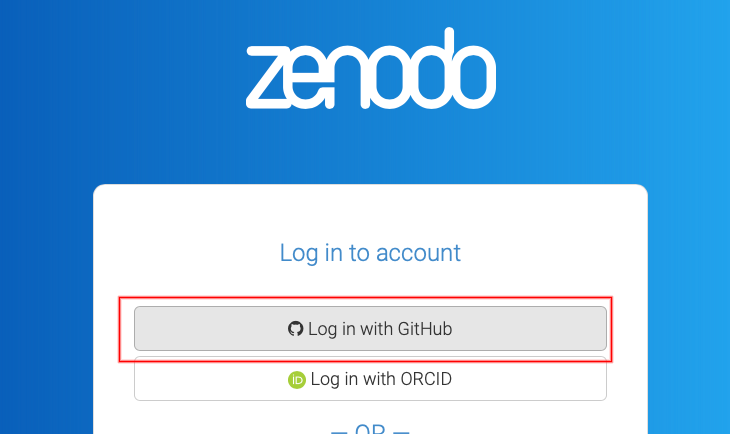
First, making sure we’re on sandbox.zenodo.org, we need to
sign up using our GitHub account - using Log in or
Sign up, and and selecting GitHub.
Once you’ve logged in, selecting GitHub from the
drop-down menu opens a list of your repositories, and we can toggle them
to ‘on’ to begin tracking releases on them. 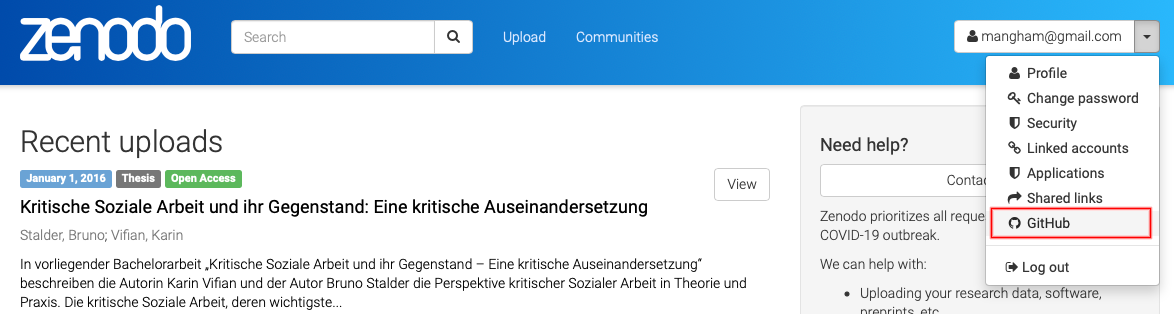
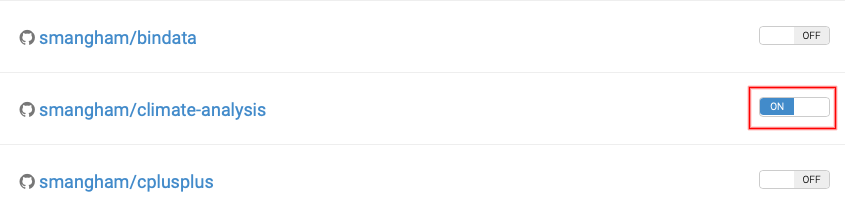
Zenodo won’t retroactively generate DOIs for releases, so we need to
head back to GitHub, and create a new release, then go
back to Zenodo and click on our repository to see the
status of our upload. 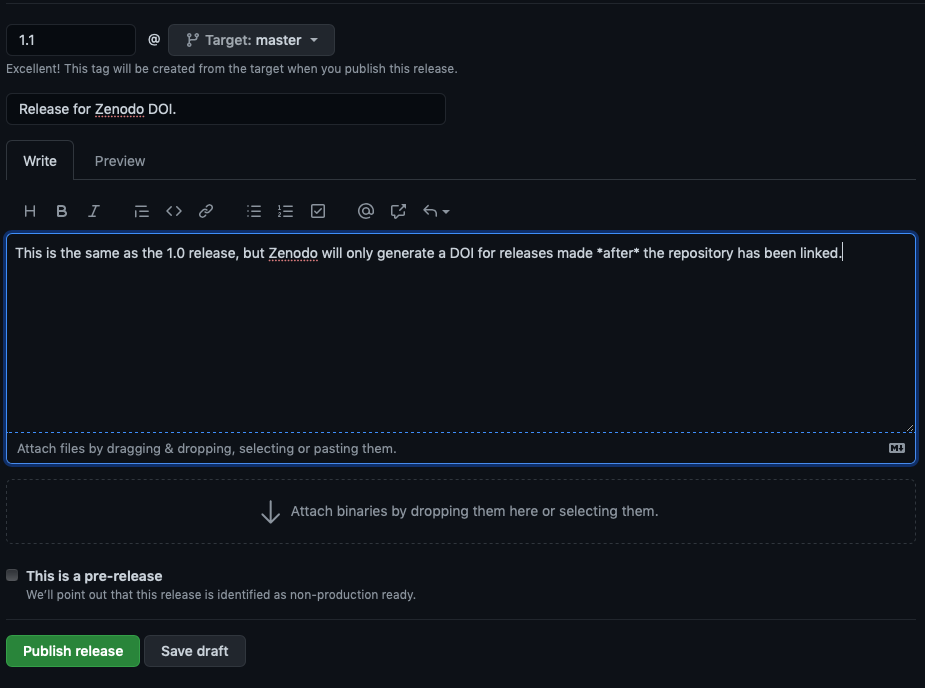
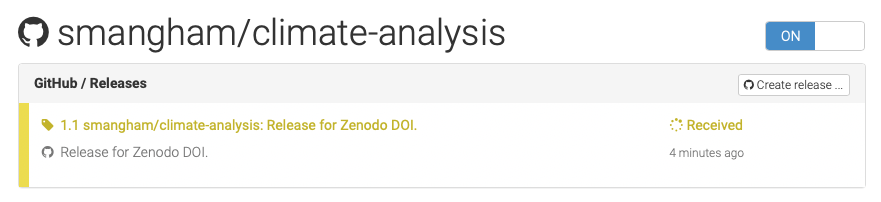
Depending on how busy Zenodo is, this can take anything from minutes
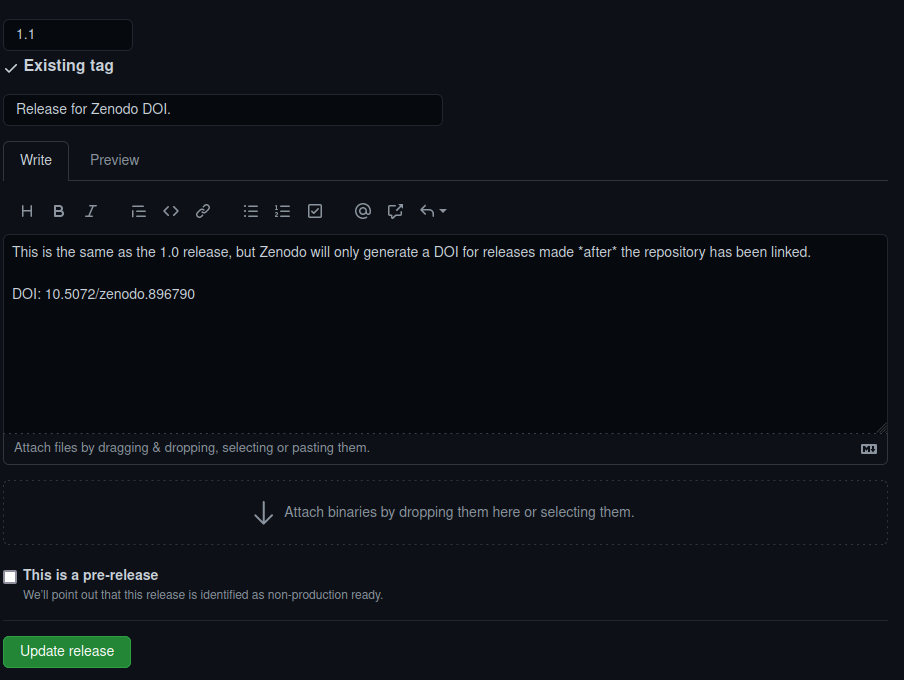
to hours to process. Once it’s done, though, you get a DOI, which we can
then edit into the message for our release. 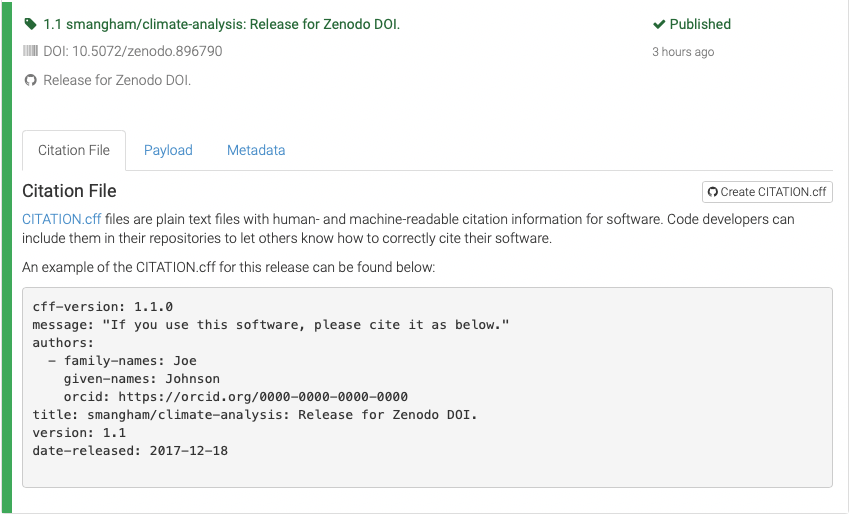
Chickens and Eggs
There’s one slightly annoying quirk with using Zenodo to generate DOIs; you only get the DOI after creating the Release for a commit.
This means you can’t put the DOI for a commit in the
README.md or a CITATION.cff file for that
commit. Unfortunately, there’s not really a good way around this! A
work-in-progress project called Zenodraft is aiming to
provide a solution by pre-reserving DOIs, and Zenodo say they are
looking into the issue further.
Citation Files
You’ll have noticed the Zenodo upload gives you a template
CITATION.cff file. This is a handy way of letting people
who use your code know how you’d like to be cited. There’s more detail on
these files here, but one of the most important features is the
ability to add your ORCID, to easily
link you to your code in a way that’s not dependent upon your university
email address. You can also request users cite multiple DOIs - for
example, the DOI of a commit, and one of a release paper.
GitHub now also supports CITATION.cff files. A repo with
one will have a button informing users of how to cite it, and providing
a pre-made BibTex citation.
Adding a CITATION.cff
Using the template from Zenodo, add a CITATION.cff file
to your repository, then push it to GitHub.
Contents of CITATION.cff:
YAML
cff-version: 1.1.0
message: "If you use this software, please cite it as below."
authors:
- family-names: Mangham
  given-names: Sam
  orcid: https://orcid.org/0000-0001-7511-5652
- family-names: Crouch
  given-names: Steven
  orcid: https://orcid.org/0000-0001-8985-6814
title: Climate Analysis Code
version: 1.1
doi: 10.5072/zenodo.896790
date-released: 2021-08-26OUTPUT
[master 88ed80d] Added citation instructions
1 file changed, 13 insertions(+)
create mode 100644 CITATION.cffOUTPUT
Enumerating objects: 4, done.
Counting objects: 100% (4/4), done.
Delta compression using up to 4 threads
Compressing objects: 100% (3/3), done.
Writing objects: 100% (3/3), 510 bytes | 510.00 KiB/s, done.
Total 3 (delta 1), reused 0 (delta 0), pack-reused 0
remote: Resolving deltas: 100% (1/1), completed with 1 local object.
To github.com:smangham/climate-analysis.git
   d596ad4..88ed80d  master -> master
Now, when we check on GitHub, there’s a button that provides a BibTex
(or APA) format citation for your code. 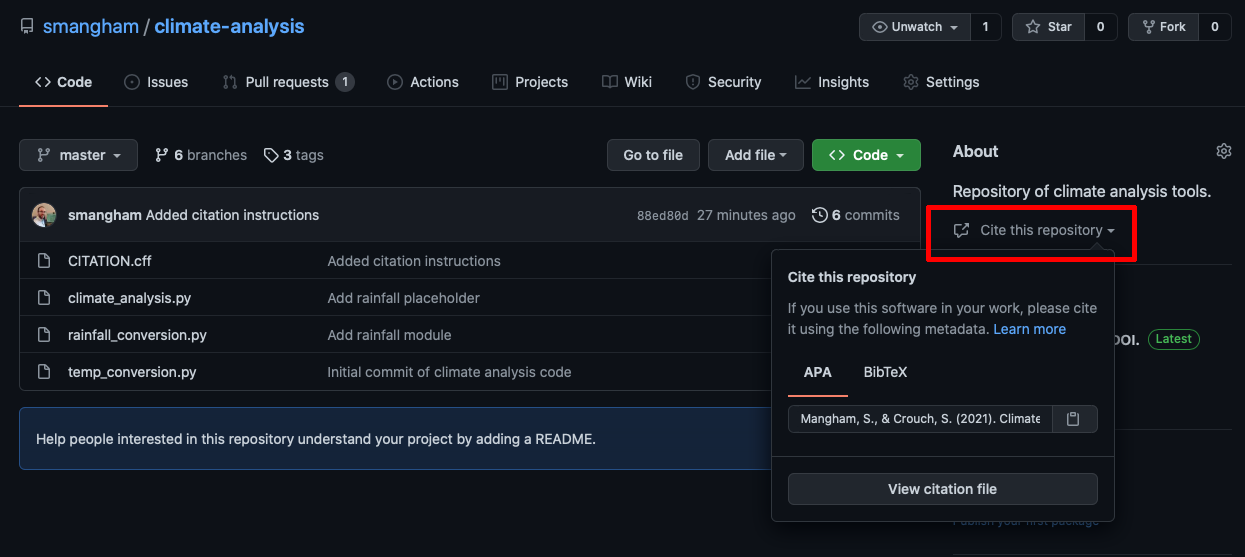
Software licensing
Software licensing can be a whole topic in itself, so we’ll just summarise here. Your institution’s Intellectual Property (IP) team will be able to offer specific guidance that fits the way your institution thinks about software.
In IP law, software is considered a creative work of literature, so any code you write automatically has copyright protection applied. This copyright will usually belong to the institution that employs you, but this may be different for PhD students. If you need to check, this should be included in your employment / studentship contract or talk to your university’s IP team.
Since software is automatically under copyright, without a license no one may:
- copy it
- distribute it
- modify it
- extend it
- use it (unclear - this has not been properly tested in court yet)
Fundamentally there are two kinds of license, Open Source licenses and Proprietary licenses, which serve slightly different purposes.
Proprietary licenses are designed to pass on limited rights to end users, and are most suitable if you want to commercialise your software. They tend to be customised to suit the requirements of the software and the institution to which it belongs - again your institutions IP team will be able to help here.
Open Source licenses are designed more to protect the rights of end users - they specifically grant permission to make modifications and redistribute the software to others. The website Choose A License provides recommendations and a simple summary of some of the most common open source licenses.
Within the open source licenses, there are two categories, copyleft and permissive. The permissive licenses such as MIT and the multiple variants of the BSD license are designed to give maximum freedom to the end users of software. These licenses allow the end user to do almost anything with the source code.
The copyleft licences in the GPL still give a lot of freedom to the end users, but any code that they write based on GPLed code must also be licensed under the same license. This gives the developer assurance that anyone building on their code is also contributing back to the community. It’s actually a little more complicated than this, and the variants all have slightly different conditions and applicability, but this is the core of the license.
Which of these types of license you prefer is up to you and those you develop code with. If you want more information, or help choosing a license, the Choose An Open-Source License (linked here) site can help.
Track and Evidence Software Reuse
Once software or data have been released, tracking their reuse provides valuable insight into impact.
Monitoring metrics such as GitHub stars, forks, downloads, or formal citations can demonstrate how widely a tool is being adopted. These indicators contribute quantitative evidence for impact case studies and funding reports. Integrating reuse tracking into project management processes helps maintain an overview of how research outputs are used beyond the original project.
- Releases are stable versions of the code.
- Zenodo can automatically generate DOIs for releases.
- Software licenses can restrict what others can do with your code.
Content from Writing Sustainable Code
Last updated on 2026-05-31 | Edit this page
Estimated time: 25 minutes
Overview
Questions
- How do I write code to make future development easier?
Objectives
- Understand the benefits of making your code more readable.
- Rename variables and functions to be more descriptive.
- Understand how to use comments to describe the code.
- Use docstrings to describe the inputs and outputs of functions.
Now we’ve covered the process around developing and releasing our software. However, one key part of software development we haven’t touched on yet is the code itself. No matter how well we manage our development, if we don’t write sustainable code, then our project will suffer.
One major problem in software development is technical debt - a term for when decisions made early-on in the project (often made on the fly without much thought) end up causing long-term problems, and require a major expenditure of effort to fix (or to pay off the technical debt). If you accrue too much technical debt without fixing it, the whole project can become unsustainable, and the effort required to fix them becomes so large you have to throw the project away and start from scratch.
So when developing academic software, we need to make sure it’s sustainable. One of the key factors for this is keeping your code readable and maintainable. We want to minimise the amount of effort required for you (or others) to read your code, understand what’s going on, and make changes to it.
In this episode, we’re going to use python as an example language. The kind of principles we discuss will be applicable to any language!
Naming Things
Good names are one of the key requirements to make a code easy to
maintain. Take a look at the temp_conversion.py file in our
climate-analysis repository:
What do these functions actually do? From the context of the filename
(temp_conversion.py) we can make a good guess that they’re
probably functions for converting temperatures in Fahrenheit into
Celsius and Kelvin, but it’s not especially clear. When you see these
functions referred to in other files, though, their behaviour’s
a lot less clear. Consider seeing this pop up in another file:
It just isn’t immediately clear. The more complex your code gets, the harder it becomes to figure out what it does from context clues and scattered comments and the harder it gets to maintain it.
It’s much easier to upkeep a code where what happens on each line is clear on that line (it’s especially easier for people who didn’t write it in the first place and have had it passed on to them!). We want to make our functions a little clearer, and there’s some common naming recommendations:
- Variables are usually lower case (e.g.
speed,participant_age) - Classes are typically capitalised nouns
(e.g.
Molecule,BlackHole,DNASequence) - Functions are typically verbs
(e.g.
calculateOrbit,splice_gene_sequence)
We’ll rewrite the Fc function to follow those
guidelines:
Whilst these names are a lot longer than x and
Fc, text editors like Visual Studio Code
offers code completion. You can start typing c and be
prompted with your function convert_fahr_to_celsius. Not
only does this mean it’s no more difficult or time-consuming to write
easily-maintainable code, it also helps avoid you making typos! If your
variables are f, g and v, a
single mispressed key can cause you a world of trouble.
Fixing Functions
Now we’ve re-written Fc to
convert_fahr_to_celsius we need to rewrite FK
to match. Either in a text editor, or on GitHub, fix FK to
match convert_fahr_to_celsius.
We want to keep the style and naming internally consistent as best we
can, so the new FK should look something like:
PYTHON
def convert_fahr_to_kelvin(fahr):
    celsius = convert_fahr_to_celsius(fahr)
    kelvin = celsius + 273.15
    return kelvin
Now every single line of the function is explicit about what it does - you don’t need to make any guesses!
Naming Styles
There’s two main styles of naming multi-word variables, camelCase and snake_case. Some languages have common standards which recommend which to use, but in general it’s good to be consistent whichever you pick!
Python recommends capitalised CamelCase for classes, lower-case snake_case() for functions and variables, and upper-case SNAKE_CASE for constants.
Single-Character Names
You might think that some single-character names are perfectly clear
- for example, C obviously refers to the speed of light!
Unfortunately, not everyone will agree. Any mathematical libraries you
use are likely to have their own interpretation of what each letter
should stand for that are likely to be at odds with your field’s
definitions. If so, this can lead to some very inconvenient errors to
debug.
In general, it’s best to give everything a name at least three
characters long. You might use a prefix, e.g. CONST_C for
‘constant’, or a more verbose description,
e.g. V_LIGHT.
Defensive Programming
Generally, when we write code we have a pretty solid idea of how we’re expecting to use it - and, importantly, its limitations. We know the input file formats we’re expecting, the range of physical parameters we can simulate, that kind of thing. But it’s very easy to accidentally push code beyond its limits. Then, it can end up simply giving answers that don’t make sense, or worse, are plausible but wrong. We call problems like this silent errors, and you tend to only find out about then when it’s too late - they’ve already quietly ruined weeks of work.
Imagine if we were using our code to calculate the average
temperature in a series of climate data files, but it turns out
one of them has missing temperature readings for some dates.
Since 0 is a valid temperature, whoever made the file
indicated missing readings with an impossible temperature value of
-999. Our functions will happily convert that to
-572.7 degrees Celsius, and drag down our average
without telling us!
Instead, we’ll make sure that if our code tries to do something we never intended it to do, it stops, and lets the user know:
PYTHON
def convert_fahr_to_celsius(fahr):
    celsius = (fahr - 32) * (5 / 9)
    if celsius < -273.15:
        raise ValueError(
            f"Trying to convert impossible temperature: {fahr}F"
        )
    return celsius
It’s easy to go overboard on defensive programming, but making incorrect assumptions about the values your functions will be given can be costly. Multiple space missions like the ESA’s first Ariane 5 rocket, NASA’s Mars Climate Orbiter and the Japanese Hitomi X-ray telescope have been destroyed by failing to check whether or not a value makes sense.
Documenting Your Code
If your code has descriptive variables and function names, then it should go a long way towards making it clear what it does. But unfortunately, codes of any real size rapidly become too complicated to understand just by reading the code! Even if your code doesn’t start that large, it will almost certainly end up that way. So it’s a good idea to write clear documentation from the start, to make sure you don’t have to go back and do it later.
Comments
If you’ve used clear variable names, then the actual logic and processes of the code should be readable from the text. So with comments, we can describe things in more detail - explaining what’s going on at a high level, or things that aren’t immediately obvious.
In Python, you can comment your code by starting a line with a
# (other languages use a different comment character, like
%, ! or //):
PYTHON
def convert_fahr_to_celsius(fahr):
    celsius = (fahr + 32) * (5 / 9)
    if celsius < -273.15:
        # If temperature is below absolute zero, throw an error
        raise ValueError(
            f"Trying to convert impossible temperature: {fahr}F"
        )
    return celsius
You can also add these at the end of lines, e.g.:
PYTHON
def convert_fahr_to_celsius(fahr):
    celsius = (fahr + 32) * (5 / 9)
    if celsius < -273.15:  # If temperature is below absolute zero, throw an error
        raise ValueError(
            f"Trying to convert impossible temperature: {fahr}F"
        )
    return celsius
A good rule of thumb is to assume that someone will always read your code at a later date, and this includes a future version of yourself. It can be easy to forget why you did something a particular way in six months time.
They should be able to understand a single function or method from its code and its comments, and shouldn’t have to look elsewhere in the code for clarification. It can be easy to get lost in code, and others will not have the same knowledge of our project or code as we do.
The kind of things that need to be commented are:
- Why certain design or implementation decisions were adopted, especially in cases where the decision may seem counter-intuitive
- The names of any particular equations you’ve implemented or algorithms you’ve used
- The format of input or output files the code uses
There are some restrictions. Comments that simply restate what the code does are redundant, and comments have to be accurate, as an incorrect comment is more confusing than no comment at all.
Docstrings & Type Hints
For your functions, it can be incredibly helpful to have this documentation on what they do in a structured way. The key properties of a function are what it does, what arguments it takes, and what values it returns. If you have this information everywhere, then when you’re scanning through the code and come across a function, you can just hop over and check out the summary and you’ll know exactly what’s going on.
We’re going to look at an example of how to do this in Python. If the
first thing in a function is a string that isn’t assigned to a variable,
that string is attached to the function as its documentation. We’ll do
this for our convert_fahr_to_celsius function (in this
example, using the Sphinx
docstring format, which we’ll get to later). We’ll also add
type hints, optional extra detail on what type of data
each variable is:
PYTHON
def convert_fahr_to_celsius(fahr: float) -> float:
    """
    Given a temperature in Fahrenheit, converts it to Celsius

    :param fahr: The temperature in Fahrenheit
    :raises ValueError: If the temperature is below absolute zero
    :return: The temperature in Celsius
    """
    celsius: float = (fahr + 32) * (5 / 9)
    if celsius < -273.15:
        raise ValueError(
            f"Trying to convert impossible temperature: {fahr}F"
        )
    return celsius
This documentation lists the input variables (as
:param VARIABLE_NAME: Description), what the function
returns (:return: Description), and any errors it might
raise too (:raises ErrorType: Description). Along with a
helpful description of what the function does, this information can act
as a contract for readers to understand what to expect in terms
of behaviour when using the function, as well as how to use it. We can
also detail the type of variable the arguments are expected to be with
hints like : int or : str, as well as
describing what the function should output
(e.g. -> float).
This kinds of clear, firm description of a function provides a solid basis for future development. If you write a function that can only take positive numbers, but don’t document that, then someone else might try and feed it negative numbers without realising that’s not possible. Then, they’ll be faced with a crash at best, or another silent failure.
These types of comments are called docstrings in Python. We don’t need to use triple quotes when we write one, but if we do, we can break the string across multiple lines.
Writing Docstrings
Now we’ve written a docstring for
convert_fahr_to_celsius we need to write one for
convert_fahr_to_kelvin to match, again either on GitHub or
in a text editor.
As before, we’ll use the same format to make the code easier to read:
PYTHON
def convert_fahr_to_kelvin(fahr: float) -> float:
    """
    Given a temperature in Fahrenheit, converts it to Kelvin

    :param fahr: The temperature in Fahrenheit
    :return: The temperature in Kelvin
    """
    celsius: float = convert_fahr_to_celsius(fahr)
    kelvin: float = celsius + 273.15
    return kelvin
In this example the comments for this function are longer than the code, but once you have a function that’s a hundred or more lines long the value of a clear summary quickly increases!
You can also write docstrings for entire Python modules. It’s useful to have a brief description of a module’s purpose, and a list of the classes and functions within it. It’s a bit redundant for our small example, but for a large project it can be a real timesaver:
PYTHON
"""
A module for converting temperature from Imperial to Metric units.
Will throw ValueErrors for temperatures < absolute zero.

Functions:
    convert_fahr_to_celsius: Converts Fahrenheit to Celsius
    convert_fahr_to_kelvin: Converts Fahrenheit to Kelvin
"""
Every language has a few common standards for documentation - for Python, they’re the Sphinx, Google and Numpy formats.
It’s a good idea to stick to a standard not just because it makes it easier for others to read your comments, but because these standards are also machine-readable. Well-formatted comments can be converted by tools like Sphinx & ReadTheDocs) into a searchable website, and you can even include images, LaTeX equations or Jupyter Notebooks. PoliAstro is an example scientific project using ReadTheDocs to include not just function documentation generated from its code, but full installation instructions and a list of references.
Help
For languages like Python, docstrings are particularly useful as
they’re what’s displayed when you use help to get more
information about a function.
If you have installed Python and downloaded your
climate-analysis repository, you can test this by opening a
terminal, navigating to the repository, and launching a Python
interpreter with the command python then trying:
- Always assume that someone else will read your code at a later date, including yourself.
- Rename variables and functions to add context to make your code more readable.
- Add comments to explain why something was done in a certain way if not obvious.
- Don’t add comments that just restate what code clearly already does.
- Use docstrings at the start of functions and files to explain their behaviour and input/output parameters.
Content from Managing a Mini-Project
Last updated on 2026-05-31 | Edit this page
Estimated time: 25 minutes
Overview
Questions
- How do we put everything we’ve learnt together?
Objectives
- Go through the steps of managing a small software project.
Now we’ve seen all the steps involved in developing sustainable code, let’s put that knowledge into practise.
Earlier, we made a fork of the project-novice-demo
repository. The code there is pretty bad - it’s written in a very
unsustainable way that makes future development harder (and passing the
project on to another researcher even harder!). However, as a published
project owned by somebody else, we don’t have the permissions required
to edit it and fix the problems.
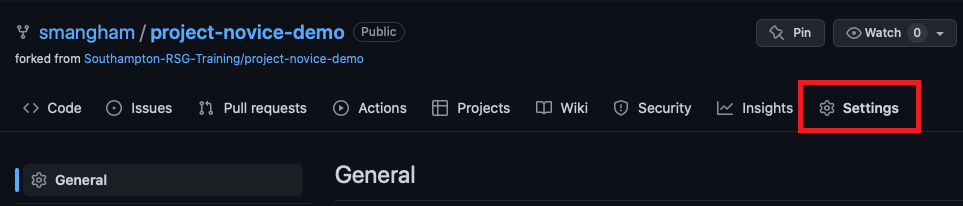
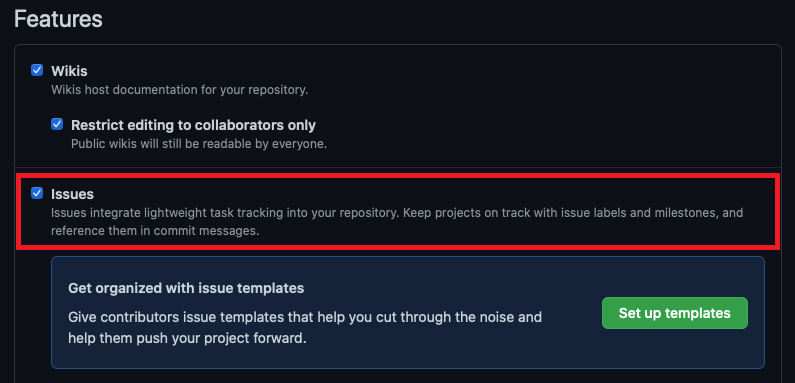
Fortunately, we have already forked it, and now we’re going to set up a small project to improve it. We’ll use the tools we’ve introduced in this lesson so far. Forks don’t have Issues by default, but you can enable them by going to the Settings tab, then scrolling down to Features:
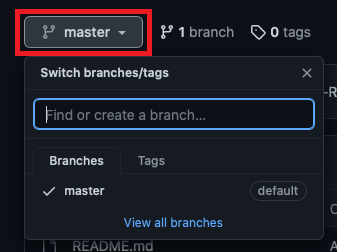
Now we can start looking for problems with the project and recording
them as issues. One immediate one is that there’s no
develop/dev branch - all the work has been
done on the master/main branch:
Identifying issues
We’ve found one problem, but there’s plenty more here. Take
a look at your fork of the project-novice-demo repository,
identify two more things wrong with the code, and raise them, along with
the lack of a dev branch, as issues. Don’t try to run the
code - there’s more than enough things wrong with it that you can spot
just from a quick read-through. Once you’ve got your issues, create a
new project board, link it to the repo, and place the issues on it.
There’s too many things wrong to provide an exhaustive list, but here’s a few you may have spotted:
- No stable releases
- Unclear commit messages
-
LICENSE.mdis empty -
README.mdhas an inaccurate list of files -
README.mdcontains broken links -
What questions do we want to answer with this data?is unfinished - Multiple versions of the same file in the repository
- Poorly-named functions (e.g.
add_column5) - Poorly-named variables (e.g.
df47) - Poorly-documented functions
*(e.g.
plot_bar_charts) - Undocumented functions (e.g.
produce_count)
We’ll go to the Issues tab of our
project-novice-demo, repository, select New
Issue, then create an issue. We can even link our issue
directly to our project board from here: 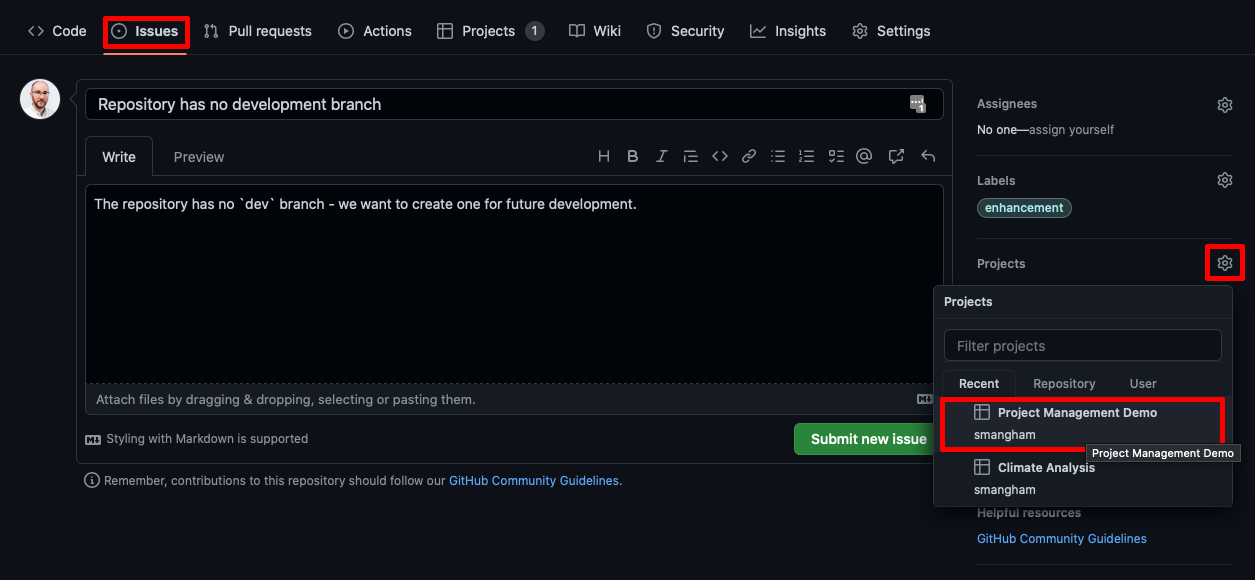
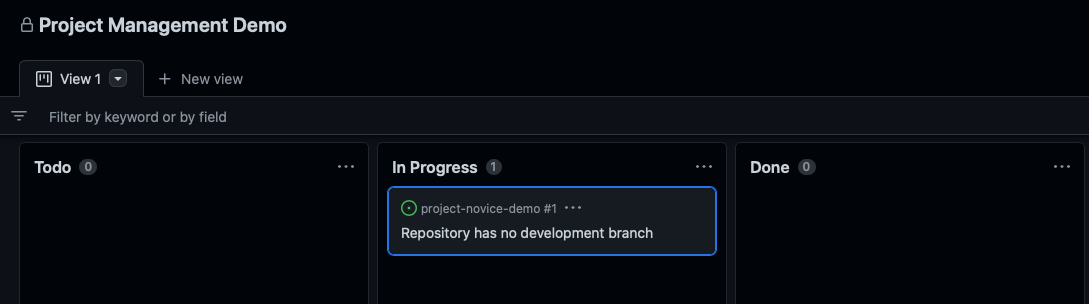
Now we’ll work on addressing the issues we’ve raised. If we want to
use the feature-branch workflow, the lack of a dev branch
is the first one we need to fix! So we’ll address that first. We go back
to our project via the Projects tab, and move the issue
to the In progress column of our kanban board to let
our collaborators know we’re fixing it:
Now we’ll clone our repository to our machine:
OUTPUT
Cloning into 'project-novice-demo'...
remote: Enumerating objects: 28, done.
remote: Counting objects: 100% (28/28), done.
remote: Compressing objects: 100% (17/17), done.
remote: Total 28 (delta 13), reused 20 (delta 10), pack-reused 0
Receiving objects: 100% (28/28), 8.32 KiB | 8.32 MiB/s, done.
Resolving deltas: 100% (13/13), done.
Then create a new branch called dev and push it to our
remote repository:
OUTPUT
Switched to a new branch 'dev'OUTPUT
Total 0 (delta 0), reused 0 (delta 0), pack-reused 0
remote:
remote: Create a pull request for 'dev' on GitHub by visiting:
remote:      https://github.com/smangham/project-novice-demo/pull/new/dev
remote:
To github.com:smangham/project-novice-demo.git
 * [new branch]      dev -> dev
branch 'dev' set up to track 'origin/dev'.
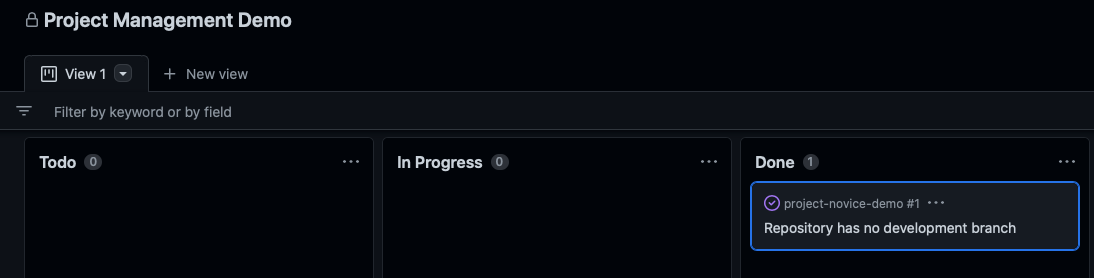
With our work finished, we can close our issue and move it to the ‘Done’ column:
GitHub Web Interface
We suggest fixing this issue by cloning the repository, to run through an example of linking up git and GitHub, but it can also be done via the web interface on GitHub.
If you open the list of branches (where we saw there was no
dev branch), we can click View all
branches:
On this page, we can click New branch on the right side to create a new branch:
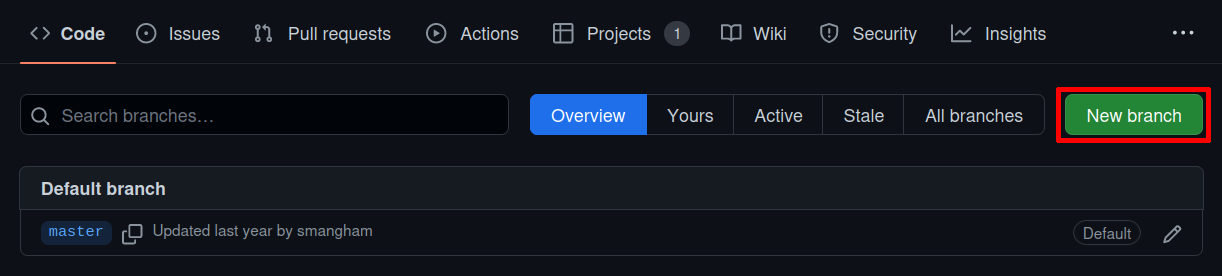
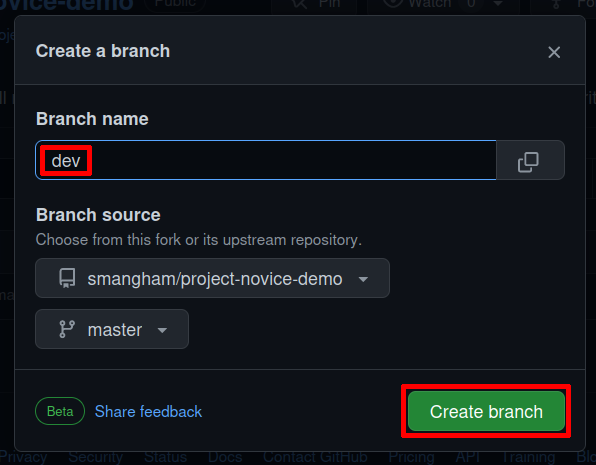
Then in the pop-up we can name the branch dev and create
it:
Solving Problems
Now we’ve got a dev branch and a project board with a
Todo column with issues in, we can set about fixing one
of them.
We want to use the feature-branch workflow, so it would be easy to
collaborate with other people. Pick one of your open issues, and fix it
using the feature-branch workflow, then once it’s done issue a release
of your updated master branch!
If you don’t have any issues that can be fixed with the
feature-branch workflow (e.g. ‘Unclear commit messages’) then
add a new issue that the code has a broken link in the
README.md file and work on fixing that. Small fixes can
even be done directly on GitHub!
Note: On GitHub, if you create a Pull Request on the
Pull Requests tab of a fork, it goes back to the
repository you forked from by default. Double-check when you’re
making a Pull Request that it’s going to your
fork repository, not Southampton-RSG-Training!
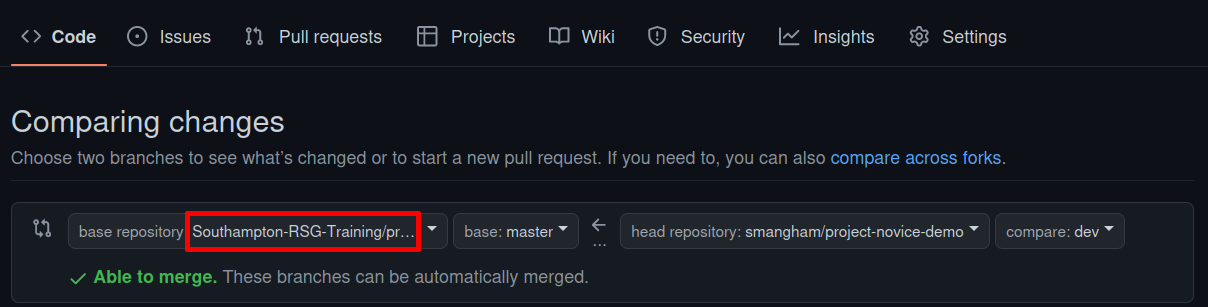
We can address the broken links like this:
- Move our issue from Todo to In Progress
- Go to our
README.mdfile on GitHub, and switch to thedevbranch version of it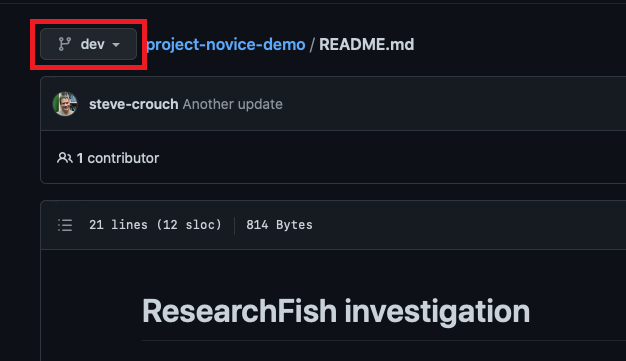
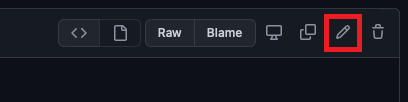
- Edit the file on GitHub to put in the correct URL (google it!)
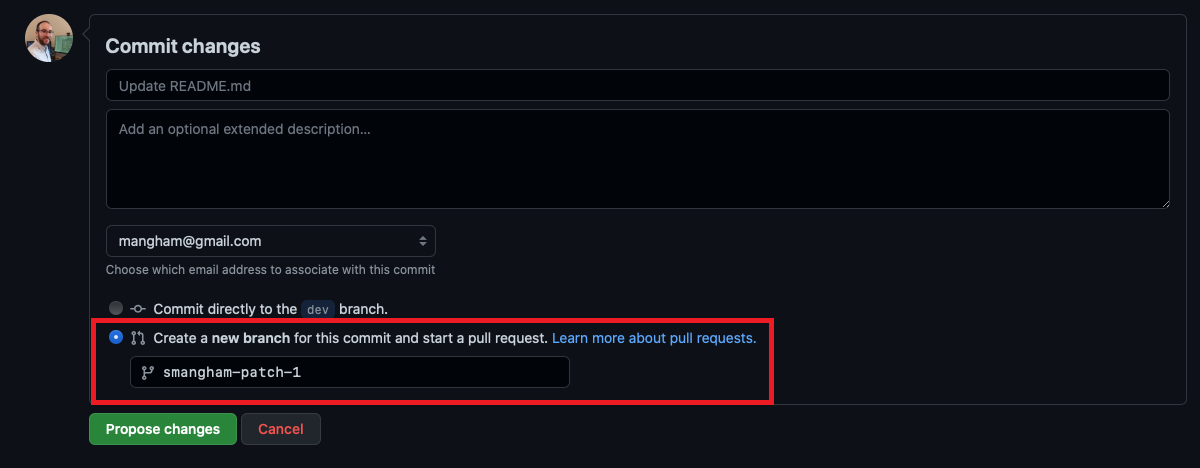
- Submit your changes as a new branch, and create a pull request
- Merge the pull request from our new branch to
dev. - Close our issue on GitHub
- Create a pull request from
devtomaster - When
masteris up to date, issue a release on GitHub.
Normally, we wouldn’t just merge a branch into dev then
dev straight into master- we’d merge several
fixes or new features into dev, then merge to
master and make a release.
Now you should have a good idea of the skills and techniques required to manage a project successfully!
- Problems with code and documentation can be tracked as issues.
- Issues can be managed on a project board.
- Issues can be fixed using the feature-branch workflow.
- Stable versions of the code can be published as releases.
Content from Survey
Last updated on 2026-05-31 | Edit this page
Estimated time: 0 minutes