Branching
Overview
Teaching: 20 min
Exercises: 0 minQuestions
What are branches?
Objectives
Understand why you would use a branch
Understand
git branchandgit merge
Optional Episode
If you don’t want to do this section, just head straight to the survey!
We’ve seen branches mentioned a lot so far - mostly main. So what are they?
A branch is a parallel version of a repository. It can branch off from a commit, contain its own set of extra commits and edits to files, then easily merge back into the branch it came off (or even another!). We can visualise this flow of splitting and merging branches like this:

Why Use Branches?
If you’re a user of a code, and don’t plan to do any development, you might never have to interact with branches. You’ll download the main branch, containing the most recent, stable version of the code, and just use that. Likewise, if you create a new repository for a small code with only a single developer, then as long as you aren’t sharing the code or its outputs you can just do all your work on the main branch like we’ve been doing.
However, if you plan on making changes to an existing code, collaborating with others, or sharing your code or its outputs, then you’ll definitely want to use branches - as they make your life a lot easier.
Sharing Your Code: main and dev branches
As mentioned, if you’re using an existing code written by somebody else, you’ll typically just download the main branch and use that. What if, though, the author(s) of the code want to continue working on it without the potential users downloading half-finished or untested code? They could keep all their changes local and only commit and push once a new feature has been completed and rigorously tested, but that’s not particularly sustainable for large features. It could potentially take months to add a new feature (a long time to go without a backup!), and you might want to share the work-in-progress version with others to test.
The traditional way to do this is to create a development branch (dev or develop) coming off the main branch (main or master). The main branch contains tested, finished code that can be shared with others, whilst the development branch contains work-in-progress code. Typically you merge your development branch into your master branch when your work on it has been tested and is ready to share - for example, when you release a paper using it. Then you can continue working on your development branch and sharing your development code with other other members of your group.
Making Changes to an Existing Code: Feature branches
Once you have a working code, particularly one that’s being shared, you’ll inevitably want to add new features. You could add them directly to your development branch - however, what happens if, mid-way through, you need to pause the feature and switch to something else as you wait for simulations to finish, new data to arrive, or similar? Instead of ending up with a mess of multiple half-finished modifications, which are impossible to evaluate independently of the other, you can instead create a new feature branch coming off of your development branch for each new feature. You work on each new feature or bugfix in their own feature branch, and merge them back into your development branch once they’re tested and complete. Then, as before, once you’re ready to publish a paper using your new functionality you merge it all back into the main branch.
Collaborating With Others: Feature branches
Feature branches also make collaborating with others far easier! Instead of stepping on each other’s toes by making conflicting edits to the same files, you can simply each work on your own branch. GitHub offers features to help manage collaborations too, by limiting who can merge their work into a branch without approval, allowing you to set up workflows where newer team members run their changes past those with experience.
Merging
We’ve mentioned merges repeatedly; as Git tracks the changes made to each file in each commit, it can easily determine whether or not the changes made in two branches conflict with each other. It can intelligently merge together two modified versions of a file where their changes don’t overlap, and highlight sections where they do for you to resolve, showing both versions of the code.
These use the same conflict resolution we saw earlier - new files are added seamlessly, whilst modified files use smart conflict resolution and might need your intervention if there’s a clash!
The Basics
We can use the git branch command to list the branches in our local repository, and let us know which we’re on:
git branch
* main
At the moment, we only have one - main - and the asterisk tells us it’s the one we’re currently on. We can check this by creating a new branch using git branch new_branch_name, and listing them again:
git branch dev
git branch
  dev
* main
Now we’ve got a dev branch set up!
Working with a dev branch
We’ll try a quick example of using the main and dev branches to have a work-in-progress version of the code that we only share when we’ve completed and tested it.
We can switch to our new branch with:
git switch dev
Switched to branch 'dev'
Compatibility Notice
Older versions of Git don’t have
git switch- instead, you have to usegit checkout dev. As we’ve already seen,checkouthas a lot of functions, and newer versions of Git simplify things by giving them new names.
Any commits we make on this branch will exist only on this branch - when you use git switch main to switch back to your main branch, they won’t show up in your git log results!
We’ll give it a try. In one of our earlier edits to climate_analysis.py, we mentioned we wanted to process rainfall measurements in our climate data. Let’s imagine these are historic values, in imperial measurements, that we’ll need to convert. We’ll make a new file, and write a simple function to handle it:
nano rainfall_conversion.py
cat rainfall_conversion.py
def inches_to_mm(inches):
    mm = inches * 25.4
    return mm
Now we’ve made the file, we want to commit it to our dev branch.
Make sure you’re on the dev branch with git switch dev if you haven’t already, and then add it like we added our changes before:
git add rainfall_conversion.py
git commit -m "Add rainfall module"
[dev b402781] Add rainfall module
 1 file changed, 4 insertions(+)
 create mode 100644 rainfall_conversion.py
So we’ve successfully made a new file, and committed it to our repository,
on the dev branch. Let’s take a look at the directory now using ls:
ls
README.md climate_analysis.py rainfall_conversion.py temp_conversion.py
We can see that the rainfall_conversion.py file is all present and correct. But we told git that we made it on the dev branch - what happens if we switch back to main with git switch again?:
git switch main
Switched to branch 'main'
Your branch is up to date with 'origin/main'.
ls
README.md climate_analysis.py temp_conversion.py
The rainfall_conversion.py file isn’t present, as the commit that created it was made on the dev branch. It still exists, and if we use git switch dev it’ll re-appear. However, whilst we’re on main, it’s tidied away into our hidden .git directory.
This doesn’t just work on new files. If you edit an existing file on dev, then when you switch back to main you’ll see the old version.
Remote Branches
Now we’ve made changes to our dev branch, we want to send them up to GitHub, to make sure that we don’t lose any of our development work! Let’s switch back to dev with git switch:
git switch dev
Switched to branch 'dev'
And use git push to synchonise our branch with GitHub, just like we did earlier. However, this time we’ll get an error:
git push
fatal: The current branch dev has no upstream branch.
To push the current branch and set the remote as upstream, use

    git push --set-upstream origin dev

To have this happen automatically for branches without a tracking
upstream, see 'push.autoSetupRemote' in 'git help config'.
When we used git clone it linked up our main branch with the main branch on our GitHub repository automatically. Our dev branch is new, though, and git doesn’t yet know where it should be pushing it to. Fortunately, git has told us what we need to do to tell it (git is good about this!).
The origin argument to git push tells it which remote repository we’re pushing to (we can see a list of them, and their web addresses, with git remote -v). The dev argument tells it to push the current branch to the remote repository as a branch called dev. The --set-upstream flag tells it that we’re setting this behaviour as the default for this branch.
We’ll use a shortcut for --set-upstream - -u:
git push -u origin dev
Enumerating objects: 4, done.
Counting objects: 100% (4/4), done.
Delta compression using up to 4 threads
Compressing objects: 100% (3/3), done.
Writing objects: 100% (3/3), 415 bytes | 415.00 KiB/s, done.
Total 3 (delta 0), reused 0 (delta 0), pack-reused 0
remote:
remote: Create a pull request for 'dev' on GitHub by visiting:
remote:      https://github.com/smangham/climate-analysis/pull/new/dev
remote:
To github.com:smangham/climate-analysis.git
 * [new branch]      dev -> dev
branch 'dev' set up to track 'origin/dev'.
Now we’ve got it up on GitHub successfully! Let’s go check on the site:
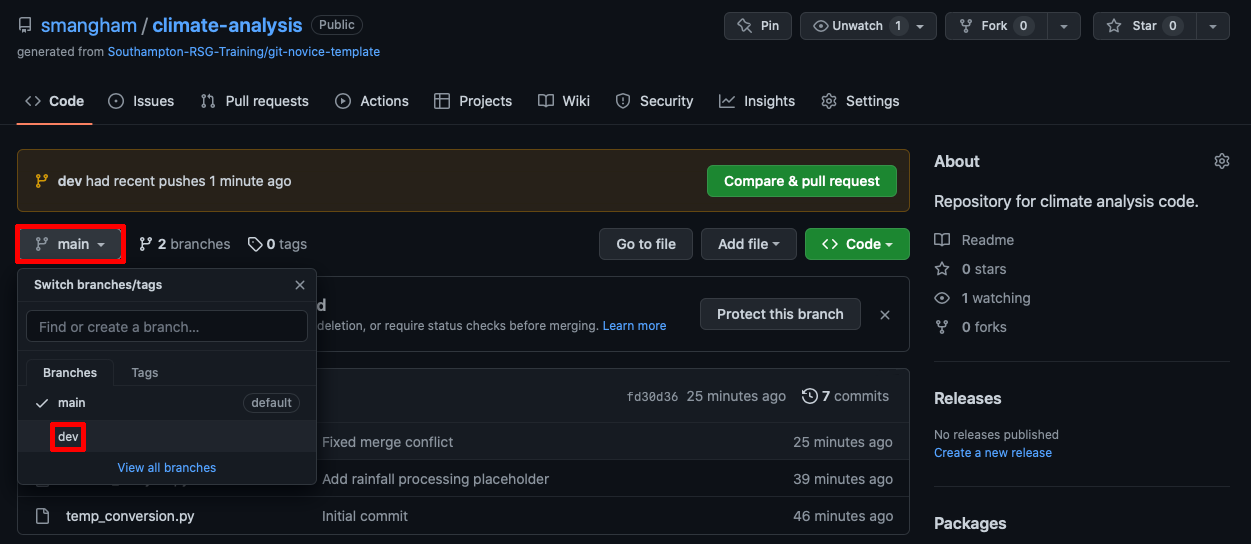
It defaults to showing the main branch, but lets us know there’s been a recent push to a different branch. We can check out what the other branch looks like by clicking on the drop-down on the left and selecting dev:
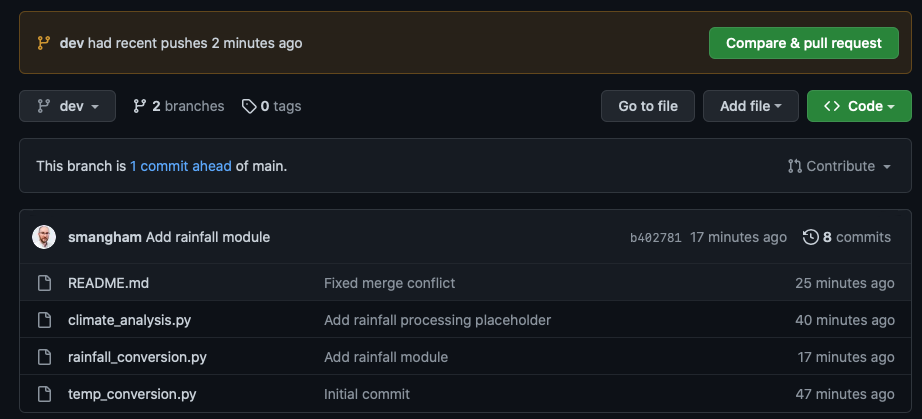
We can see the rainfall_conversion.py file has been uploaded! This makes it easy for us to share work-in-progress versions of our code that others can easily look at.
Linking Remotes
It’s always worth double-checking before you run
git push origin devfor the first time - if you’re accidentally still on themainbranch, you can end up pushing it to GitHub as a new branch calleddev, and having two copies!To avoid this, we can set the ‘upstream’ for a branch when we make it, using:
git branch --track branchname origin/branchnameBut this functionality isn’t available on older versions of git. Alternatively, if your git is new enough to suggest it, you can make it automatically link branches to their remote equivalents with:
git config --global push.autoSetupRemote true
Downloading Branches
It’s easy to share a branch with a collaborator so they can test out a different version of the code. If they
clonethe repository, like we did back at the start, it defaults tomainbut they can download the other branches and try them out too, using:git clone git@github.com:yourname/climate-analysis.git git fetch git switch devWhere
git fetchdownloads all the branches on the remote repository, not just themainone.
Merging Branches
If we’re happy with the way our work on the dev branch has gone, and we’ve tested it, we can merge the content back in!
Let’s switch back to our main branch:
git switch main
Switched to branch 'main'
Your branch is up to date with 'origin/main'.
Now, to merge the changes from our dev branch into the current (main) branch, we just need to do:
git merge dev
Updating fd30d36..b402781
Fast-forward
 rainfall_conversion.py | 4 ++++
 1 file changed, 4 insertions(+)
 create mode 100644 rainfall_conversion.py
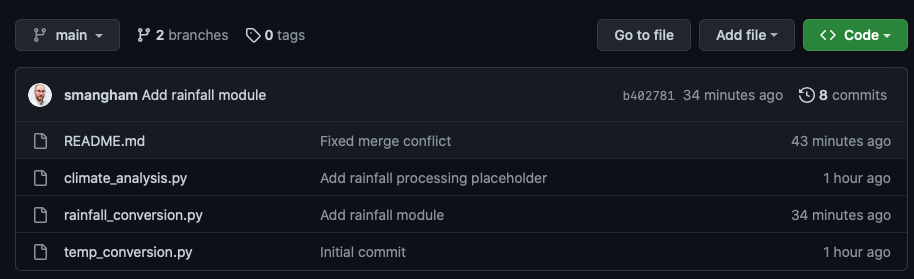
Now, let’s push our updated main branch to GitHub:
git push
Total 0 (delta 0), reused 0 (delta 0), pack-reused 0
To github.com:smangham/climate-analysis.git
   fd30d36..b402781  main -> main
And we can see on GitHub that the two branches are up-to-date:
Pull Requests
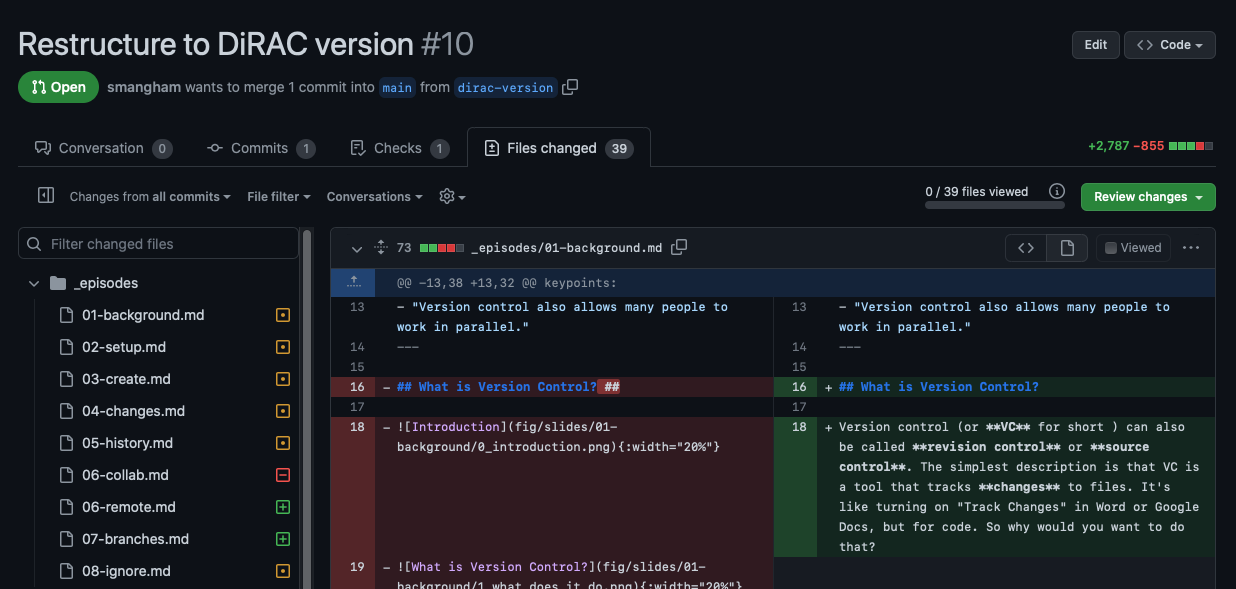
When we looked at GitHub earlier, we saw a banner letting us know we could compare our branches, make a Pull Request:
A Pull Request is another way of merging branches, that works better when you’re part of a team. There’s an interface for discussing the changes you’ve made with your colleagues, requesting others peer-review your code, and it shows all your changes in detail:
Then, once you’ve taken a proper look and you’re happy with your changes, you can merge the branches through the GitHub web interface. If you’re working as part of a team, it’s better to make a Pull Request than use than
git merge.
Key Points
Branches are parallel versions of a repository
You can easily switch between branches, and merge their changes
Branches help with code sharing and collaboration