All in One View
Content from Day 1: Landscape of approaches and undertaking an example project
Last updated on 2025-04-10 | Edit this page
Overview
Questions
- FIXME
Objectives
- FIXME
- FIXME
Content from 1.1 Welcome to the Course
Last updated on 2025-09-25 | Edit this page
Overview
Questions
- What is this course all about?
- What topics will be covered throughout this course?
- How will each day run?
- How can I provide feedback?
Objectives
- Describe the Code of Conduct for the course
- List what will be covered for each day
- Articulate that all levels of course feedback are useful
Group Exercise: Introductions and Deciding a Team Name
15 mins.
In your groups:
- (Maximum of 2 mins each) Have each of you briefly introduce yourselves and list your development skills, noting them in your team GoogleDoc
- (Maximum of 5 mins) As a group, discuss and decide on a team name that reflects your group skills and values
Ensure you keep to time!
- Ensure you have filled in the pre-training survey before the course begins
- If you feel that the Code of Conduct has been violated, please raise it as an issue with the course instructors inbetween learning sessions
- Feedback about the course can be provided at any time
Content from 1.2 Software Development Process and the Landscape of Approaches
Last updated on 2026-03-12 | Edit this page
Overview
Questions
- What are the main stages in a typical software development process?
- What are waterfall, iterative, and V-Model approaches to software development?
- What is Agile and how does it compare to project management?
- How do software development models compare and relate to project management frameworks?
Objectives
- Highlight the main stages in a software development process
- Order and describe the stages within a typical software development process and how these apply within waterfall and iterative approaches
- Summarise the V-Model approach to software development
- Describe how software development models compare and relate to project management frameworks (AgilePM, PRINCE2)
The Stages of a Typical Software Development Process
Writing Code vs Engineering Software
Within academic research, software is often seen as a necessary but throwaway artefact. For example, there may be research questions for a given research project, code is created to answer those questions, the code is run over some data and analysed, and finally a publication is written based on those results. After this the code may be discarded or stored on a laptop somewhere, unlikely to ever be run again.
In this context, the terms programming (or even coding) and software engineering are often used interchangeably, but there are actually a great number of differences between them.
Pairs exercise: Writing Code vs Engineering Software
3 mins.
With your partner, discuss the following question: What’s the difference between writing code and engineering software?
Consider your own experiences, for example:
- University modules
- Work placements or internships
- Personal or group projects
Programmers or coders tend to focus on one part of software development: implementation, more than any other. In academic research, often they are writing software for themselves, where they are their own stakeholders. And ideally, they write software from a design that fulfills a research goal to publish research papers.
Someone who is engineering software takes a wider view. They would likely consider:
- The lifecycle of software: software development is a process that proceeds from understanding what is needed, to writing the software and using/releasing it, to what happens afterwards.
- Who will be involved: software is written for stakeholders. This may only be the researcher initially, but there is an understanding that others may become involved later (even if that is not evident yet).
- Software as an asset: software inherently contains value - for example, in terms of what it can do, the lessons learned throughout its development, and as an implementation of a research approach (i.e. a particular research algorithm, process, or technical approach).
- Possibilities of software reuse: it may not be evident initially that the software will have use beyond its initial purpose or project, but there is an assumption that the software - or even just a part of it - could be reused in the future.
Software Development Process
Thinking about software engineering from that wider view, there are some typical stages that a software development project would go through.
Class Exercise: Stages of a Project
3 mins.
What are the typical stages of a software development project? (Assume that the broader project management aspects have already been done)
- R___________
- D_____
- I__________
- T______
- D_________
- M_________
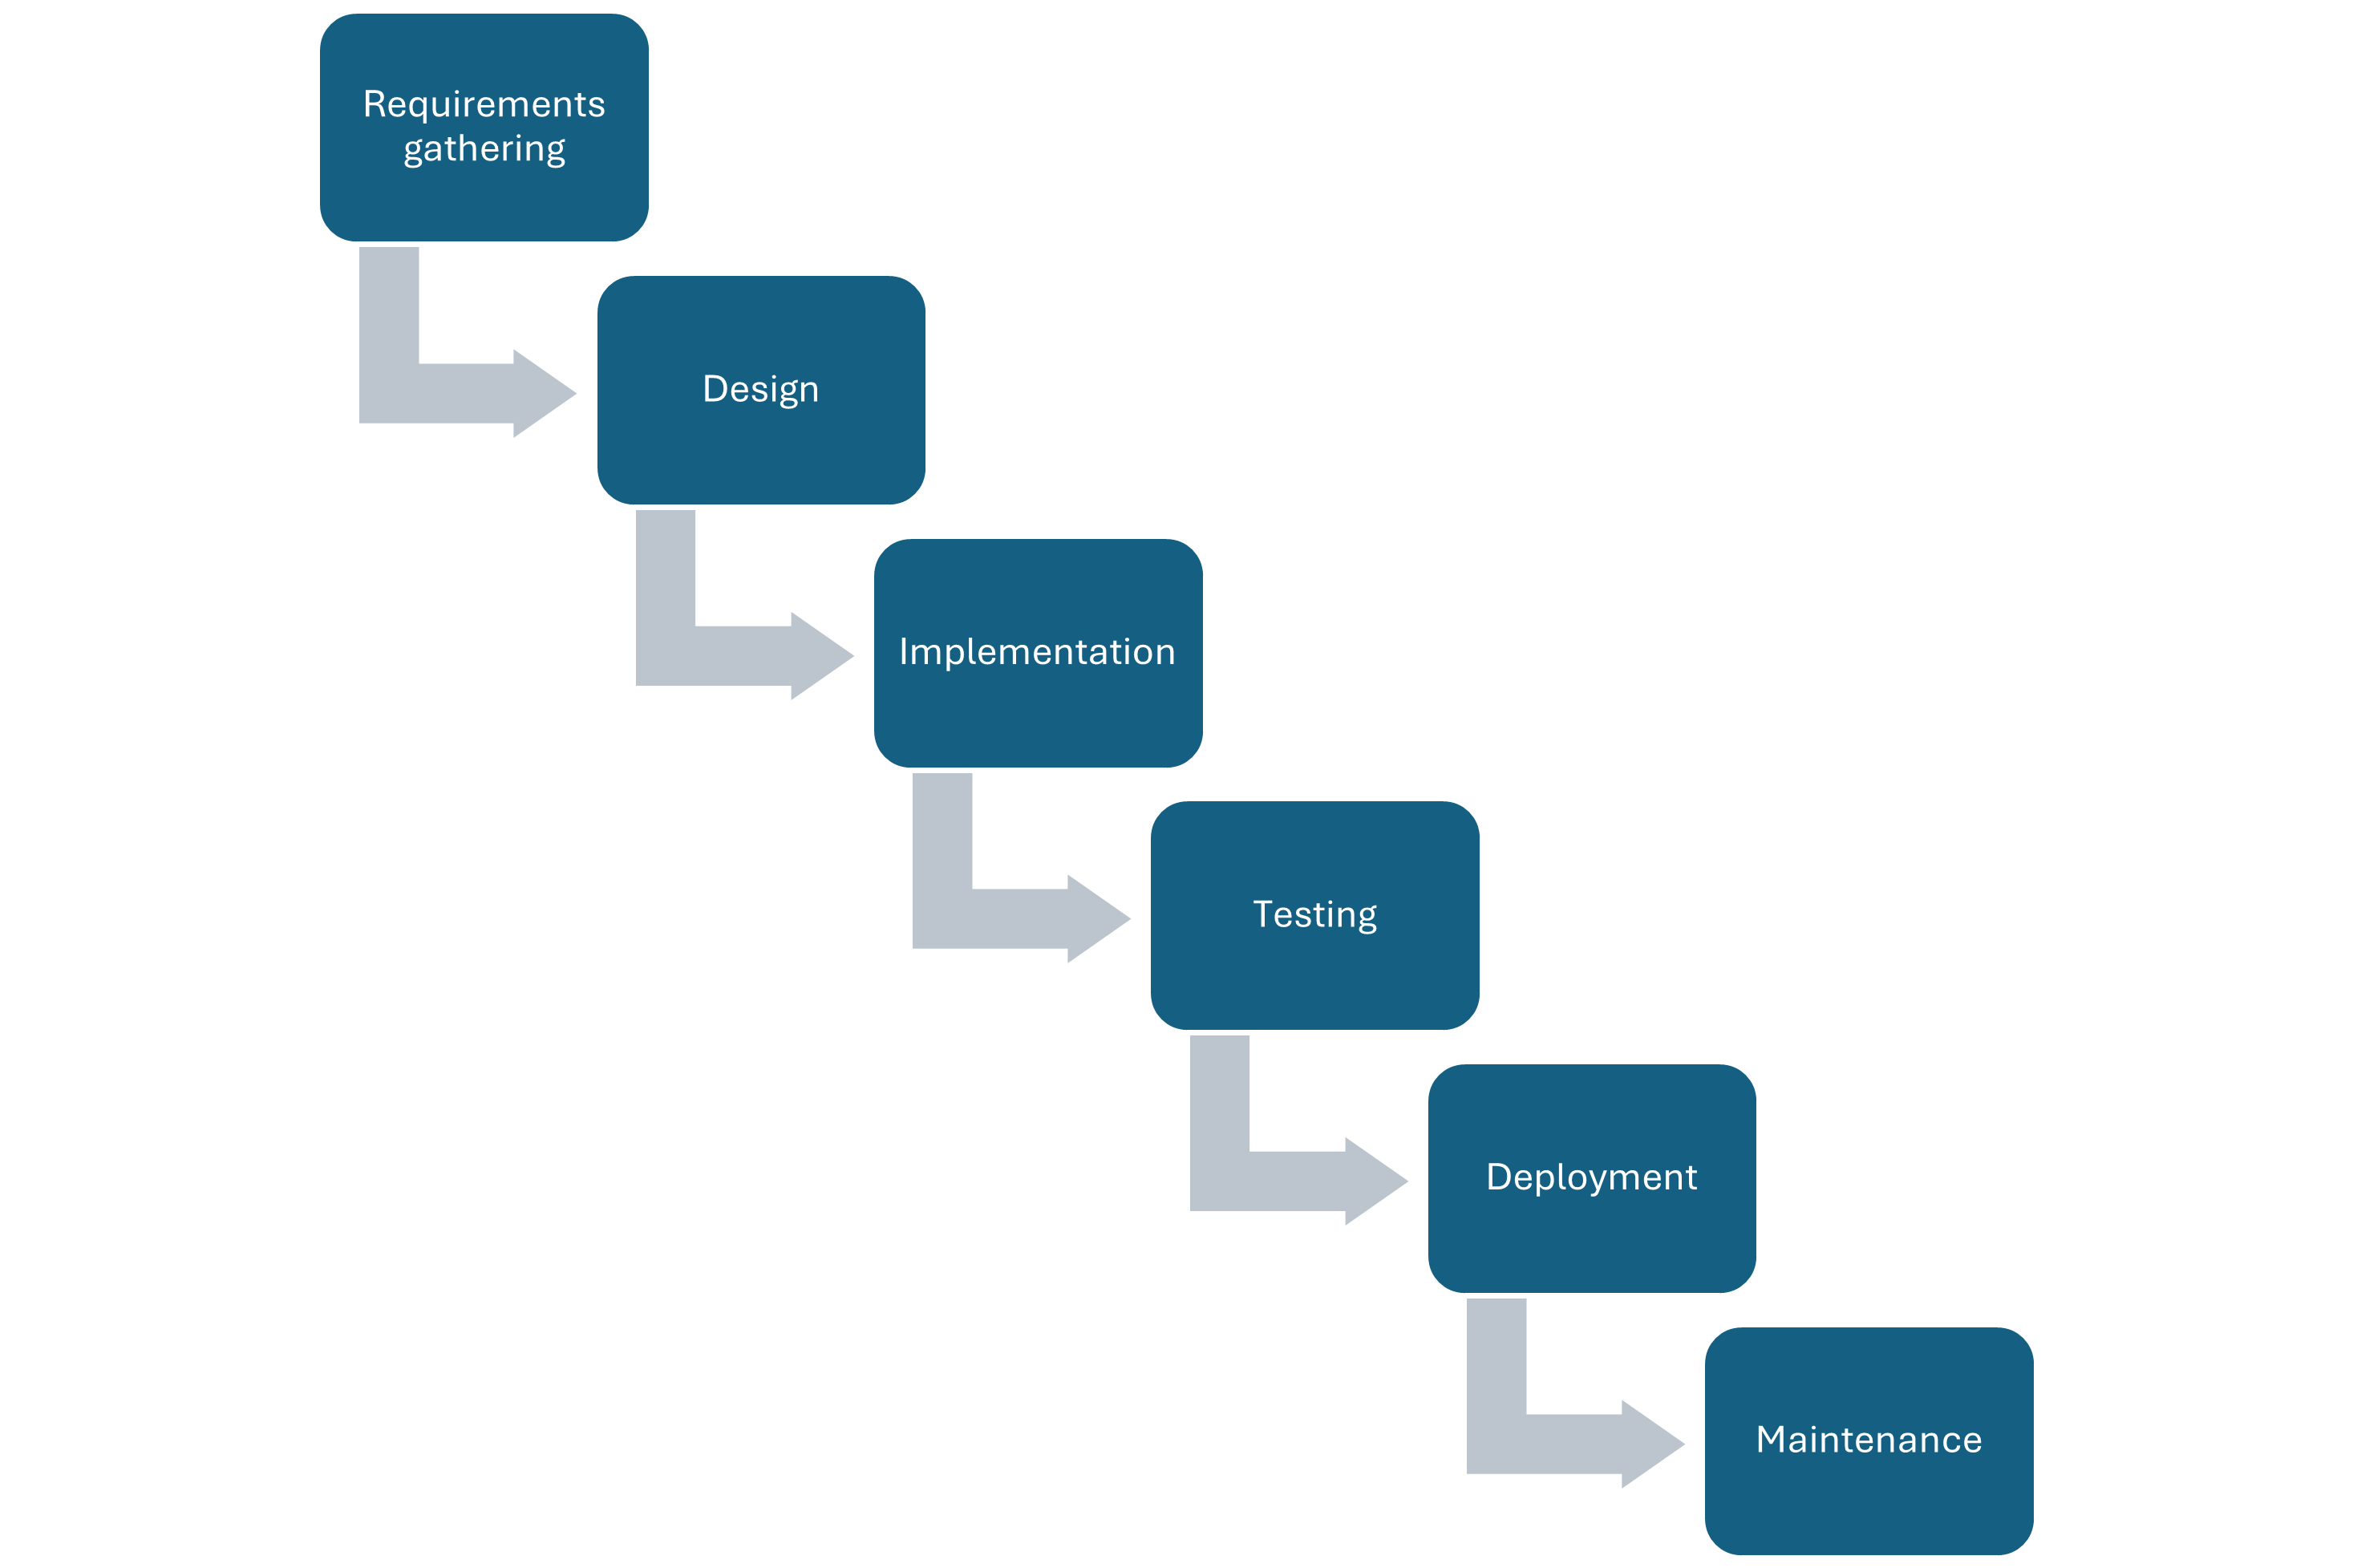
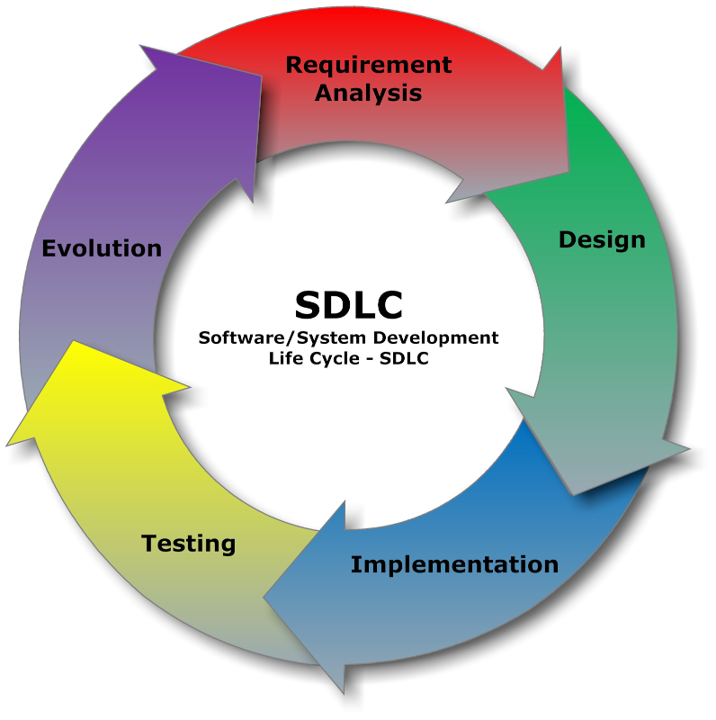
The typical stages of a software development process are:
- Requirements gathering: the process of identifying and recording the exact requirements for a software project before it begins. This helps maintain a clear direction throughout development, and sets clear targets for what the software needs to do.
- Design: where the requirements are translated into an overall design for the software. It covers what will be the basic software ‘components’ and how they will fit together, as well as the tools and technologies that will be used, which will together address the requirements identified in the first stage.
- Implementation: the software is developed according to the design, implementing the solution that meets the requirements set out in the requirements gathering stage.
- Testing: the software is tested with the intent to discover and rectify any defects, and also to ensure that the software meets its defined requirements, i.e. does it actually do what it should do reliably?
- Deployment: where the software is deployed or in some way released, and used for its intended purpose within its intended environment.
- Maintenance: where updates are made to the software to ensure it remains fit for purpose, which typically involves fixing any further discovered issues and evolving it to meet new or changing requirements.
These stages are followed implicitly or explicitly in every software project but there are many different ways to arrange them.
The stages may be arranged according to an established model of software development.
Models of Software Development
Waterfall
The Waterfall Model is a software development methodology in which the typical stages of the software development process (that we outlined above) are followed step-by-step in a set, sequential order.
The Waterfall Model is effective when used for projects where the requirements are clearly defined from the outset. It is ideal for projects with long timelines and minimal tolerance for errors, where stakeholders require high confidence in the final outcome.
London’s Crossrail project (later rebranded as the Elizabeth Line) used a Waterfall approach of clear, sequential phases. This approach was appropriate because the requirements were known from the start, with little possibility for change throughout the project. The line spans 118km, serving 41 stations (10 new) and had been used for over 500 million journeys by early 2025 since its opening in 2022. Despite the project delays and overspend, the Elizabeth Line was widely praised as an engineering triumph.

However, there are some disadvantages to the Waterfall Model:
- The model is relatively inflexible. Once a phase is completed, the model does not account for going back to make changes and therefore there is no mechanism for error correction.
- The model assumes that project requirements are fully defined from the beginning, which is rarely the case for smaller, non-critical software projects, particularly in research.
- The software is not seen by the client until late in the project timeline, which may increase the risk of it not meeting the client’s expectations.
The myki ticketing system project in Melbourne, Australia, demonstrates some of the limitations of the Waterfall approach.
The myki ticketing system was designed to replace the Metcard system for Public Transport Victoria, improving the efficiency and reliability of public transport. Almost $1 billion was committed to this project in July 2005.
The project was expected to be completed in two years but ended up taking over nine years in total and the budgeted cost was exceeded by 55%. Furthermore, due to the rigidly fixed scope and upfront planning, the system could not adapt to evolving user expectations or new technologies. The system was plagued by multiple issues including overcharging, slow touch readers, top-up delays and limited device compatibility.
These issues were all symptomatic of the inflexible development process.
V-Model
The concept of the V-model was developed simultaneously, but independently, in Germany and in the United States in the late 1980s.
The V-Model emphasises the importance of validating each level of the software development. This approach ensures that verification (checking work during development) and validation (checking final products against requirements) are systematically integrated throughout the process.
The left side of the V includes creation and verification steps, i.e. does it work according to the specification.
Requirements gathering
System design
Architectural design
Module design
Coding
The right side of the V includes validation for each step, i.e. have you built the right thing
Unit testing (validation for module design)
Integration testing (validation for architectural design)
System testing (validation for system design)
User acceptance testing (validation for requirements gathering)
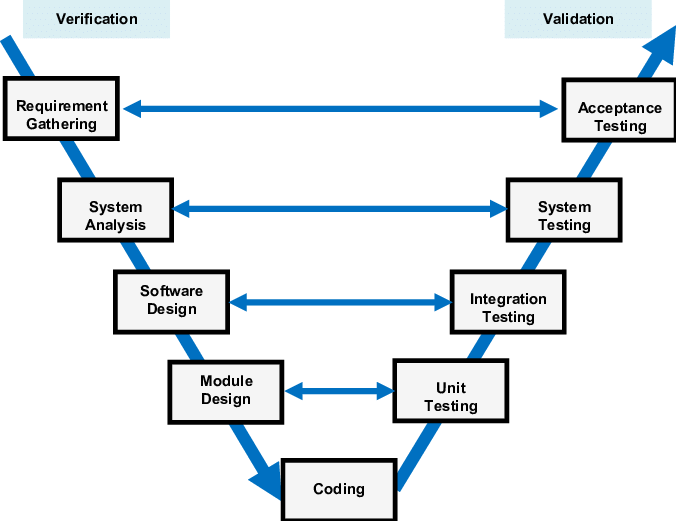
The V-Model is used in safety-critical, regulated industries where traceability, formal verification and compliance with standards are essential. These include:
Aerospace and defense
Automotive
Medical devices
Railways and transportation
The V‑Model is a mandated development framework in German federal and defense software projects.
This originated in the late 1980s with the Ministry of Defense and later extended to civilian administration.
Advantages
- Focus on quality through early and continuous testing
- The strong link between requirements and the final product improve the traceability of software changes.
Disadvantages
- Not flexible so struggles to deal with changing requirements
- Time-consuming due to extensive documentation and testing.
- No support for development activities to occur concurrently or to iterate.
When developing ultrasound systems, Siemens Healthineers used a combination of V-Model and Agile (SAFe, SCRUM, Kanban) to balance regulatory compliance with flexibility.
The V-Model and Product Lifecycle Process defined phases, milestones, and quality gates for verification, validation, and documentation, while Agile teams delivered iteratively within those phases.
Each Agile increment was aligned to V-Model requirements, meaning that each increment included test evidence, documentation, and traceability, as well as the software itself.
Regular clinical feedback was fed into the development early and often, allowing the team to adapt to changes without breaking compliance.
This hybrid process has improved efficiency (release cycles take nearly half the time) and improved predictability. This demonstrates how writing code iteratively (Agile) and engineering software with a focus on validation and verification (V-Model) can complement each other in practice.
Iterative
In many cases, it doesn’t make sense for software development to follow a linear process such as the Waterfall or V model for a number of reasons. For example:
- Changes to a design mean that the requirements must be adjusted
- A company may build on the same project for years, adding more complexity
- The design of a key algorithm may need changing, leading to a need to change the implementation
- A mistake is could be found during deployment which requires changes to the implementation
In iterative development, a large application is built in smaller, manageable parts called iterations. Each iteration includes planning, design, development, and testing, and produces a working version of the product. Unlike the Waterfall and V models, where the entire product is developed at once, iterative development adds features incrementally, with each cycle enhancing the functionality of the product.
The evolution of Google’s search engine exemplifies the principles of Agile development through continuous iteration and adaptation.
Rather than being developed in a rigid, one-time release, Google Search has undergone thousands of incremental improvements, including hundreds of algorithm updates annually.
Now handling at least 8.5 billion searches daily, Google’s sustained success is built on a foundation of iterative enhancements, frequent feedback integration, and rapid deployment.
Agile
Agile software development is a phrase used to describe any iterative method which broadly follows a set of principles determined by a group of 17 software developers, called the Agile Alliance, at a meeting in Utah in 2001. These principles, outlined in the Manifesto for Agile Software Development, are as follows:
Individuals and interactions over processes and tools
Working software over comprehensive documentation
Customer collaboration over contract negotiation
Responding to change over following a plan
The Agile Manifesto was inspired by the desire for a more rapid and lightweight approach to software development, as an alternative to the more heavyweight processes such as Waterfall and V-Model. It drew on ideas from existing lightweight software development methods such as rapid application development, the rational unified process aka RUP, dynamic systems development method, scrum, extreme programming and feature driven development. Although these methods were developed in the 1990s, before the Agile Manifesto, they are now all referred to under the umbrella term ‘Agile’ and, with the exception of Scrum, these methods have now gone out of fashion.
Amazon embodies the Agile principle of customer collaboration through relentless feedback-driven iteration.
Amazon systematically gathers and acts on customer feedback to continually refine its products, and small, agile teams rapidly prototype and test ideas.
This Agile model has driven Amazon’s extensive expansion into e-commerce, cloud (AWS), smart devices, and subscription services.
Advantages of Iterative Development:
- Progress on the software product can initially be faster as less time is spent on the requirements and design stages before starting implementation
- Iterative approaches allow for continuous feedback, adaptation, and improvement throughout the project’s lifecycle.
- Defects can be found and corrected early, preventing them from affecting later stages.
- After each iteration, feedback can be gathered from users, allowing for adjustments and improvements to meet their expectations.
Disadvantages of Iterative Development:
- Without fully determined requirements and design, software can become messy or ‘hacky’ if quality control standards are not maintained
- Since not all requirements are defined from the start, unforeseen changes may arise during the development process which require revision of the software architecture, costing more time in the long run.
The UK’s Universal Credit welfare reform project demonstrates that estimating timings and delivery costs can be challenging when using an Agile delivery method.
The project was initially budgeted at £2.2 billion but is estimated to have cost £15-16 billion.
Originally due to complete by 2017, the project end date is now 2028.
Which Model to Choose?
Any model can be used for any software development project. Waterfall and V-Model and more likely to be used when all the requirements are known at the start of the project. Iterative methods are particularly suited to prototyping, where quick development and user feedback help shape early versions of a system, and to research software, where evolving requirements and experimental objectives demand adaptability. However, iterative approaches can be used on any project including those which are large scale and safety critical.
It’s also worth noting that, to some extent, linear approaches become iterative in reality, as it is nearly always necessary to return to previous stages throughout the software development process. For example, knowing 100% of the requirements from the start is nearly always impossible. Even if a waterfall approach is applied, changes will most likely be made at each of the stages, requiring revision of an earlier stage.
Group Exercise: Which Model is the Best Fit?
5 mins.
Imagine you’ve been hired to develop a web-based system for managing applications for public research grants. The portal will be used by applicants, reviewers and administrators.
The government has already defined detailed and fixed requirements.
There is no flexibility in the deadline, as it must go live before the start of the next fiscal year.
The system must be fully tested and reliable on day one, as errors could affect funding decisions.
Stakeholder involvement is minimal after the requirements have been approved.
Your task:
Discuss the project as a group and decide which software development model would be most suitable for delivering
Consider factors such as the nature of the project, clarity of requirements, timeline, risk, and the need for flexibility
Be prepared to justify your choice - why is this model a good fit for the scenario?
In this course, we will focus on Agile, as it is currently a commonly used method for software engineering across sectors, and it suits the project that you’ll be working on throughout this course. In particular, we will focus on a an Agile framework called ‘Scrum’.
Scrum
Scrum is one of the most popular Agile frameworks. Scrum is defined in the Scrum Guide as ‘a lightweight framework that helps people, teams and organisations generate value through adaptive solutions for complex problems’. The core philosophy of Scrum is to make incremental progress toward a goal through repeated iterations.
In Scrum:
A Product Backlog is created. This is a list of everything that needs to be done to build the product.
Work is done in Sprints, which are short blocks of time (< 1 month).
At the start of a Sprint, a subset of the Product Backlog is selected to be worked on during the Sprint. This is called the Sprint Backlog.
The developers work on tasks from the Sprint Backlog during the Sprint, creating an Increment of Value.
The Scrum Team and its stakeholders inspect the results and adjust for the next Sprint.
Repeat
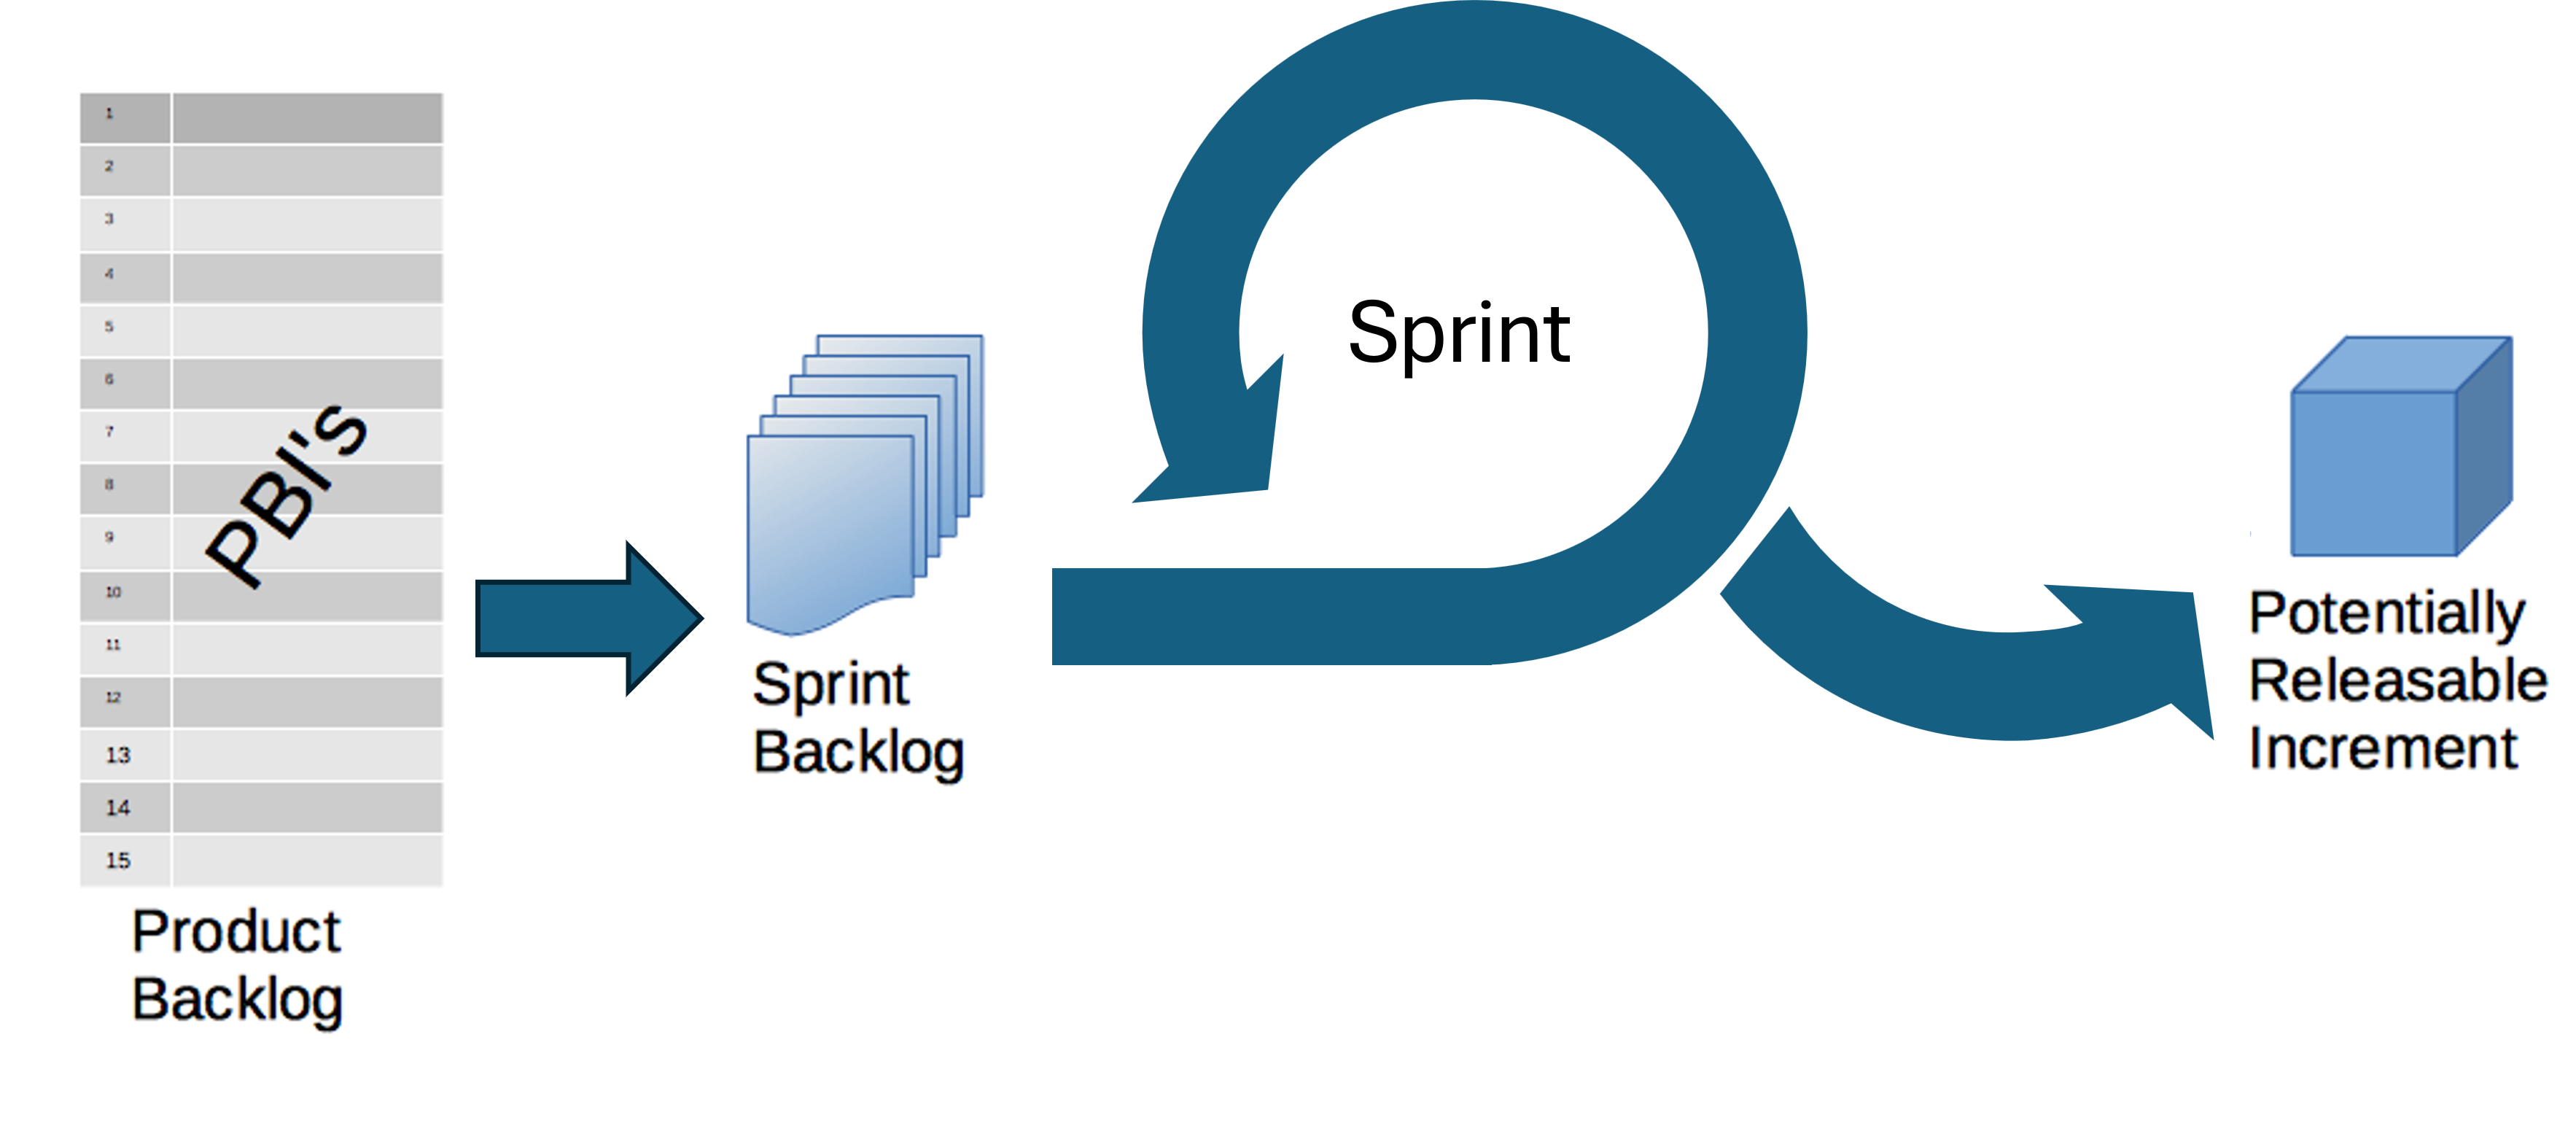
Scrum Buzzwords Decoded
- Product Owner - responsible for maximising the value of the product.
- Product Backlog - Ordered list of what is needed to improve the product.
- Increment of Value - a concrete stepping stone toward the Product Goal.
- Scrum Team - one Scrum Master, one Product Owner, and Developers (we’ll discuss what each of these roles does later in the course).
- Sprint Backlog - the set of Product Backlog items selected for the Sprint.
- Sprint - Fixed-length events of one month or less in which the work gets done.
Later in this course we will talk more about Scrum so that you are able to use it to run your own Sprints on a project.
Scrum vs Project Management
Scrum is an Agile delivery technique that guides the actual software development process. Scrum is concerned with delivering a project i.e. doing the actual software engineering.
Project management is concerned with all aspects of a project including planning, executing, and closing projects, as well as managing change and risk within a project. Project management may contain Scrum but will also cover the wider project aspects including ensuring that a project meets its goals, timeline, and budget.
There are lots of project management frameworks, we’ll briefly mention two of them here: Agile Project Management and PRINCE2.
Agile Project Management
Whilst agile practices originated within software development, it is increasingly being used in other areas. For example, the agile approach as taught in the AgilePM project management framework is applicable to any project where change needs to be managed.
AgilePM also follows the core values of the Agile Manifesto:
- Individuals and interactions over processes and tools.
- Working software over comprehensive documentation.
- Customer collaboration over contract negotiation.
- Responding to change over following a plan.
There are foundation and practitioner certifications available for Agile Project Management through APMG International. The foundation stage focuses on understanding the Agile framework whereas the practitioner stage transitions the understanding into effective application of the Agile framework to real-life projects.
PRINCE2
PRINCE2 (PRojects IN Controlled Environments) is the world’s most practiced method for project management (Axelos), it’s a flexible method that guides you through the essentials of managing any project. PRINCE2 was developed by the UK government for information systems projects and is currently maintained by Axelos.
PRINCE2 is more heavyweight than AgilePM and is often used in sectors where governance and documentation are priorities.
PRINCE2 is built on seven principles, seven themes and seven processes.
Seven Principles (The Why)
- Continued business justification
- Learn from experience
- Defined roles and responsibilities
- Manage by stages
- Manage by exception (people should be given the right amount of authority and only have to escalate to a higher management level if there is an exceptional circumstance)
- Focus on products
- Tailor to suit the project environment
Seven Themes (The What)
- Business case
- Organisation
- Quality
- Plans
- Risk
- Change
- Progress
Seven Processes (The How)
- Starting up a project
- Directing a project
- Initiating a project
- Controlling a stage
- Managing product delivery
- Managing stage boundaries
- Closing a project
There are foundation and practitioner certifications in PRINCE2 available. Similar to the AgilePM certification, understanding of the PRINCE2 framework is the goal of the foundation stage and application is the goal of the practitioner stage.
It’s possible to combine Agile and PRINCE2, and there is even an ‘Agile PRINCE2’ qualification.
Group Exercise: Software Development or Project Management?
Below is a list of tasks, discuss whether each task belongs in software development models or project management models:
- Writing and testing code for a new feature
- Designing the software architecture for a system
- Creating a risk mitigation plan for project delivery
- Allocating team members across multiple concurrent projects
- Refactoring legacy code to improve maintainability
- Tracking project progress against the Gantt chart
- Setting up a version control system (e.g. Git)
- Reviewing whether the project is on track to meet its deadline and budget
- Leading a daily stand-up meeting
- Leading a group retrospective to reflect on project outcomes and team performance
- Software development
- Software development
- Project management
- Project management
- Software development
- Project management
- Software development
- Project management
- Could be either
- Could be either
References
- Stages of Software Development from Python Intermediate Development Carpentries Training
- The Scrum Guide
- It’s Time to End the Battle Between Waterfall and Agile
- Software Engineering by Ian Sommerville
- Software Engineering: Theory and Practice by Shari Lawrence Pfleeger
- British Standards Online
- V-Model
- Waterfall Model
- Iterative ideas from Eastern Peak
- Agile
- PRINCE2
- APMG International
- AXELOS
- The typical stages of a software development process are: requirements gathering, design, implementation, testing, deployment and maintenance
- These stages are arranged differently in different models of software development
- The Waterfall model follows the stages in a set, sequential order
- The V-Model emphasises the importance of testing and validation at each stage
- In iterative development, a large application is built in smaller, manageable parts called iterations.
- Boehm’s Spiral is an iterative, risk-driven approach to software development
- Agile software development is any iterative method that follows a set of Agile principles: Individuals and interactions over processes and tools; Working software over comprehensive documentation; Customer collaboration over contract negotiation; Responding to change over following a plan.
- Any model can be used for any software development project but some may suit particular types of projects better than others
- Scrum is one of the most popular Agile frameworks. Later in this course we will talk more about Scrum so that you are able to use it to run your own Sprints on a project.
- Software development is concerned with delivering a project whereas project management will also cover the wider project aspects.
Content from 1.3 User Stories and Capturing Project Requirements
Last updated on 2026-03-19 | Edit this page
Overview
Questions
- What types of requirements should be captured for a project?
- What is a non-functional requirement?
- How do I describe and ensure how desired features will provide value to the end user?
- How should I capture and manage requirements for change?
Objectives
- Describe the key features of writing user stories
- Highlight the characteristics and differences between functional and non-functional requirements
- Describe the purpose and composition of the product backlog
- Describe what makes a good product requirement
- Create an initial product backlog from a given scenario
In this section, we’ll introduce two established key concepts for capturing the needs of a project,
- User stories, which capture what is needed from solely the perspective of the client
- Requirements, which state what needs to be built (or what needs to change) by the development team
So whilst they both capture what the software will do, each reflects one side of the client/developer perspective.
User Stories: Understanding what is Needed from the User Perspective
Capturing “requirements” is pivotal to understanding what needs to be built, but whilst they state what is technically required, they lack the end-user context of what they are and why they are important. User stories aim to capture this perspective, being short and simple descriptions of new features or functionality from the perspective of the end user themselves. Therefore, user stories help:
- The project remains user-centered and focused on real needs, rather than jumping prematurely to solution or technical requirements
- To clarify the the value behind a feature, and anchor development in user outcomes, not just functionality
- Prevent requirements ballooning, if not guided by real user goals
- Prioritise what matters to users
- Provide a concise description of value - they should be short and encapsulate a single aspect
They typically follow the following template, to ensure user stories are clear and concise:
As a [type of user], I want [an action] so that [benefit].
Breaking each of these three aspects down:
- “As a [type of user]”: who are we building this for? There may be more than one type of user, but in any case we need to think about this from the user’s perspective.
- “I want [an action]”: this describes the intent of this type of user, not the features of the system. What do they want to achieve?
- “so that [benefit]”: what is the benefit they are trying to realise? How will it help them directly, solve a problem for them?
Some examples of user stories include:
- E-commerce site: as a shopper, I want to add items to my cart so that I can purchase multiple products at once
- Mobile application: as a user, I want to receive push notifications for important updates so that I stay informed when I’m not using the app
As mentioned, note that they are short and to the point, and each encapsulate a single aspect.
FIXME: mention acceptance criteria for functional and non-functional requirements
Solo Exercise: User Stories
5 mins.
Consider this scenario:
“A small town cheese-making business has received many enquiries about being able to make online purchases delivered to their homes or place of business, and so now want to also sell their many types of cheeses using an online store. Online customers are looking to be able to search the store, select cheeses to purchase, and when ready, add payment and shipping details and confirm the order. There is some evidence that some online customers are environmentally and ecologically conscious, so are interested in the environmental impacts of products. In order to schedule their supply chains efficiently, business customers are keen to have updates on shipping. From the perspective of the business owner, they want to able to manage available stock inventory on the online store.”
Identify at least two types of user - also known as personas - that would use the store. From the above scenario, create at least four user stories using this format:
As a [type of user], I want [an action] so that [benefit].
Hint: focus on the user needs, not what may be implemented.
Here are some example user stories:
Business owner:
- As a business owner, I want to add new stock to the sit,e so that customers can purchase it.
- As a business owner, I want to remove old stock from the site, so that customers cannot purchase expired stock.
Personal customer:
- As a customer, I want to search available cheeses by name, so I can find the ones I want easily.
- As a customer, I want to add cheeses to a basket, so I can continue to shop and purchase them all later.
Eco-conscious customer:
- As an eco-conscious customer, I want to view the environmental impact details of products, so I can make environmentally-informed purchasing choices.
Business customer:
- As a business customer, I want to have real-time updates of orders that have been shipped, so I can organise my supply chains efficiently.
What Exactly is a Requirement, and Why are they Important?
In general, a requirement is a capability or condition that must be met for software to solve a problem or address a need. They form the foundation of our project and drive what will be developed, so if we do not properly explore and understand what is required, the software will not be suitable for it’s intended purpose.
Whilst user stories focus purely on the user perspective, requirements concentrate on what technically needs to change. For this reason, it’s common to develop user stories first (to understand the user), then from those stories, derive requirements (to understand what needs to be built). Requirements typically address technical aspects of software functionality and features that are needed to complete a user story, and are more numerous than the collection of user stories. Therefore, each user story is often addressed by more than one requirement.
There is repeated evidence that most errors aren’t actually introduced during the software development stage, but during requirements analysis and design. For example, one analysis of the software errors uncovered during integration and testing and the Voyager (1977) and Galileo (1989) probes discovered that 79% of these errors were due to a poor understanding of requirements.
However, it is unlikely that we will be able to determine all of the requirements correctly and completely upfront. In practice, very often requirements may need be flexible to some extent and may change as the project evolves, so we need to ensure we are able to accommodate any agreed changes.
Requirements are More than just Features
When considering software requirements, it is very tempting to just think about the features users need. However, many design choices in a software project depend on the users themselves and the environment in which the software is expected to run (as well as how the software should run), and these aspects should be considered as part of the software’s non-functional requirements.
To explore the importance of this aspect, let’s consider two software types, mobile applications and embedded software. They may appear similar, but examining the environments in which they are developed and operate uncovers many differences that need to be accounted for in order for the software to be fit for purpose.
| Concern | Mobile Apps | Embedded Software |
|---|---|---|
| Platform | Work on range of mobile hardware and iOS/Android operating systems | Exact specification of hardware is known - often not necessary to support multiple devices; typically low power |
| Development Language | Typically written in one of the higher-level platform preferred languages (e.g. Java, Kotlin, Swift) | Typically lower-level language (e.g. C) for better control of resources |
| Compilation | Users will not (usually) modify / compile the software | Users will not (usually) modify / compile the software |
| Installation | Usually distributed via a controlled app store | Usually distributed pre-installed on a physical device |
| Interface | Must have graphical interface suitable for a touch display | May have no user interface, or interface may be physical buttons |
| Documentation | Probably in the software itself or on a Web page | Documentation probably in a technical manual with a separate user manual |
| Uptime | May not run continuously due to restarts | May need to run continuously for the lifetime of the device |
Therefore, whilst a single piece of software may provide the same functionality on a mobile app or embedded device (for example, a photo frame application), the other non-functional considerations describe facets of how the software must be developed and how it must operate (often as constraints), and we must account for them in our requirements.
Class Exercise: What Classes of Non-functional Requirements Are There?
5 mins.
As a class, what types of non-functional requirements can you think of?
Some typical classes of non-functional categories include:
- Security: how do we ensure a user is authenticated and authorised to conduct a particular action?
- Performance: what performance goals will the software be required to satisfy?
- Usability: how will the user interact with the software?
- Reproducibility: how do we ensure others are able to reproduce results generated using the software?
- Portability: to what extent should the software be able to run on different systems with minimal changes?
- Maintainability: how easily can the software be modified, enhanced, or restructured?
- Reliability: to what extent should the software we able to operate without errors and unexpected failures?
- Availability: to what extent should the software remain accessible and operational when needed?
A more comprehensive list can be found on Wikipedia.
Introducing the Coffee Beans Analysis Project
Throughout the course, we’ll be making use of a hypothetical scenario where a fictional coffee company is looking for a small software company to do some software development and analysis for them on an existing dataset.
Often at the start of a project, you might learn some information about the domain you’re working in so that you can better communicate with the client and understand the problem at hand.
A Note on Coffee Production
A coffee bean is a seed from the Coffea plant and the source for coffee. This fruit is often referred to as a coffee cherry, but unlike the cherry, which usually contains a single pit, it is a berry with most commonly two seeds with their flat sides together. Even though the seeds are not technically beans, they are referred to as such because of their resemblance to true beans
The two most economically important varieties of coffee plant are the Arabica and the Robusta; ~60% of the coffee produced worldwide is Arabica and ~40% is Robusta. Arabica beans consist of 0.8–1.4% caffeine and Robusta beans consist of 1.7–4% caffeine.
As coffee is one of the world’s most widely consumed beverages, coffee beans are a major cash crop and an important export product, accounting for over 50% of some developing nations’ foreign exchange earnings. The global coffee industry is valued at $495.50 billion, as of 2023; the largest producer of coffee and coffee beans is Brazil. Other main exporters of coffee beans are Colombia, Vietnam, and Ethiopia.
Two methods are primarily used to process coffee berries. The first, “wet” or “washed” process, has historically usually been carried out in Central America and areas of Africa. The flesh of the cherries is separated from the seeds and then the seeds are fermented – soaked in water for about two days. This softens the mucilage, which is a sticky pulp residue that is still attached to the seeds. Then this mucilage is washed off with water.
The “dry processing” method, cheaper and simpler, was historically used for lower-quality beans in Brazil and much of Africa, but now brings a premium when done well. Twigs and other foreign objects are separated from the berries and the fruit is then spread out in the sun on concrete, bricks or raised beds for 2–3 weeks, turned regularly for even drying.
Coffee cupping, or coffee tasting, is the practice of observing the tastes and aromas of brewed coffee. It is a professional practice but can be done informally by anyone or by professionals known as “Q Graders”. A standard coffee cupping procedure involves deeply sniffing the coffee, then loudly slurping the coffee so it spreads to the back of the tongue. The coffee taster attempts to measure aspects of the coffee’s taste, specifically the body (the texture or mouthfeel, such as oiliness), sweetness, acidity (a sharp and tangy feeling, like when biting into an orange), flavour (the characters in the cup), and aftertaste.
Project Brief
(Download a PDF of the Project Brief)
We are a coffee company based in Southampton, UK, and are looking to improve where we source our coffee from. The quality of coffee sourced from our existing suppliers has significantly reduced in recent years, so we want to change suppliers whilst maintaining our reputation as the best artisanal coffee place in town.
We have obtained a wealth of coffee supplier data from the independent Coffee Quality Institute. We would like to use this data to help us decide where to send our coffee buyers to negotiate a new supply. However, we lack the skills required to analyse the data so we would like the help of your software team.
We would like an answer to the following question: “Which country should we send our buyers to?”
- We need you to provide evidence for your choice, including statistics and visualisations of all relevant variables that have impacted your choice
- We need the modified code to be supplied in a GitHub repository, with documentation that provides instructions for us to easily re-run your analysis code to reproduce your findings
Please bear in mind the following information about the coffee preferences of our business and customers:
- A survey found that our customers care most about the flavour, aroma, body and uniformity of their coffee.
- Our customers prefer coffee with a lower caffeine content.
- We would prefer to send our buyers to a country with lots of coffee producers so that they can visit multiple producers during their visit.
- We have a preference for washed/wet processing of beans because it results in a more consistent and predictable flavour profile.
Dataset
The data comes from the Coffee Quality Institute and was assembled by Data Scientist James LeDoux into the Coffee Quality Database GitHub Repository. The data contains reviews of 1312 arabica and 28 robusta coffee beans from the Coffee Quality Institute’s trained reviewers. The features include:
Quality measures
- Aroma
- Flavour
- Aftertaste
- Acidity
- Body
- Balance
- Uniformity
- Cup Cleanliness
- Sweetness
- Moisture
- Defects
Bean Metadata
- Processing Method
- Colour
- Species (arabica / robusta)
Farm Metadata
- Owner
- Country of Origin
- Farm Name
- Lot Number
- Mill
- Company
- Altitude
- Region
The data is not perfect, which may present some challenges for analysis. For example: Some of the data is missing, largely indicated by NA (not available) for data in some columns, e.g. “mill”, “variety” and “processing_method” The units used in some columns is inconsistent, e.g. “bag_weight” contains data in both kilograms and pounds
Data Dictionary
We have created a simplified version of the dataset, which contains the following variables:
| Variable | Class | Description |
|---|---|---|
| species | character | Species of coffee bean (arabica or robusta) |
| owner | character | Owner of the farm |
| country_of_origin | character | Where the bean came from |
| farm_name | character | Name of the farm |
| lot_number | character | Lot number of the beans tested |
| mill | character | Mill where the beans were processed |
| company | character | Company name |
| altitude | character | Altitude |
| region | character | Region where bean came from |
| producer | character | Producer of the roasted bean |
| number_of_bags | double | Number of bags tested |
| bag_weight | character | Bag weight tested |
| in_country_partner | character | Partner for the country |
| harvest_year | character | When the beans were harvested (year) |
| grading_date | character | When the beans were graded |
| owner_1 | character | Who owns the beans |
| variety | character | Variety of the beans |
| processing_method | character | Method for processing |
| aroma | double | Aroma grade |
| flavor | double | Flavor grade |
| aftertaste | double | Aftertaste grade |
| acidity | double | Acidity grade |
| body | double | Body grade |
| balance | double | Balance grade |
| uniformity | double | Uniformity grade |
| clean_cup | double | Clean cup grade |
| sweetness | double | Sweetness grade |
| cupper_points | double | Cupper Points (higher score = superior quality) |
| moisture | double | Moisture Grade |
Data Download
You can download a csv file of the data by clicking here: Download coffee ratings dataset
Note: We found this dataset through TidyTuesday, a weekly social data project organised by the Data Science Learning Community
Existing Code
From the coffee company:
We have some existing code that was developed by a part-time barista who was studying computer science at the University. We would like to build on this existing code, whilst ensuring we’re able to run the updated code ourselves in the future.
This code generates a visual plot of United States coffee suppliers in terms of flavor and cupper points, and can be found at https://github.com/softwaresaved/coffee-analysis. It is not currently documented, but can be run using the following commands:
BASH
python3 -m venv venv
source venv/bin/activate
pip install -r requirements.txt
python analyse-coffee.py
The code produces the following plot:
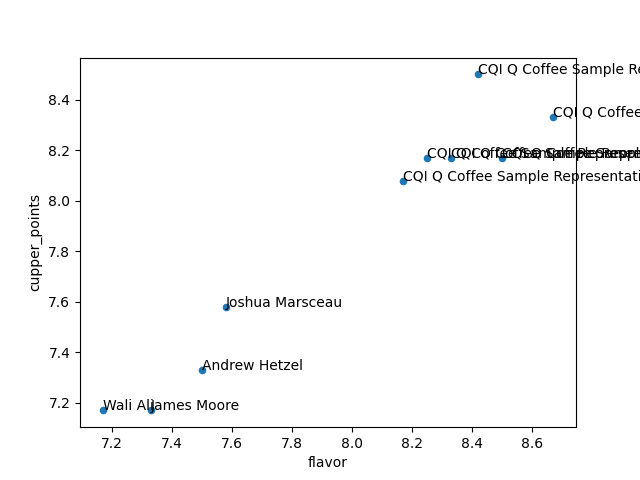
The plot is quite confusing and doesn’t help us, but please use the code as a starting point if it’s helpful to you at all.
Plan for the Coffee Beans Analysis Project
Over the next five days, you will work in teams on the coffee beans analysis project.
- On Day 1 (today), you’ll develop the product backlog for the project.
- On Day 2, you’ll meet with the client (someone role playing as the coffee company owner) and you’ll have your first Sprint Planning Meeting.
- On Day 3, you’ll conduct Sprint 1! You’ll hold a stand-up meeting, work on the project during a three hour block, then hold a Sprint Review and Sprint Retrospective (we’ll explain more about what these are later on).
- On Day 4, you’ll conduct Sprint 2, including the Sprint Planning Meeting, three hour work block, Sprint Review and Sprint Retrospective.
- On Day 5, you’ll present your work to the client and a panel of judges.
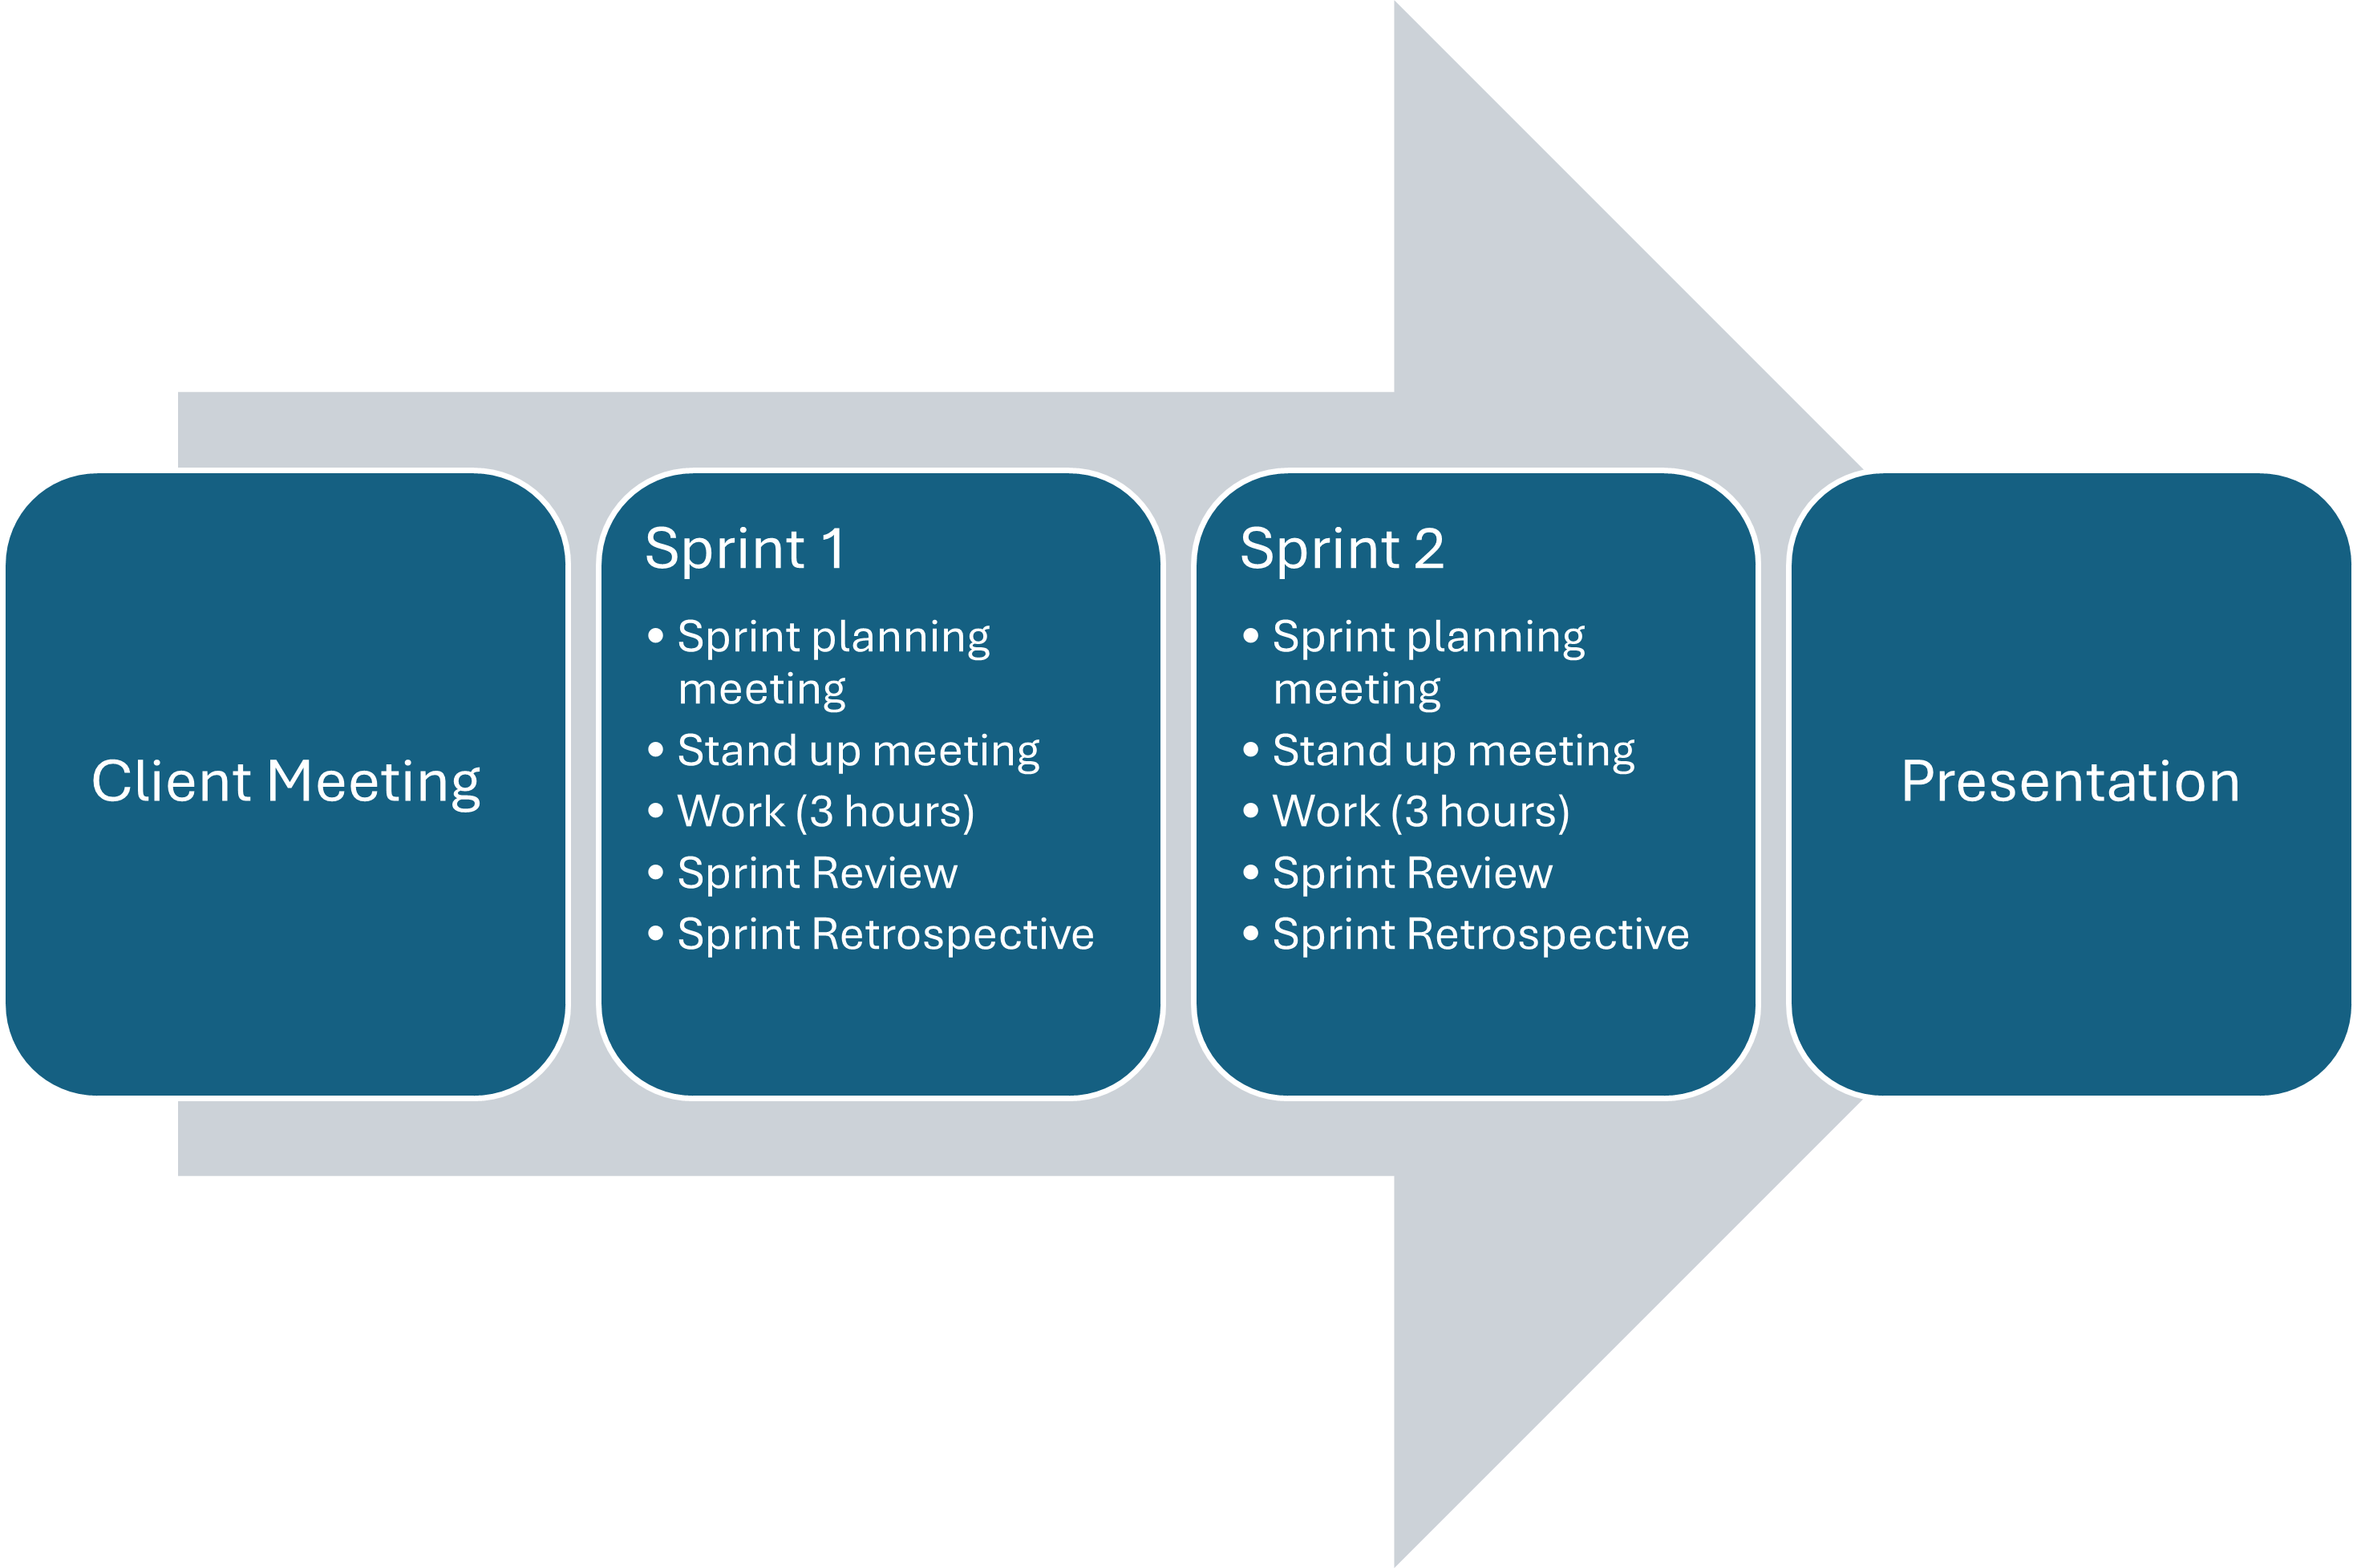
Bear in mind that this training course focuses on the process of software development rather than the work itself. You only have a total of 6 hours to actually work on the coffee beans analysis project, so we’re not expecting anything complex or large-scale.
Let’s get started with the Coffee Beans Analysis Project!
Solo Exercise: Develop User Stories
5 mins.
Read through the project brief linked above, and write down some user stories (no more than 6). The project is only concerned with the needs of the coffee company, so you only need to consider that as a single user type or persona.
Reminder of user story format:
As a [type of user], I want [an action] so that [benefit].
Some examples:
- As a coffee provider, I want to understand from which suppliers to source the best coffee beans, so that we maintain our artisanal reputation.
- As a coffee provider, I want to understand how many suppliers exist in each country, so that we can simplify our supplier chain.
- As a coffee provider, I want the resultant code to be reproducible and documented, so that I can regenerate results from previous analyses.
Group Exercise: Create a Product Repository
10 mins.
For this course each group will create it’s own GitHub software repository, based on another repository that contains the original client code that will be adapted.
First, select one member of the group to create the repository, who needs to:
- Go to https://github.com/softwaresaved/coffee-analysis on GitHub.
- Select the
Use this templatebutton on the right, and thenCreate a new repository. - On the following page, enter a suitable owner (such as yourself) and
the repository name (such as
coffee-analysis), and ensure the repository is public. Ordinarily in such circumstances, development would very likely be private, but for the purposes of training, select a public repository. - Select
Create repository
A new repository will be created, with the contents of the original repository included.
Secondly, each member of the group needs to be invited to collaborate on the repository, to ensure they have access. The individual who created the repository thus needs to:
- Select
Settingson the new repository page, then selectCollaborators(you may need to provide additional authentication for this step). - On the
Collaborators and teamspage, underManage access, selectAdd people. - In the pop-up box, you should be able to search for each group
member’s GitHub account by username, and select
Add to repositoryto send an invite. - Each new member will need to accept the invite, which is sent out by email.
Capturing Requirements in a Product Backlog
A product backlog is a prioritised list of functionality that a product should contain; essentially, a list of work for the development team. It represents everything that might be needed in the product and is the single source of truth for all work. They include requirement-related aspects such as features, bugs, improvements, and non-functional requirements, but also any other supporting tasks such as any needed research (also known as spikes), and other implementation-related tasks (like cleaning up/refactoring code).
A product backlog is owned by the product owner (the client), and is dynamic, in that it evolves as the needs of the product evolves. Regular backlog refinement sessions throughout a project ensure items are updated, estimated, re-prioritised if necessary, and ready for upcoming sprints.
Using GitHub Issues to Manage Requirements
For a given repository, GitHub provides Issues - a framework for managing bug reports, feature requests, and lists of future work which is ideal for our needs.
Go back to the home page for your repository in GitHub, and click on
the Issues tab. You should see a page listing the open
issues on your repository - currently there should be none. The issues
we add here will form our product backlog.

The Issues aren’t Visible!
If you do not see the Issues tab, the repository owner
needs to enable it in the settings of the repository: go to the
Settings tab, scroll down to the Features
section, and activate the checkmark on Issues.
From the Issues tab you can create new issues by
selecting New Issue:
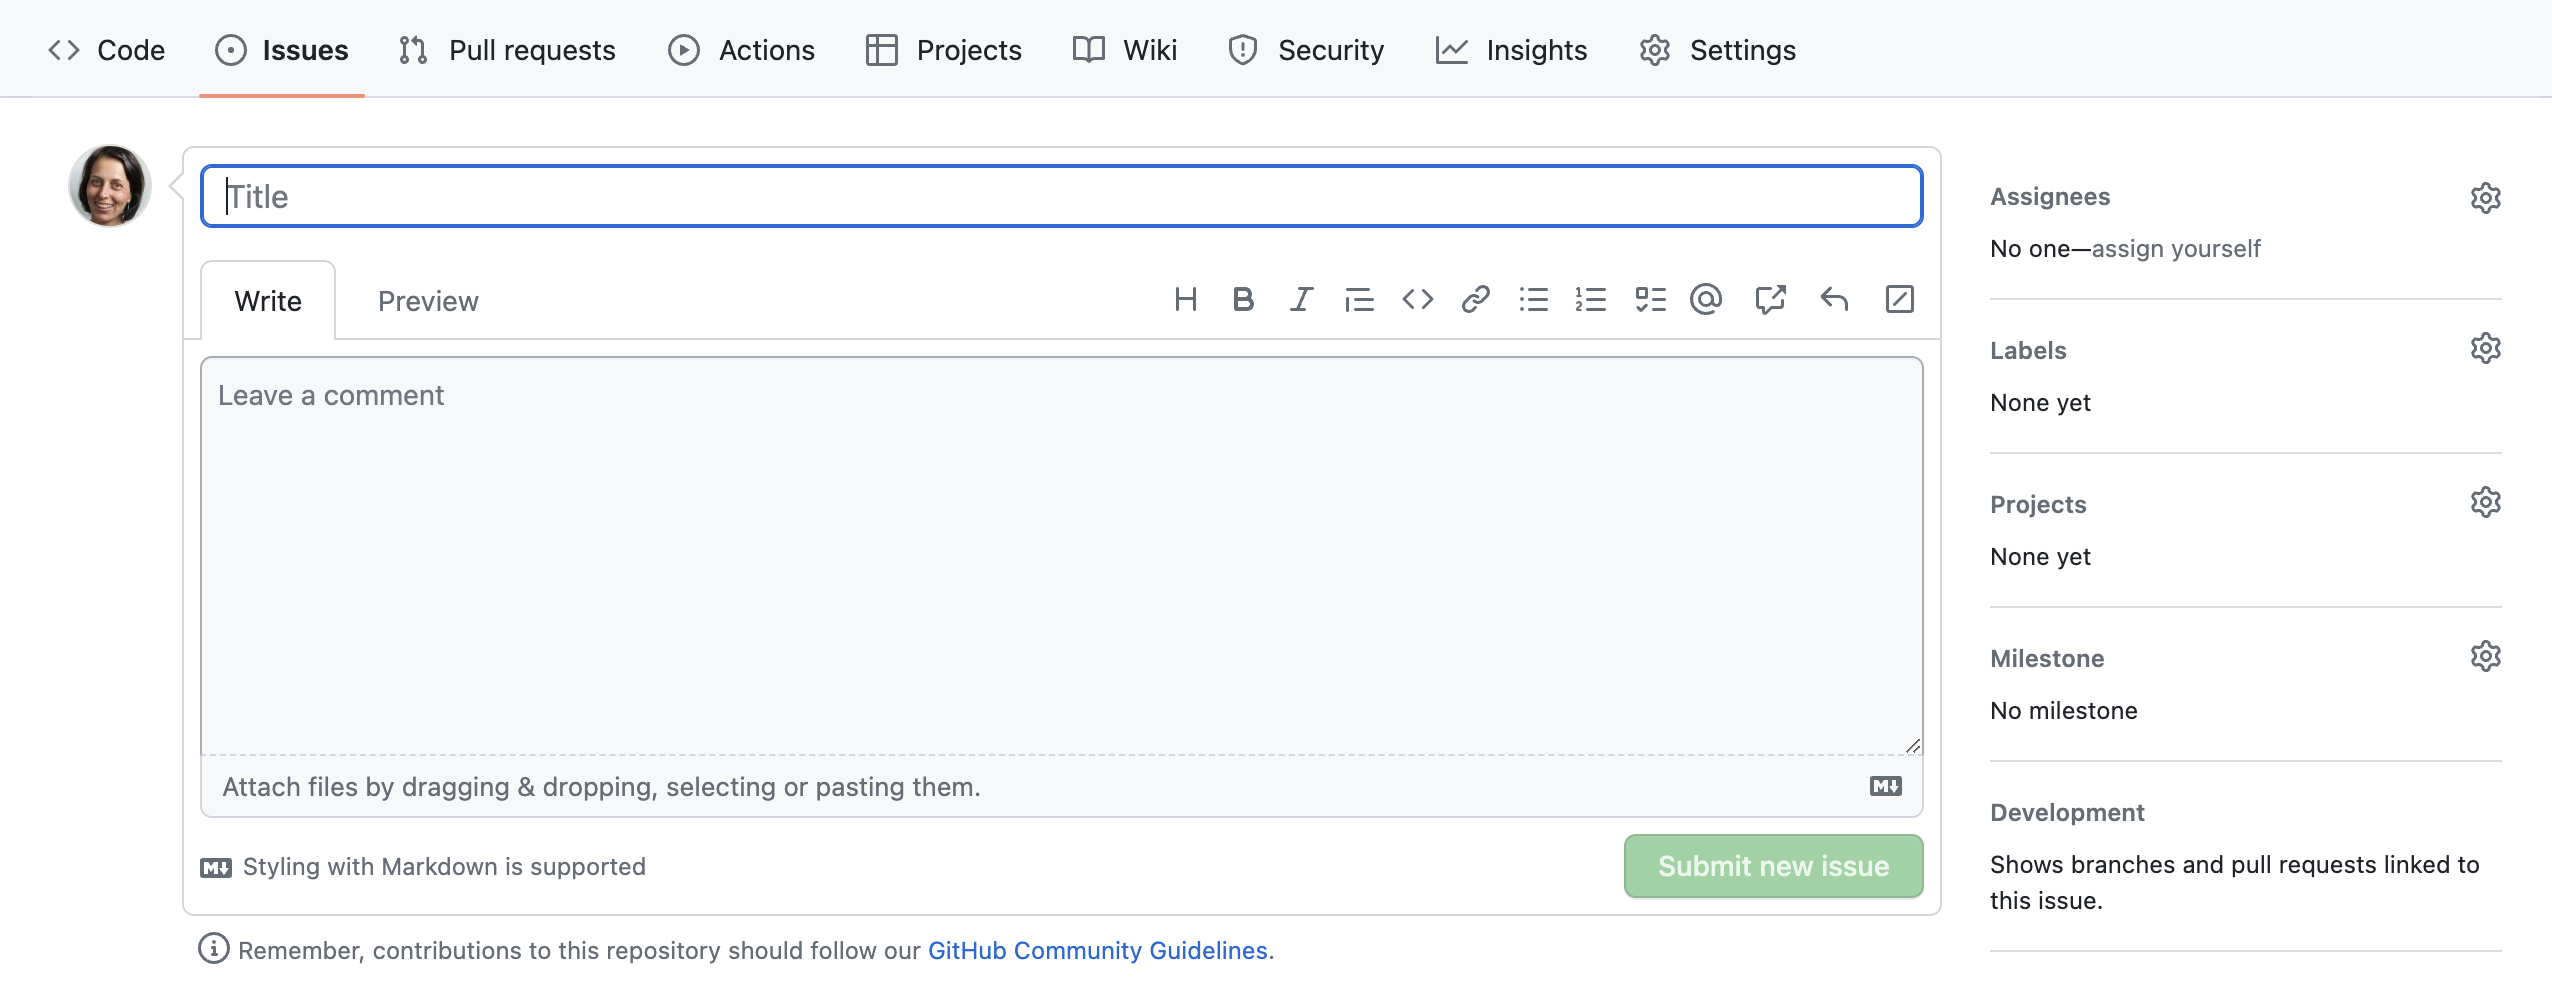
When you create an issue, you can add a range of details to them. They can be assigned to a specific developer for example - this can be a helpful way to know who, if anyone, is currently working to fix the issue, or a way to assign responsibility to someone to deal with it.
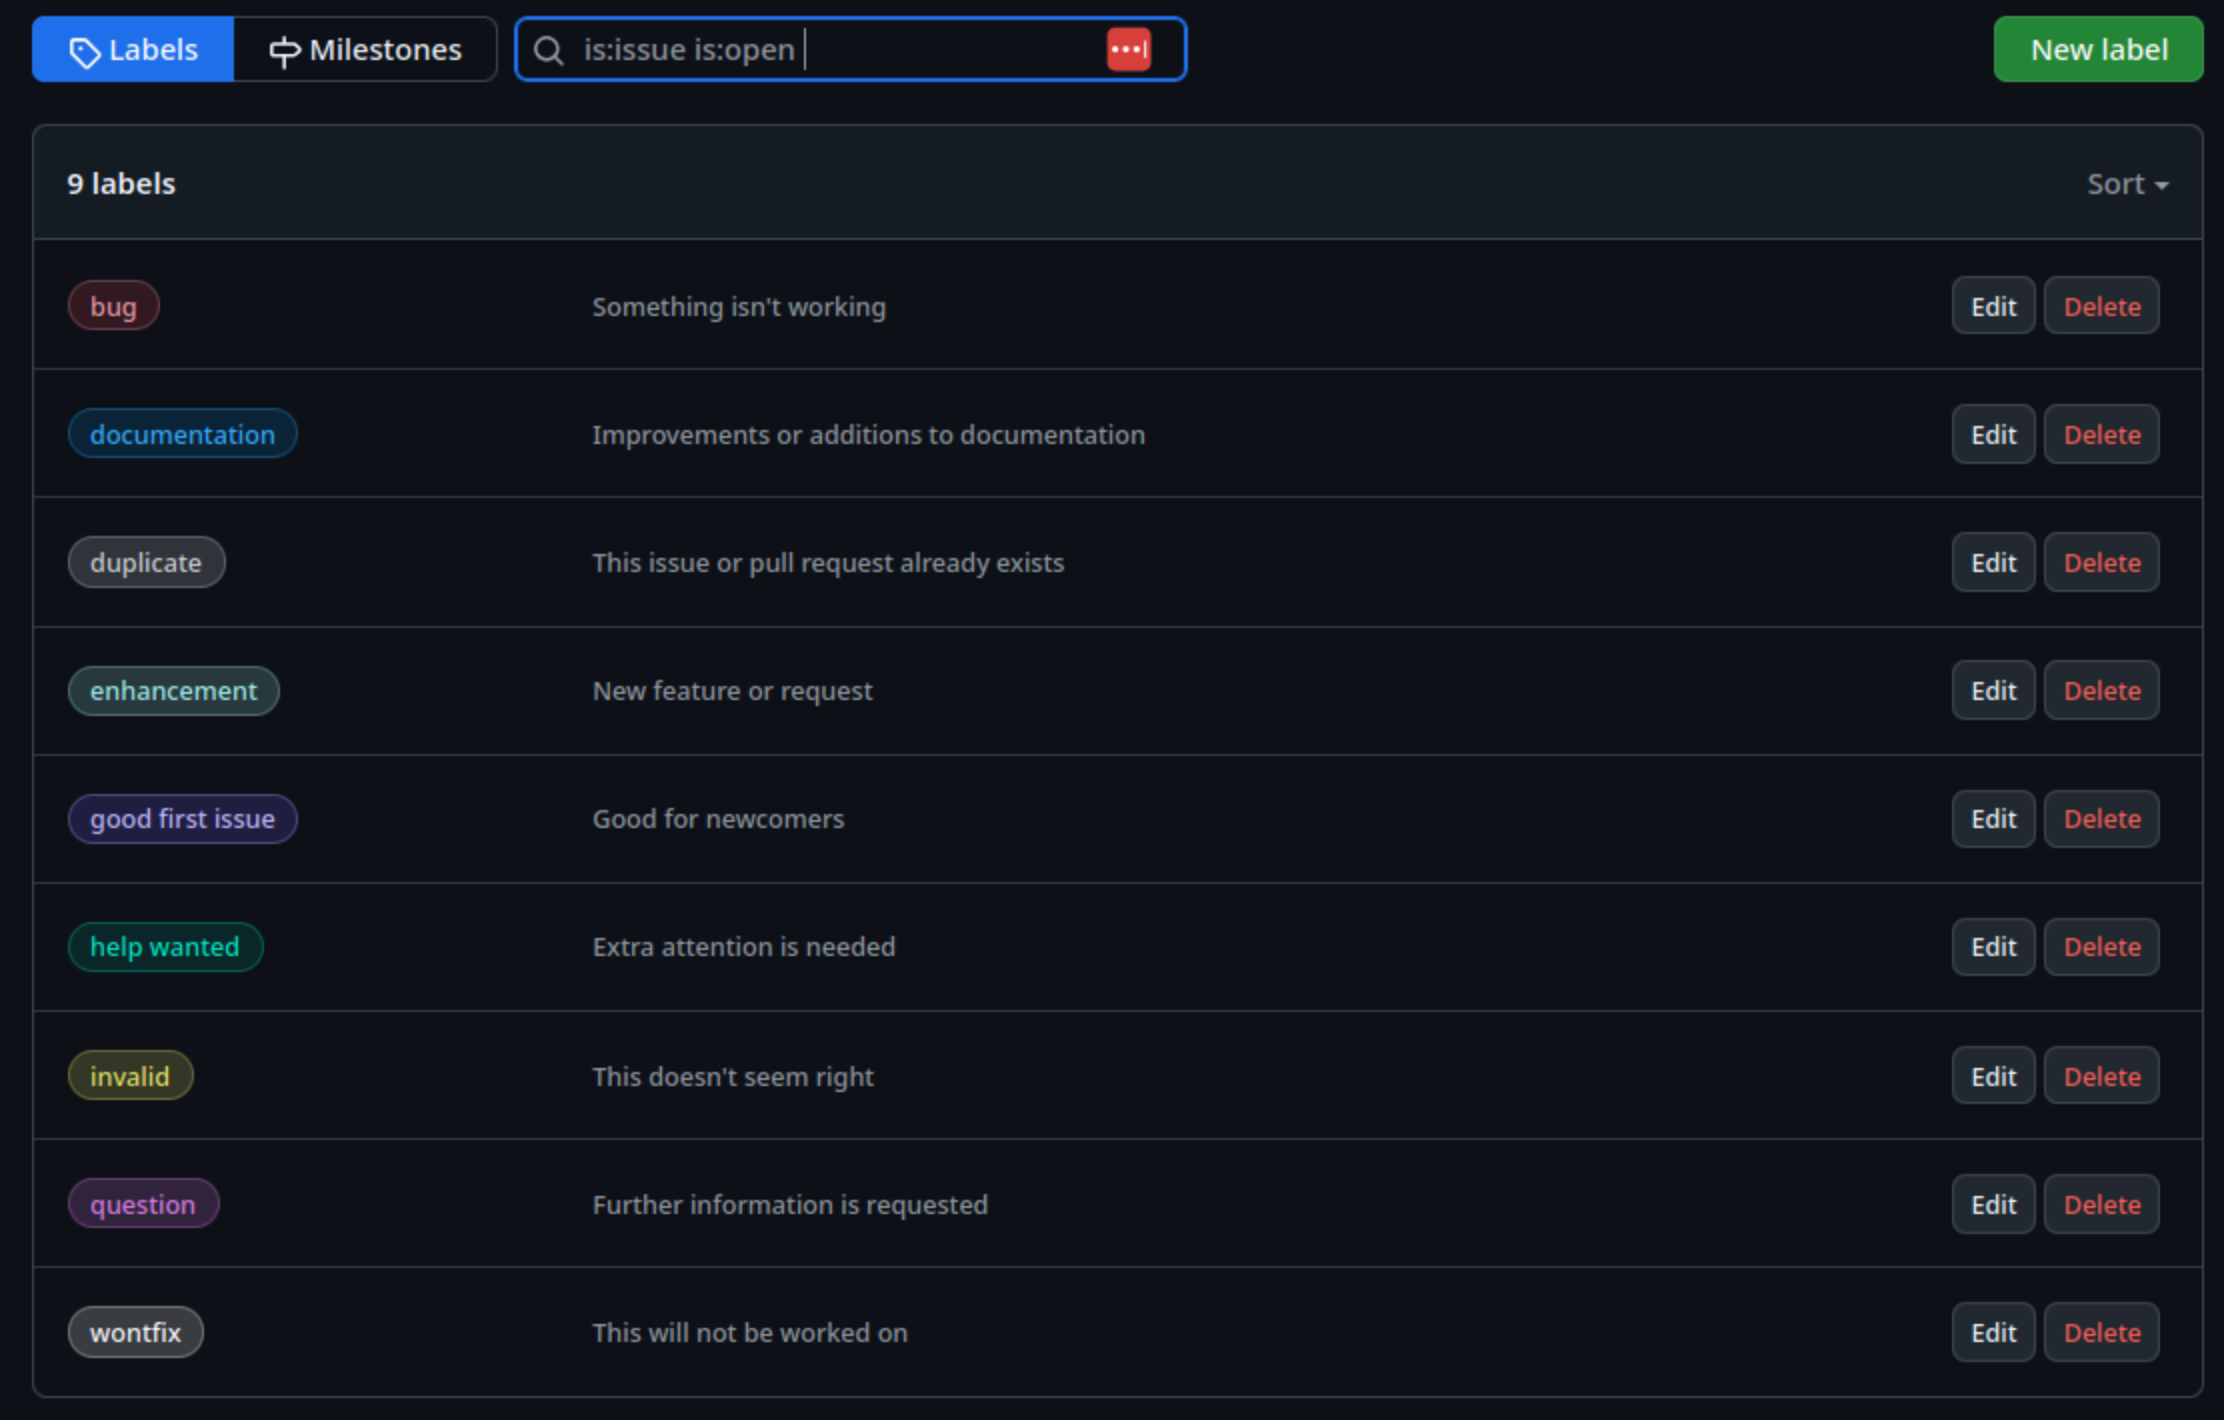
They can also be assigned a label. The labels available for issues can be customised, and given a colour, allowing you to see at a glance the state of your code’s issues. The default labels available in GitHub include:
-
bug- indicates an unexpected problem or unintended behavior -
documentation- indicates a need for improvements or additions to documentation -
duplicate- indicates similar or already reported issues, pull requests, or discussions -
enhancement- indicates new feature requests, or if they are created by a developer, indicate planned new features -
good first issue- indicates a good issue for first-time contributors -
help wanted- indicates that a maintainer wants help on an issue or pull request -
invalid- indicates that an issue, pull request, or discussion is no longer relevant -
question- indicates that an issue, pull request, or discussion needs more information -
wontfix- indicates that work will not continue on an issue, pull request, or discussion
Adding New Issue Labels
Many of these label types are useful, but what if we need to add new labels?
If we go to our Issues tab, then select
Labels next to the search box, we should see a list of
existing issue labels:
By selecting New label, we specify a new label name,
description, and even a new label colour, before selecting
Create label.
Add our Coffee Analysis Requirements to a Product Backlog
Class Exercise: What Makes a Good Requirement?
5 mins.
As a class, discuss which characteristics make a good requirement.
In general, a good requirement is:
- Clear and concise - there shouldn’t be any confusion regarding its interpretation
- Valuable - is relevant to the project by addressing a user need
- Singular in scope - articulating a single need or quality attribute
- Actionable - is sufficiently concrete and detailed enough to be implementable
- Attainable - is realistic enough in scope to be achieved within a reasonable timeframe
- Verifiable/testable - any solution that addresses the requirement can be verified to satisfy that requirement
Group Exercise: Create a Product Backlog
15 mins.
As a group:
- Examine the project brief and identify (perhaps around 10-15) key requirements for the project, noting them down in your shared team GoogleDoc.
- Once you have your list, add these as new issues to your product backlog in GitHub, assigning an appropriate label to classify the type of issue.
For our purposes it would be good to label some issues as a new
feature as well (as opposed to an enhancement
of existing code), so have one member of the team add this as a new type
of label and use that where appropriate. Note: ensure
only one member of the team adds the new label!
Be sure to add a suitable (and concise) description for the issue.
References
- User Stories help to understand project needs from the perspective of the client
- User Stories follow the format
As a [type of user], I want [an action] so that [benefit] - Clear and well understood requirements are fundamental to a successful project
- Evidence that most project errors are introduced during the handling of requirements
- Requirements will change over time, and we need to allow and manage for that
- Requirements are more than just features: non-functional requirements capture the environment and how and in what way the software should operate and be provided
- A product backlog is a prioritised list of desired product functionality owned by the product owner (typically the client)
Content from 1.4 Estimation, Prioritisation, and Stakeholder Management
Last updated on 2025-09-25 | Edit this page
Overview
Questions
- How should I estimate how long fulfilling a requirement will take?
- How should I prioritise requirements?
- What methods help to clarify requirements with stakeholders?
Objectives
- Create a GitHub Project Board to manage issues
- Add backlog items to the Project Board
- Describe the key principles and approaches to estimation
- Apply MoSCoW internally to initially prioritise items in a product backlog
Managing Issues in GitHub
Managing our issues as presented in the Issues page is
helpful as a view to everything that’s being done, but it gives a
relative flat representation of tasks and it’s not straightforward to
determine, at a glance, the overall status of a project. In
particular:
- What’s still to do
- What’s currently in progress
- What’s been completed
This is particularly the case when we have many issues for a given project, and more than one person working on them.
In an agile Scrum sense, if we’re currently in a sprint (or preparing for one in a sprint planning session) it would be beneficial to have a way to visualise and manage this information efficiently. GitHub does provide Milestones as an organisational mechanism, where we are able to group issues together in logical lists, but this approach also has similar limitations at scale. In addition, a key technique in agile approaches is frequent prioritisation, and that’s difficult to do without a higher-level approach.
GitHub Projects
GitHub Projects enable ways of organising issues into smaller “sub-projects” (i.e. smaller than the “project” represented by the whole repository). Projects provide a way of visualising and organising work which is not time-bound and is on a higher level, which makes management easier.
Milestones are typically used to organise lower-level tasks that have deadlines and progress of which needs to be closely tracked (e.g. release and version management). The main difference is that Milestones are a repository-level feature (i.e. they belong and are managed from a single repository), whereas projects are account-level, and can manage tasks across many repositories under the same user or organisational account. This is particularly useful for larger projects with development across multiple repositories (for example, with client-side code in one repository and server-side code in another). This enables the development team to manage issues on these repositories under a single project board, if desired.
Conceptually, for our purposes a GitHub Project is a “project board”, which originated as a tool used by Toyota in the 1940s called the “Kanban” system. Kanban-style boards consists of columns and cards to keep track of tasks. You break down your project into smaller sub-projects, which in turn are split into tasks which you write on cards, then move the cards between columns that describe the status of each task. Cards are usually small, descriptive and self-contained tasks that build on each other. Breaking a project down into clearly-defined tasks makes it a lot easier to manage.
In GitHub, a project board adopts this Kanban-style, with entries on the board either being:
- Cards - a short note which belongs only to the Project Board
- Issues - essentially GitHub issues imported from a repository (or many repositories)
As well as a Kanban-style boards, GitHub Projects also supports other types of view too, including roadmap views, table-based views, or as a spreadsheet. For the purposes of this training, we’ll use the boards view.
Creating a Board for our Project
Group Exercise: Create a Project Board
5 mins.
To use a project board in GitHub, it needs to be created and shared with the rest of the group.
Firstly, select one of the team to create the board, who will:
- On the group repository’s main page, select
Projects, thenNew Project.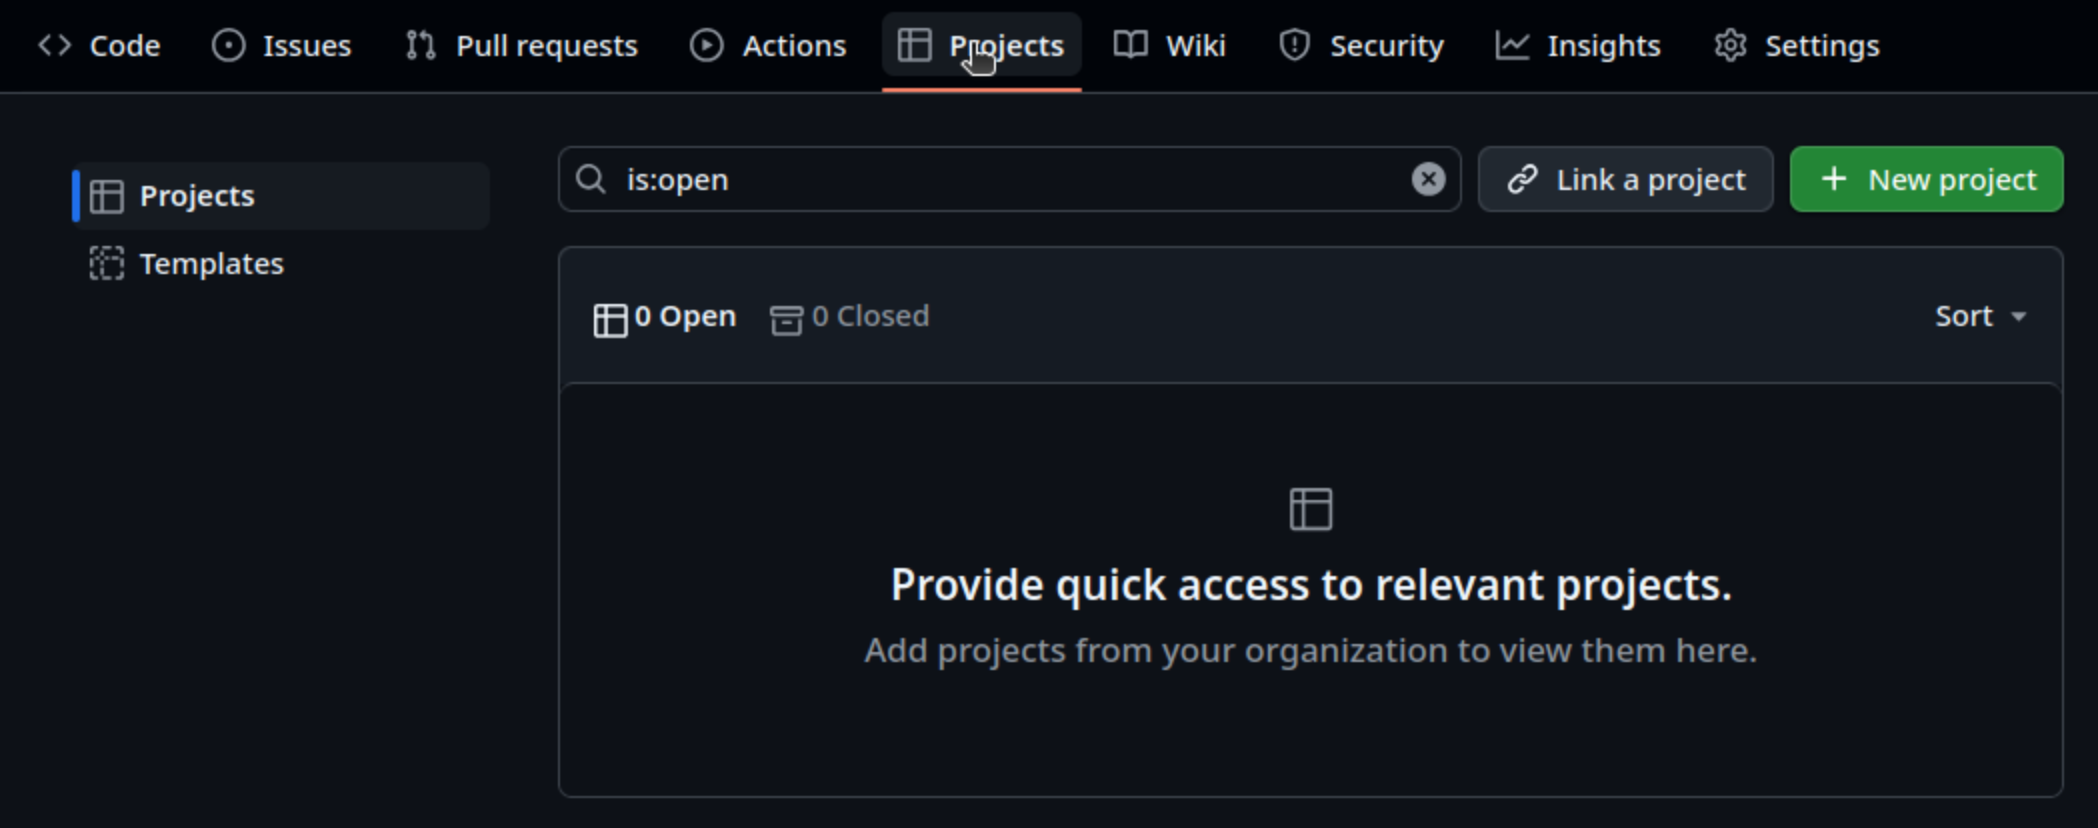
- In the
Create Projectpop-up window, we are presented with some styles to choose from:Table,BoardandRoadmap. SelectBoard. - Decide and enter a name for the board,
Coffee Analysisfor example: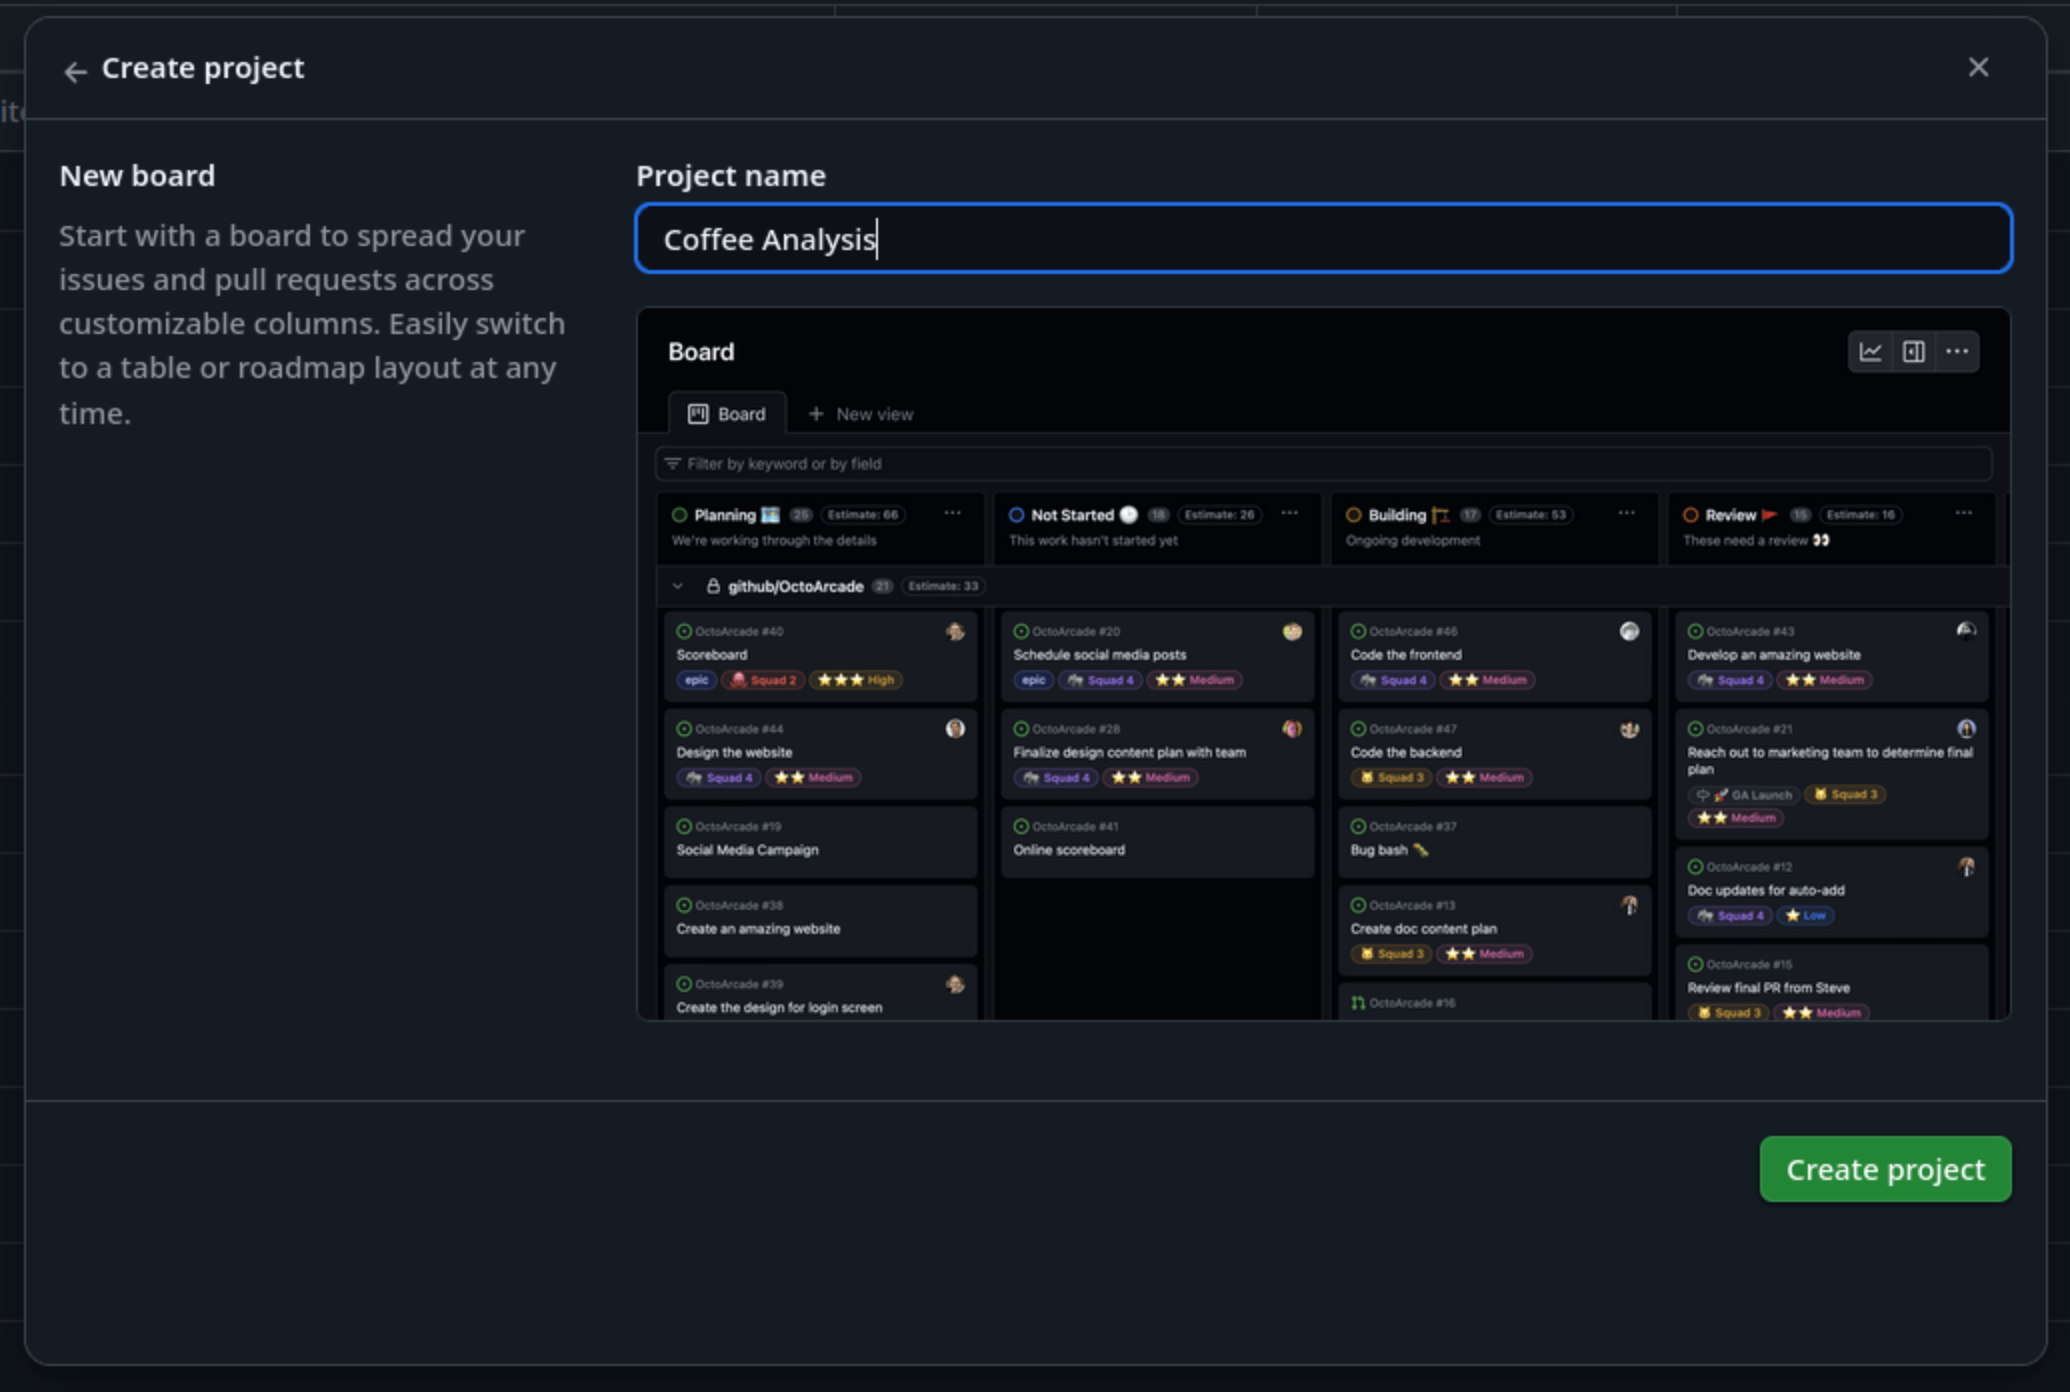
Similarly to how the repository was shared with the rest of the group, the project board also needs to be shared:
- Select the
...in the top right and select `Settings: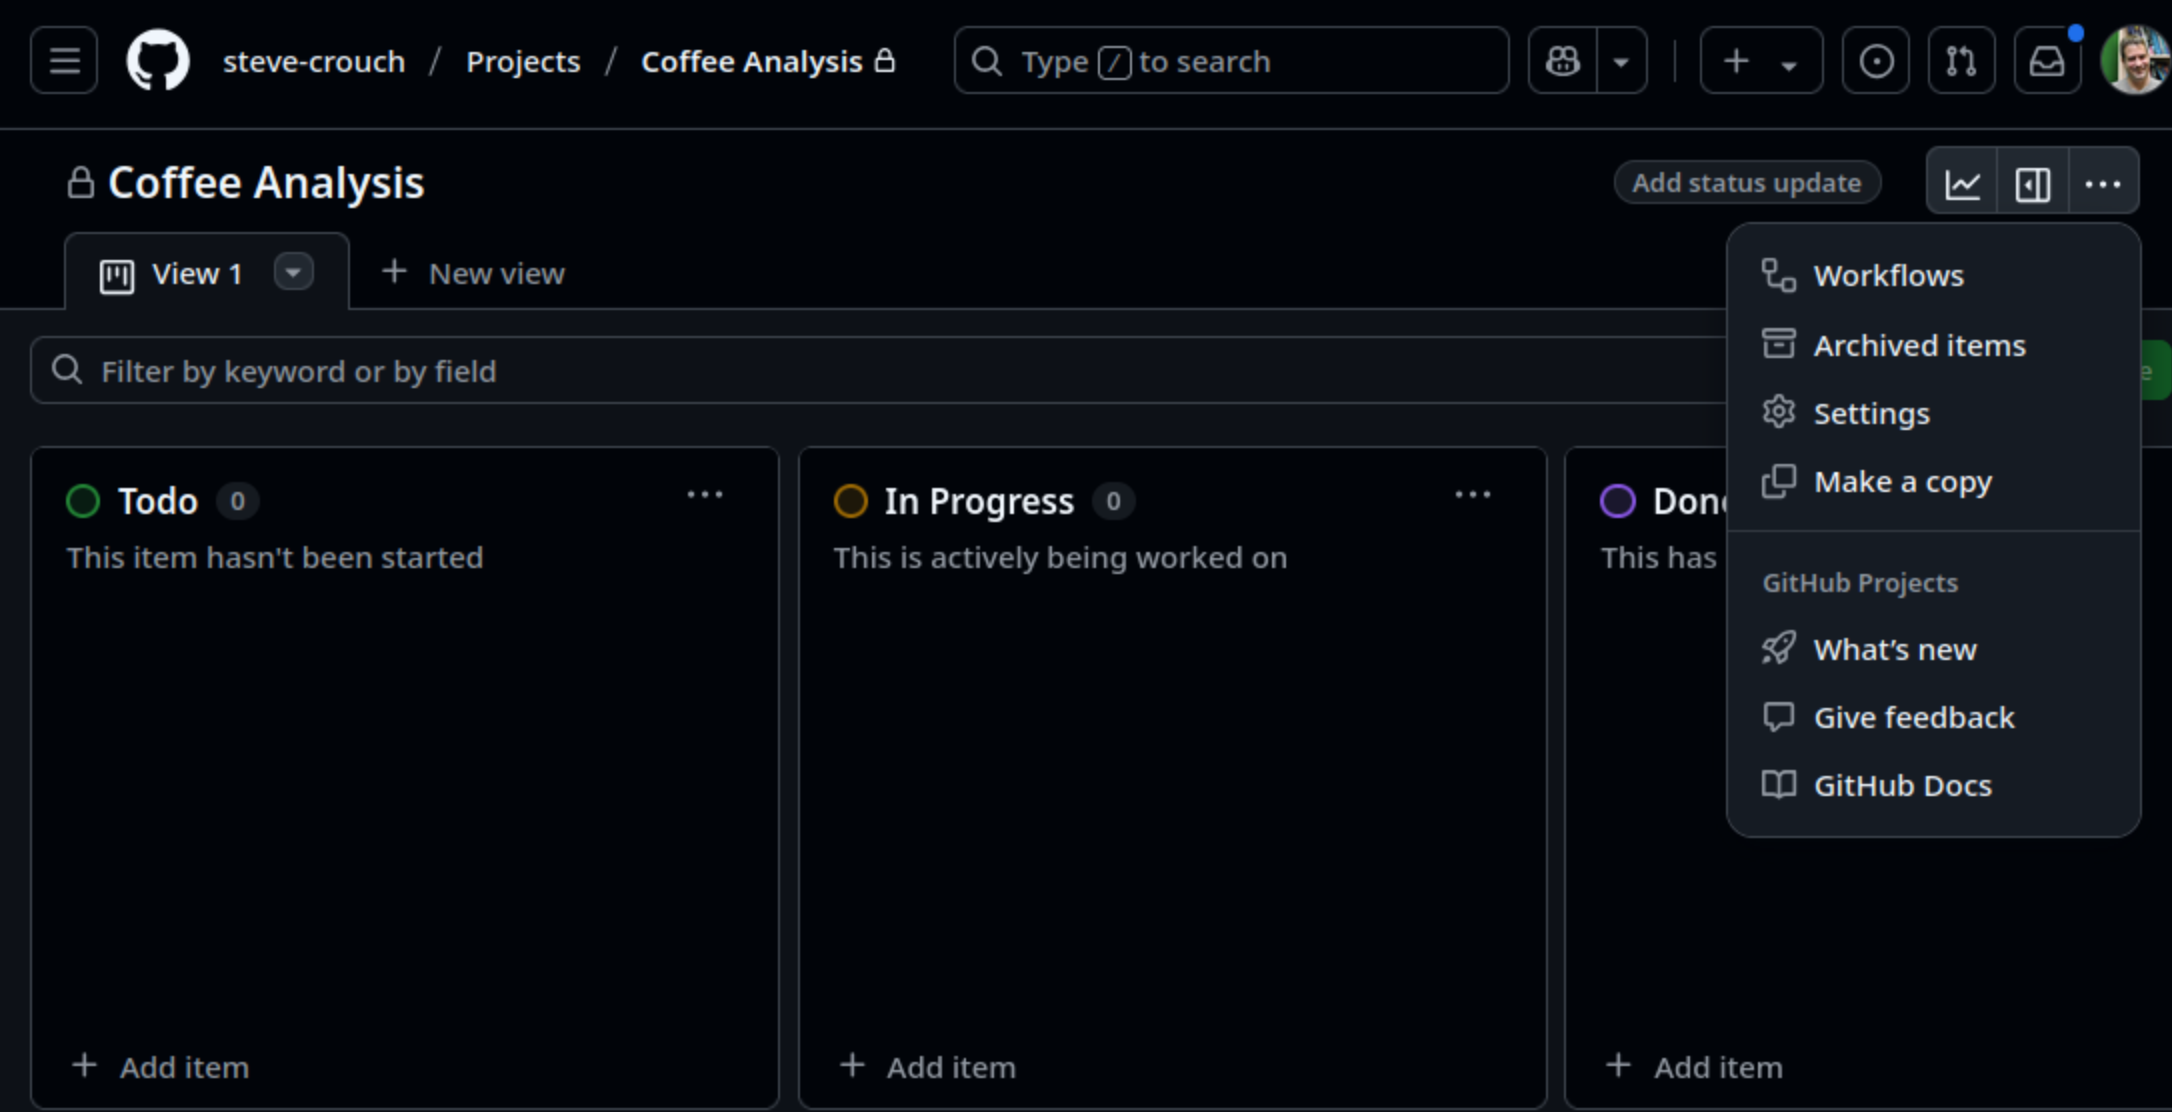
- Select
Manage accessfrom the navigation bar on the left. - Under
Invite collaborators, add each member of the group by adding their username.
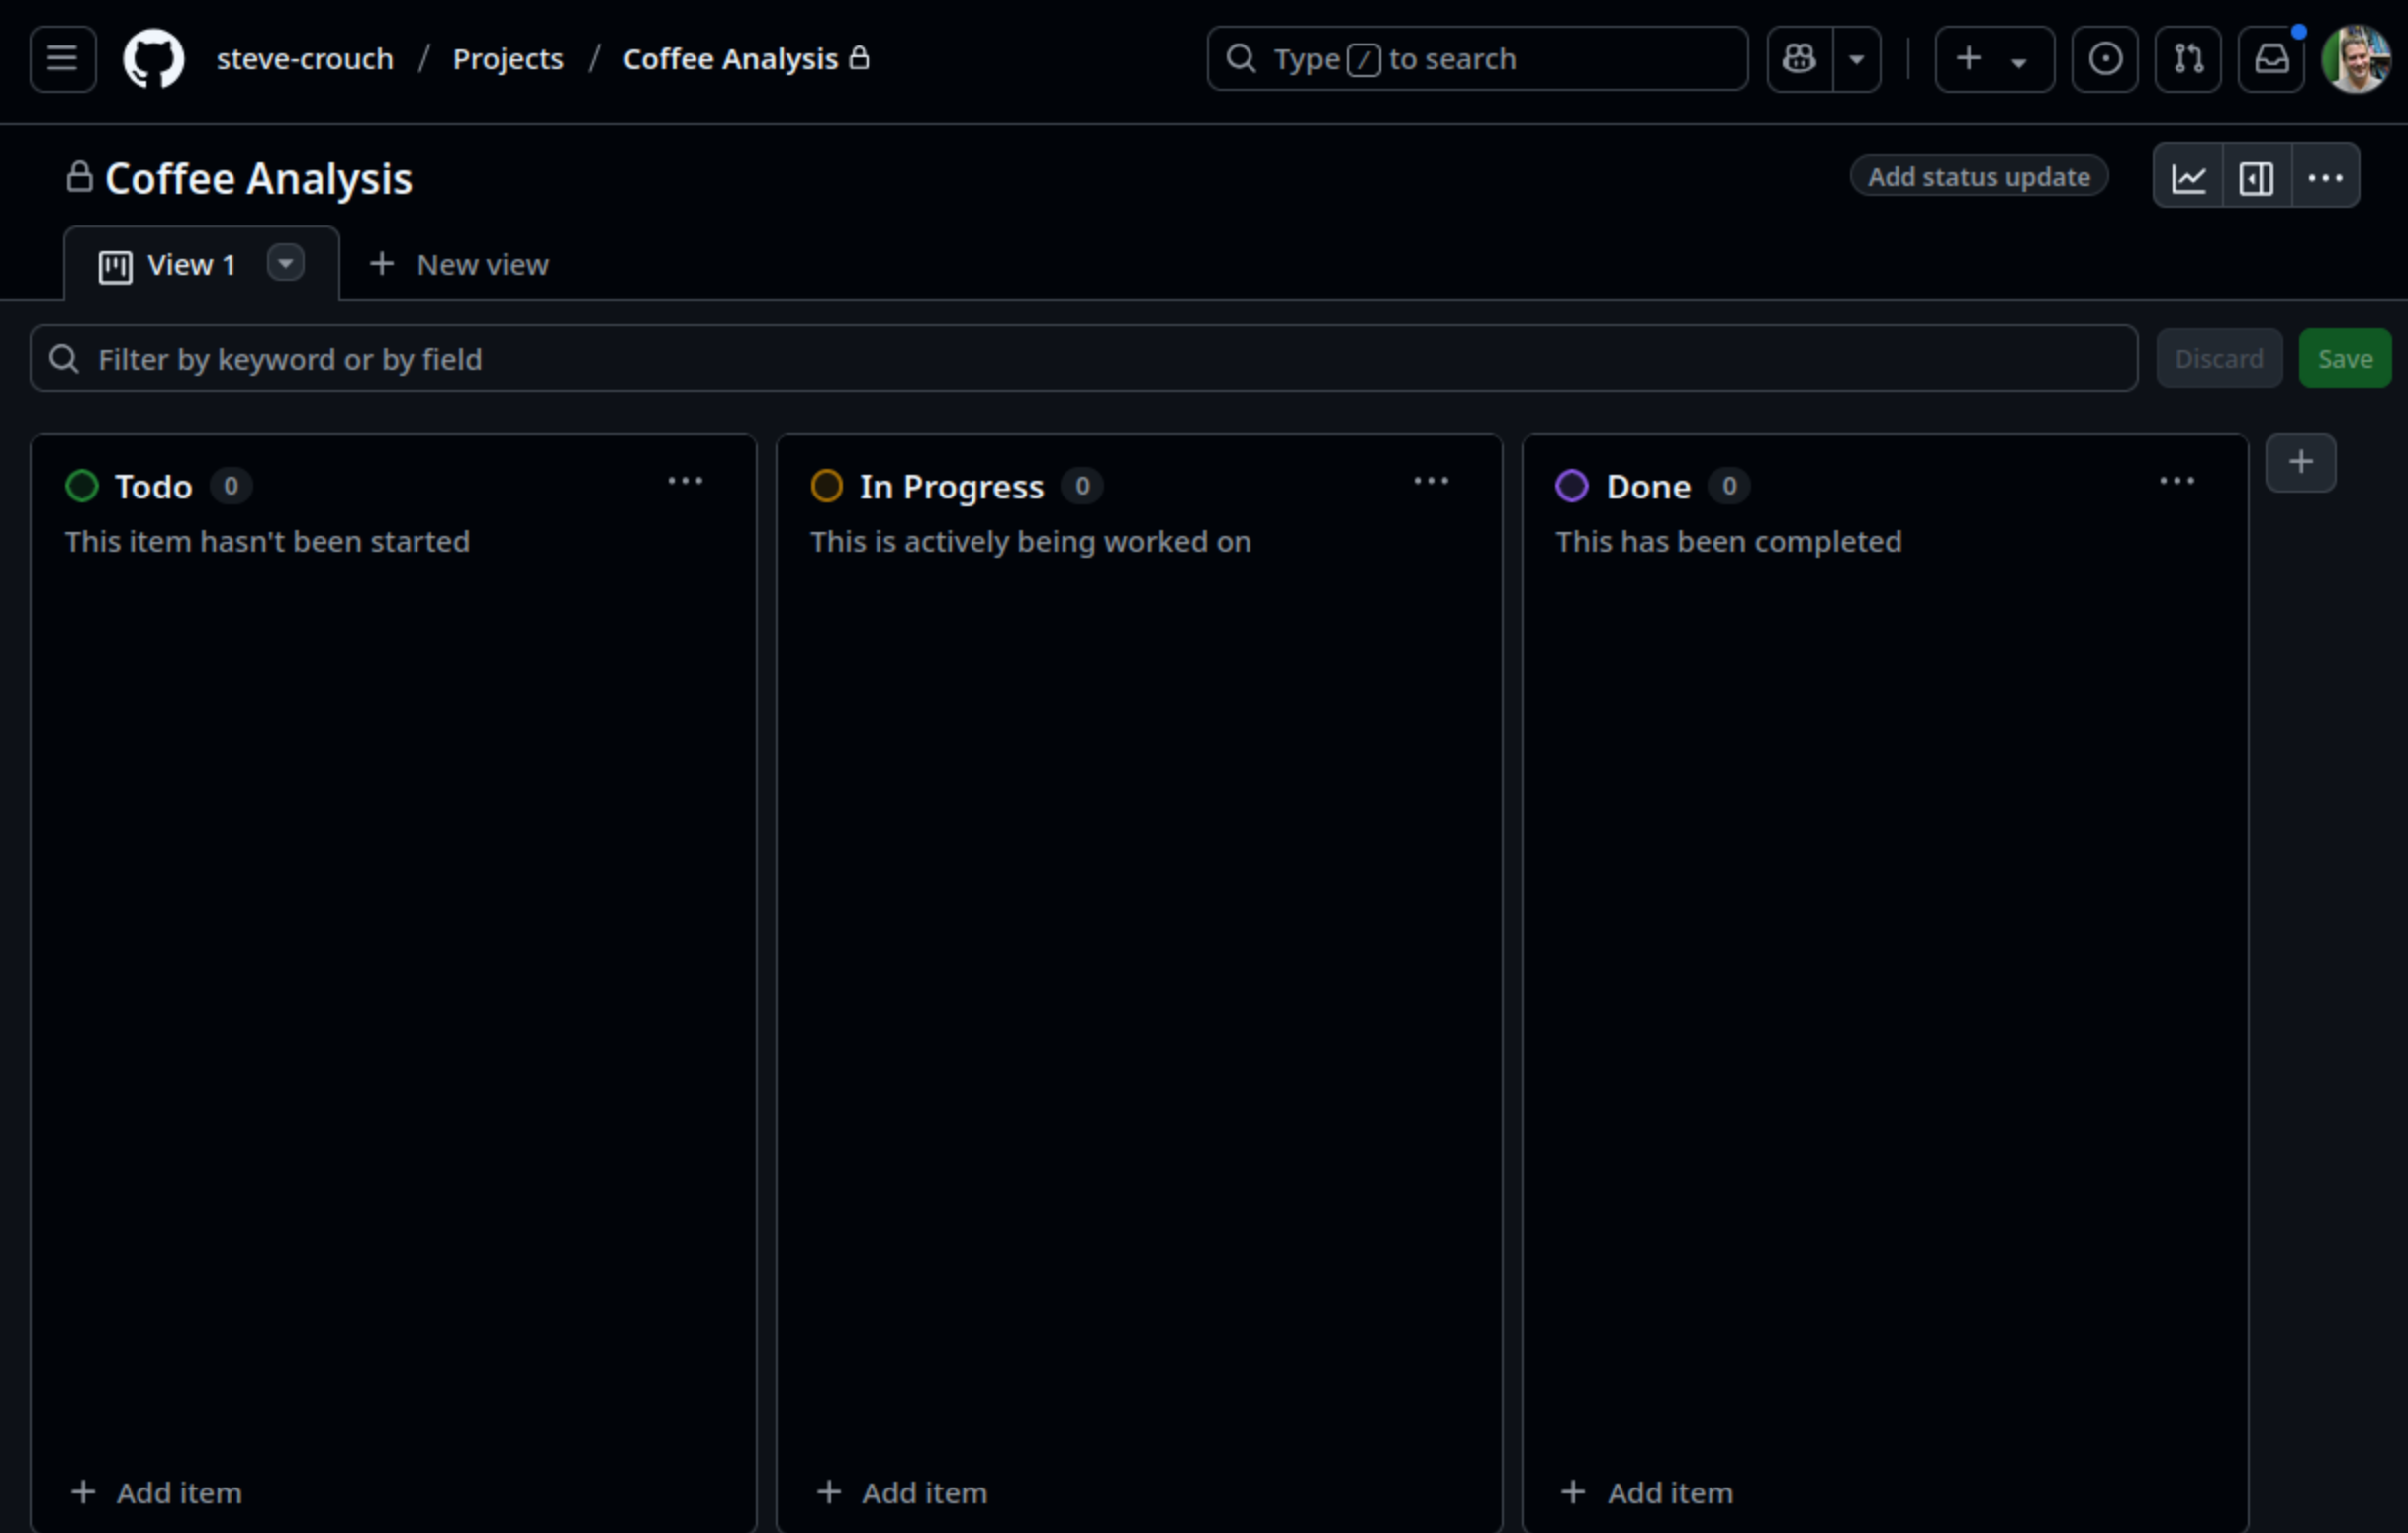
Once created, you should see the default layout for a GitHub board,
with three columns: Todo, In Progress, and
Done, into which we import repository issues, and manage
them.
Adapting our Board Columns…
You can add or remove columns from your project board to suit your
use case. One commonly seen extra column is On hold or
Waiting. If you have tasks that get held up by waiting on
other people (e.g. to respond to your questions) then moving them to a
separate column makes their current state clearer.
Importing Issues
In order to manage our repository’s issues, we need to first add them to our board.
If you select + Add item at the bottom of the
Todo column, you’ll be able to enter some text. If you
continue to add arbitrary text, this will create a board card, but
instead, we want to add issues from our repository. To do this, type
# followed by your repository name,
e.g. #coffee-analysis.
This will present a short list of repositories that match that name (hopefully just the one!). Select the repository and you should see a list of issues appear from which you are able to select to add to the board (although don’t do this just yet!)
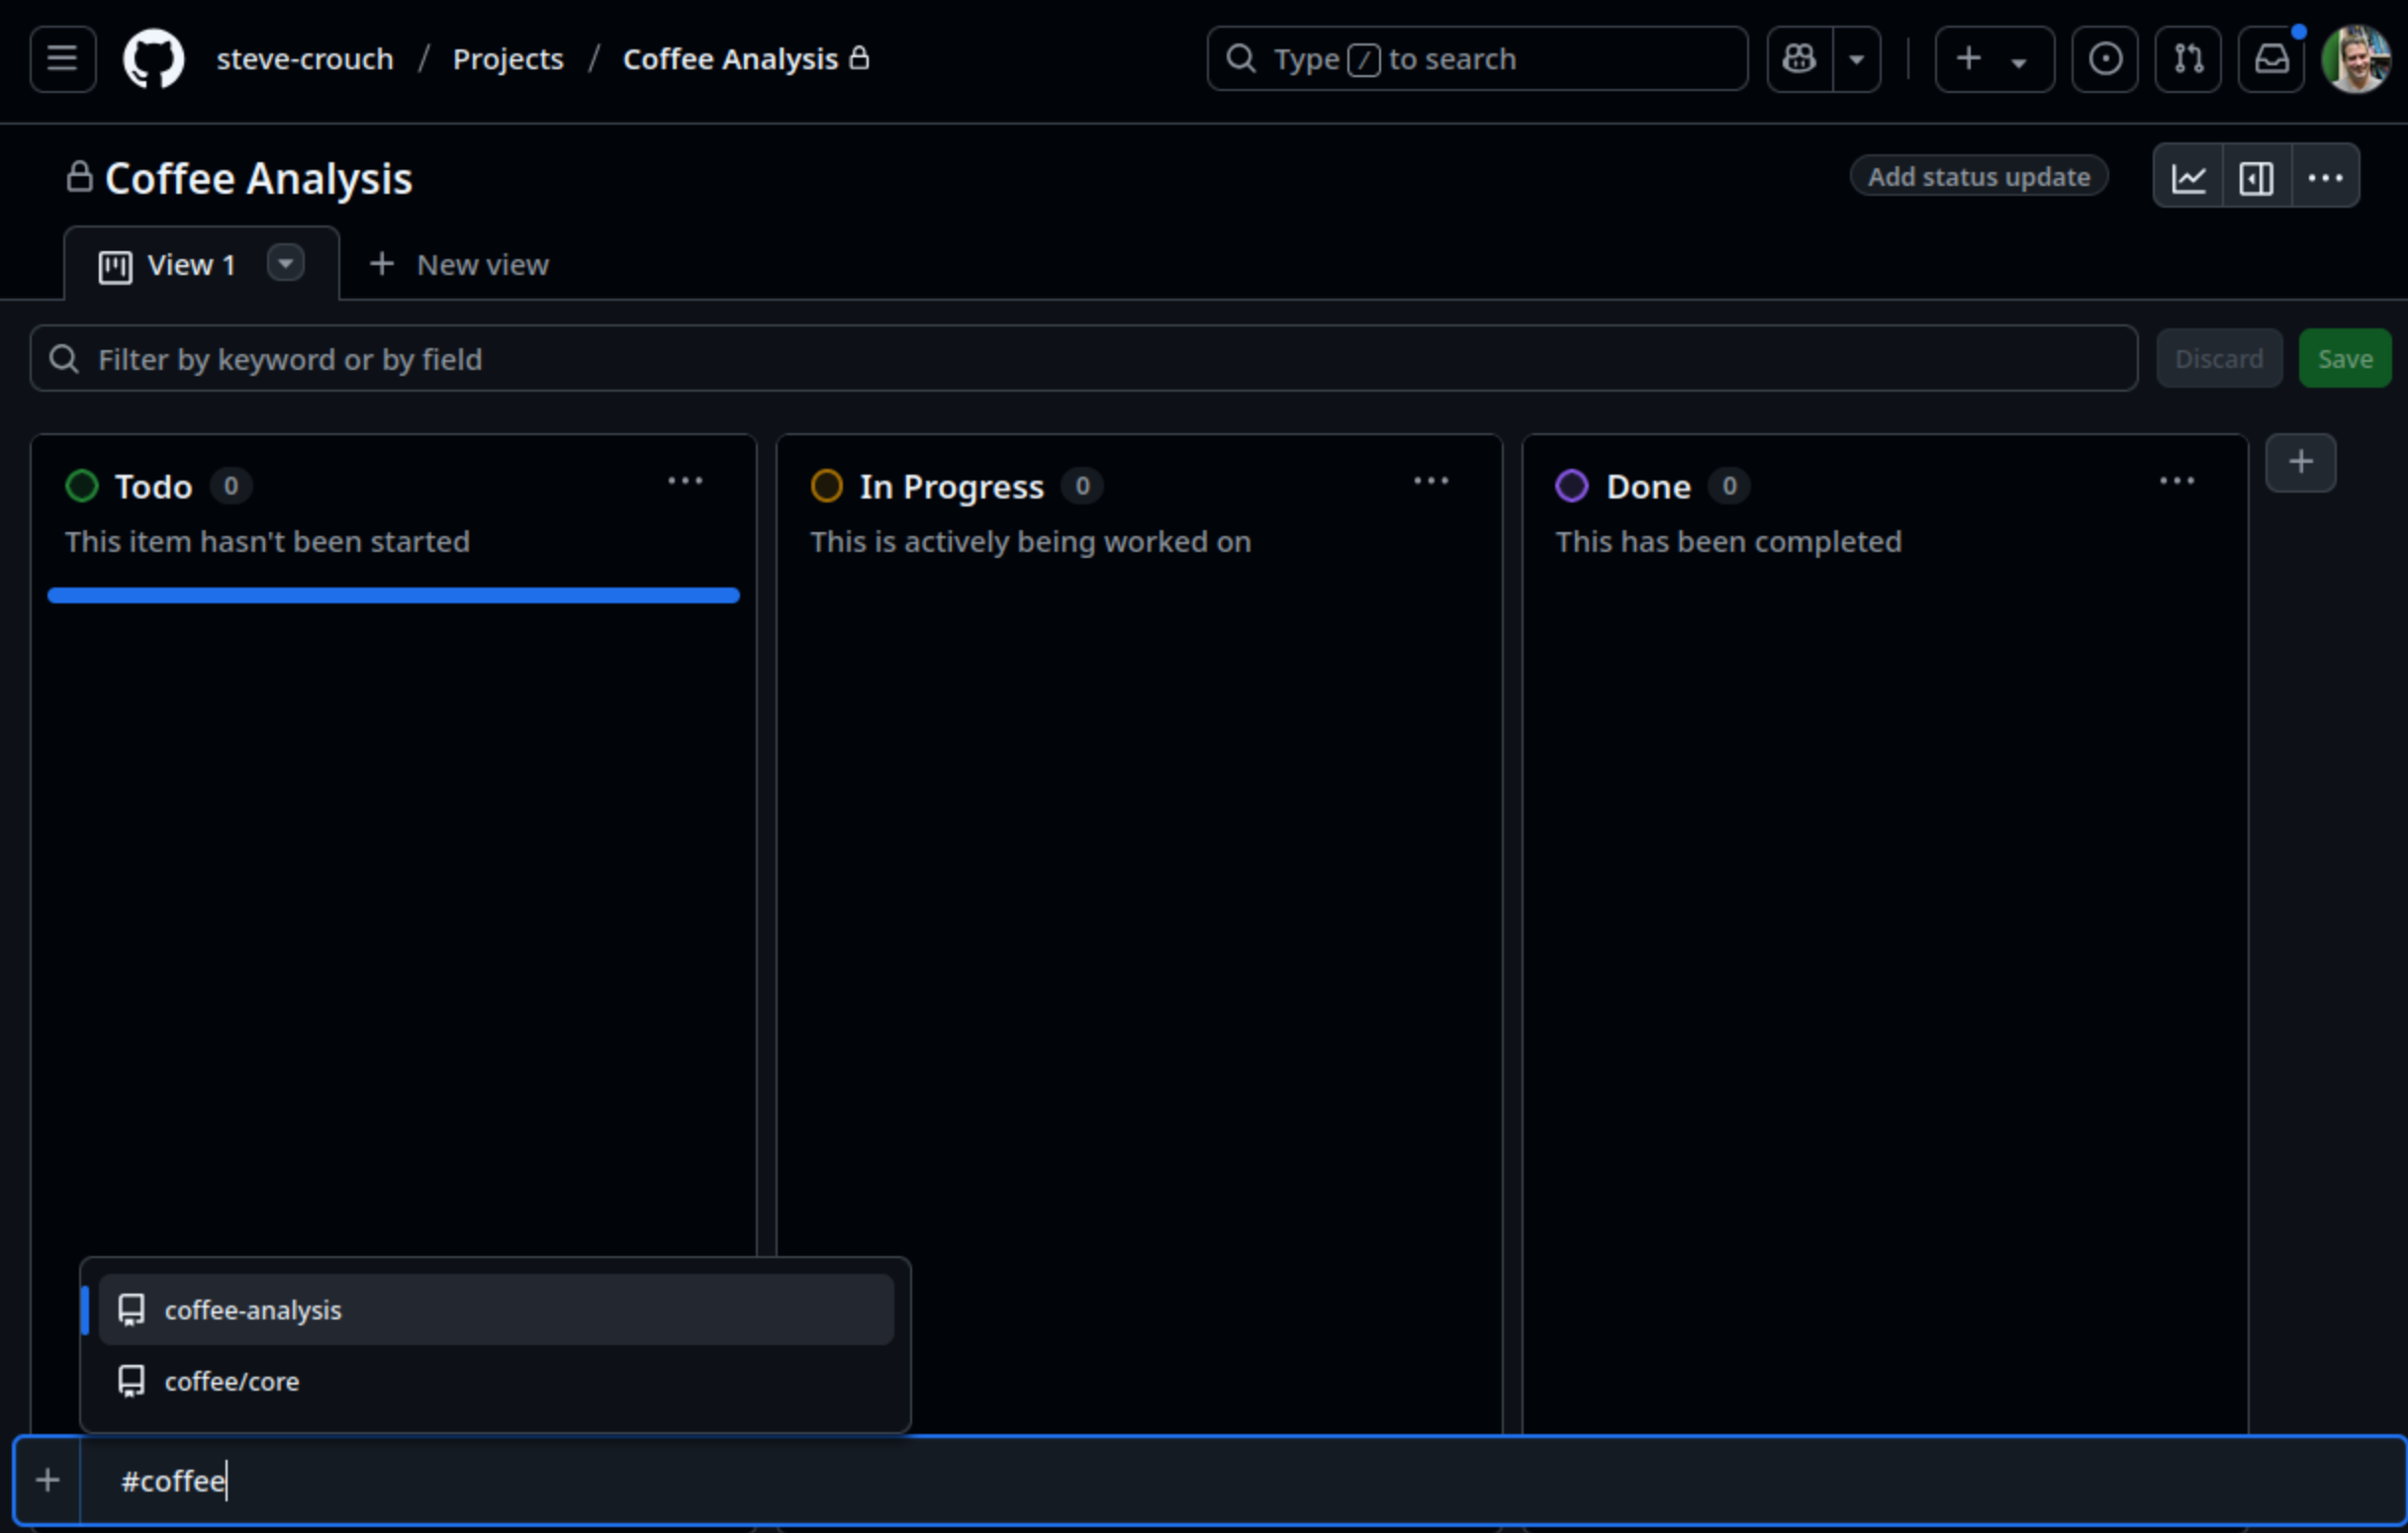
Group Exercise: Add our Project Backlog Issues to the Board
5 mins.
In your groups each add at least one repository issue to the
Todo column in the project board until they have all been
added. Ensure that everyone gets a chance to add at least one issue!
You may see that the added issues don’t display their labels by default. This is particularly useful, so to do that:
- Select the drop down next to
View 1(a down pointing arrow) - Select
Fields, then selectLabelsfrom theHidden fields - Select
Saveon the pop=up that appears
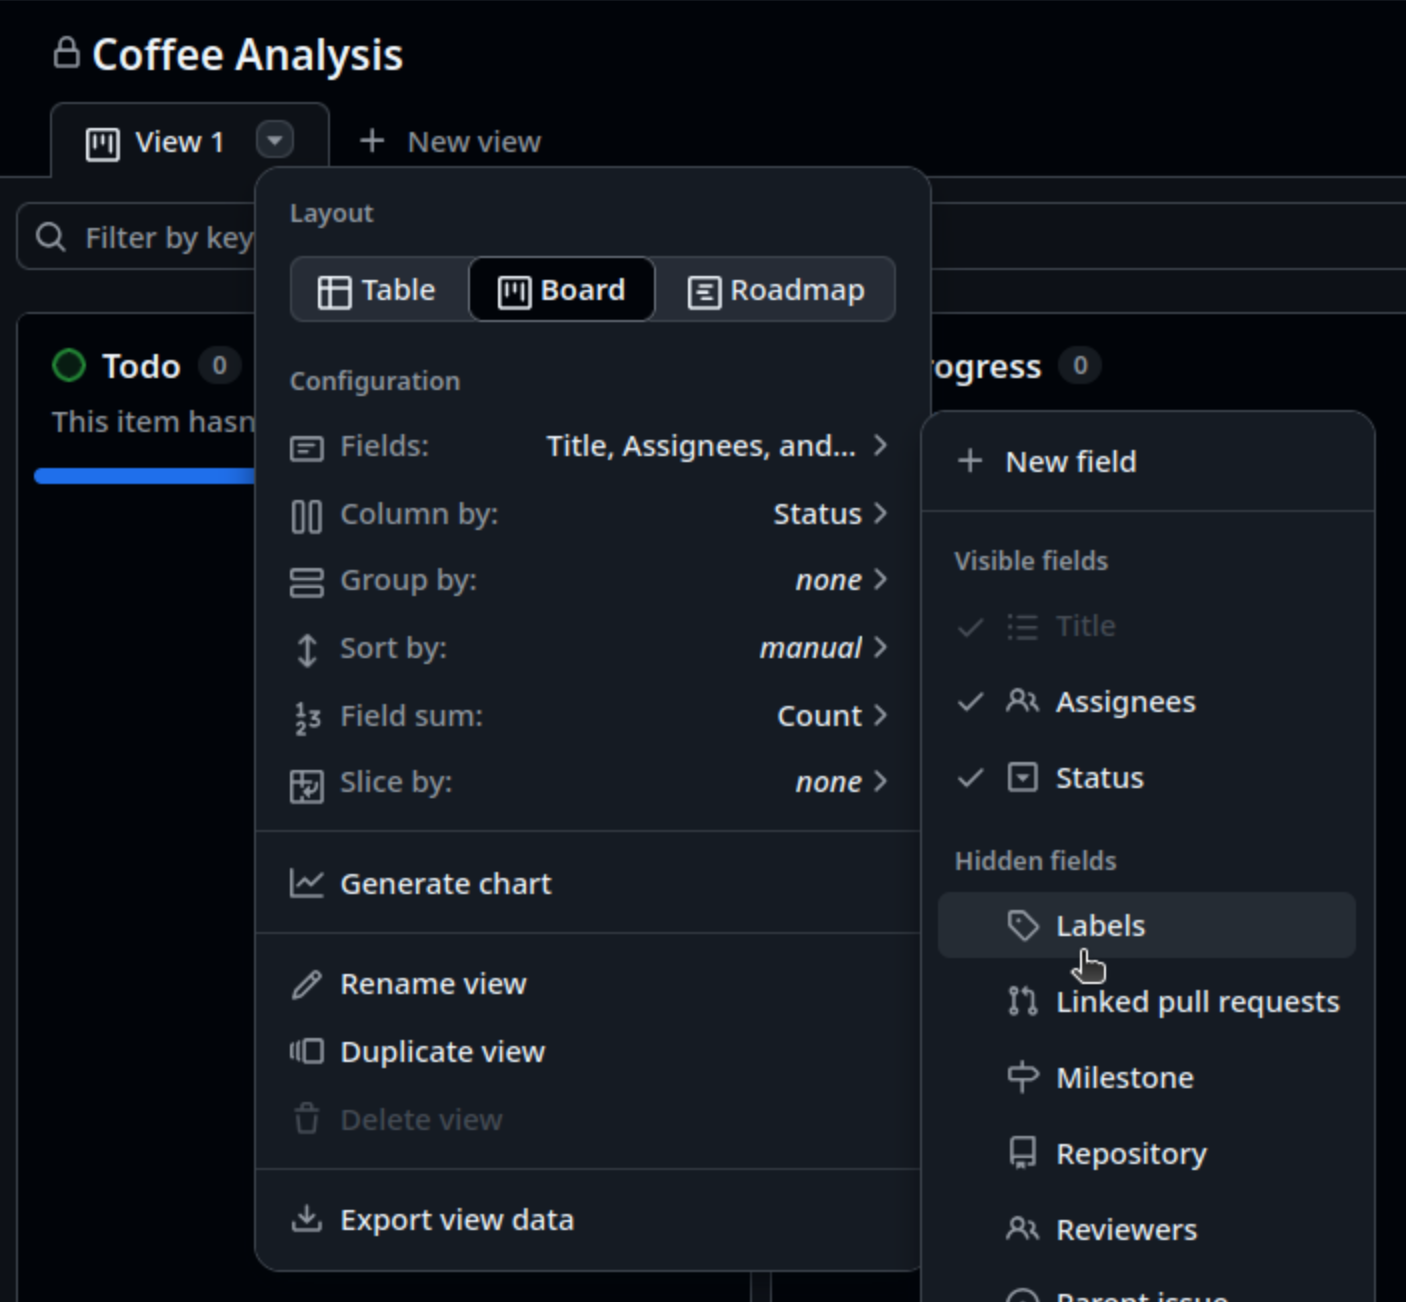
The assigned labels for each issue should now be visible.
Estimation: the Foundation for Prioritisation
Once we have an initial set of requirements captured, we need to understand their importance in relation to each other: essentially we need to prioritise them.
But before we can prioritise our requirements, there are some things we need to find out.
Firstly, we need to know:
- The period of time we have to resolve these requirements - e.g. before the next software release, pivotal demonstration, or other deadlines requiring their completion. This is known as a timebox. This might be a week or two, but for agile, this should not be longer than a month. Longer deadlines with more complex requirements may be split into a number of timeboxes.
- How much overall effort we have available - i.e. who will be involved and how much of their time we will have during this period.
We also need estimates for how long each requirement will take to resolve, since it’s difficult to meaningfully prioritise requirements without knowing what the effort tradeoffs will be. Even if we know how important each requirement is, how would we even know if completing the project is possible? Or if we do not know how long it will take to deliver those requirements we deem to be critical to the success of a project, how can we know if we can include other less important ones?
It is often not the reality in practice, but estimation should ideally be done by the people likely to do the actual work: the developers themselves. It shouldn’t be done by project managers or those otherwise not involved in development, simply because they are not best placed to estimate, and those doing the work are the ones who are effectively committing to these figures. As well as lacking the inherent technical skills required to estimate, having senior non-development roles dictating estimates is that they are at risk of non-development biases such as idealised project timelines and goals which may not be achievable.
T-Shirt Estimation
One method typically used in agile for estimation is t-shirt estimation. Instead of applying specific estimates of time to complete each requirement or task, you instead assign a t-shirt size to each in order to estimate their size relative to each other. T-shirt estimation is a far simpler method that emphasises simplicity, speed, and collaboration in early stages of a project where details are often vague.
Some example sizes might be:
| Size | Description | Rough time estimate |
|---|---|---|
| XS | Very quick and easy | < 1 day |
| S | Small effort | 1-2 days |
| M | Medium effort | 2-4 days |
| L | Large effort | 5-7 days |
| XL | Very large or unclear | - |
So for any tasks judged to be XL, this implies it needs
to be clarified and/or broken down into further tasks.
Solo Exercise: Apply T-shirt Estimates to your Product Backlog
5 mins.
On your own, quickly apply the t-shirt estimation technique to the issues in your product backlog, noting down your estimates. Use the following categories, which have a greatly reduced time scale:
| Size | Description | Rough time estimate |
|---|---|---|
| XS | Very quick and easy | < 10 mins |
| S | Small effort | 10-30 mins |
| M | Medium effort | 1-2 hours |
| L | Large effort | 2-5 hours |
| XL | Very large or unclear | - |
An effective way of helping to make your estimates more accurate is to do it as a team. Other members can ask prudent questions that may not have been considered, and bring in other sanity checks and their own development experience. Just talking things through can help uncover other complexities and pitfalls, and raise crucial questions to clarify ambiguities.
Group Exercise: Collate your Estimates!
5 mins.
As a group, reveal your individual estimates for each requirement - which may be wildly different! - and decide the final size based on the majority size. For those that have equal votes, decide quickly as a group on the final size.
Have one member lead the discussion for a requirement, and rotate this role until all requirement estimates have been decided, such that every member leads the discussion at least once.
Once you have a list of final sizes, add each agreed size as a comment to its corresponding issue in your product backlog.
Why is it so Difficult to Estimate?
Estimation is a very valuable skill to learn, and one that is often difficult. Lack of experience in estimation can play a part, but a number of psychological causes can also contribute. One of these is Dunning-Kruger, a type of cognitive bias in which people tend to overestimate their abilities, whilst in opposition to this is imposter syndrome, where due to a lack of confidence people underestimate their abilities. The key message here is to be honest about what you can do, and find out as much information that is reasonably appropriate before arriving at an estimate.
More experience in estimation will also help to reduce these effects. So keep estimating!
General Tips for a Successful Estimation Session
- Avoid mapping sizes to exact hours/days too early
- Focus on relative sizing between stories
- Discuss outliers - why does someone see it as an XL when others see M?
- Use the discussion to uncover unknowns or assumptions about the requirements, and clarify them in the product backlog
To an extent, the process of deciding estimates is more important than the actual result of estimation. Creating estimates forces the team to consider the detail of what will be required to fulfil a requirement, beyond just coming up with a number. For example, when coming up with an estimate it may become clear there are unrealised dependencies between tasks, or some requirements are not readily estimable due to being too complex or too widely scoped, and require further decomposition into multiple smaller requirements to estimate properly. It may also become clear that some requirements may not be achievable at all within the timeframe of the project!
Prioritisation
Now we have our estimates we can decide how important each requirement is to the success of the project. This should be decided by the project stakeholders; those - or their representatives - who have a stake in the success of the project and are either directly affected or affected by the project, e.g. clients, end-users, collaborators, etc.
To prioritise these requirements we can use a method called MoSCoW, a way to reach a common understanding with stakeholders on the importance of successfully delivering each requirement for a timebox. MoSCoW is an acronym that stands for Must have, Should have, Could have, and Won’t have. Each requirement is discussed by the stakeholder group and falls into one of these categories:
- Must Have (MH) - these requirements are critical to the current timebox for it to succeed. Even the inability to deliver just one of these would cause the project to be considered a failure.
- Should Have (SH) - these are important requirements but not necessary for delivery in the timebox. They may be as important as Must Haves, but there may be other ways to achieve them or perhaps they can be held back for a future development timebox.
- Could Have (CH) - these are desirable but not necessary, and each of these will be included in this timebox if it can be achieved.
- Won’t Have (WH) - these are agreed to be out of scope, perhaps because they are the least important or not critical for this phase of development.
In typical use, the ratio to aim for of requirements to the MH/SH/CH categories is 60%/20%/20% for a particular timebox. Importantly, the division is by the requirement estimates, not by number of requirements, so 60% means 60% of the overall estimated effort for requirements are Must Haves.
Why is this important? Because it gives you a unique degree of control of your project for each time period. It awards you 40% of flexibility with allocating your effort depending on what’s critical and how things progress. This effectively forces a tradeoff between the effort available and critical objectives, maintaining a significant safety margin. The idea is that as a project progresses, even if it becomes clear that you are only able to deliver the Must Haves for a particular time period, you have still delivered it successfully.
Group Exercise: Prioritise our Product Backlog
15 mins.
In this exercise you’ll be prioritising the issues/backlog items according to a MoSCoW approach.
Firstly, have someone in the group add some additional custom labels to the repository, one each for the MoSCoW classifications, e.g.:
-
MHforMust Have -
SHforShould Have -
CHforCould Have -
WHforWon't Have
Once added, as a group, go through each the backlog items and taking
into account the time estimates for each, decide what level of priority
to assign to them. Try to assign a 60%/20%/20% balance of
MH/SH/CH across the issues. For
the purposes of this training exercise, assume there is only a total of
7 hours available for the project (which may mean, depending on your
estimates, that some things won’t make the cut!)
(If time) Group Demonstration Exercise
10 mins.
Firstly, as a group:
- Nominate one person (or many!) to briefly demonstrate their product backlog board to the class
- Nominate one person to take short notes of the discussion
For 5 minutes, briefly discuss what to present in a maximum about 2 minutes, in terms of the chosen layout of the board, key findings, usefulness, and challenges of developing your issues and boards. A list of very short key points is fine!
Each group presents to the class for 2 minutes each.
- GitHub Projects provide project boards to organise issues and visualise the status of a project in terms of its requirements
- Kanban boards consists of columns (which represent statuses) and cards (which represent tasks), which are moveable between columns
- GitHub Project Boards are owned by the creating user or organisation, and not any particular repository
- GitHub Boards can contain either board-specific cards, or issues imported from GitHub repositories
- Estimation is a foundation for prioritisation
- T-shirt estimation is a technique employed early in a project that assigns a t-shirt size to each task in order to estimate their size relative to each other
- MoSCoW prioritisation classifies requirements either as Must Have (MH), Should Have (SH), Could Have (CH) or Won’t Have (WH)
- Using a 60%/20%/20% effort ratio of MH/SH/CH ensures a 40% safety margin of effort for a project
Content from 1.5 Collaborative Workflow: Branches and Merging Strategies
Last updated on 2026-03-19 | Edit this page
Overview
Questions
- What’s the relationship between development infrastructure and process?
- What is a feature branch, and why are they used?
- Describe the benefits and risks of using feature branches
- What are the options for merging branch commits into a baseline branch?
- What are the risks with merging code from feature branches?
Objectives
- Describe how workflow relates to process
- Describe the purpose of branches in a repository
- Define the elements of a feature-branch workflow
- Describe four major strategies for merging branches
- Create and use a branch
How are a Development Process and Version Control Related?
In a software development project the infrastructure - particularly the version control system - should be configured and used in way that reflects and support the team’s chosen development process. This alignment ensures that the tools in place reinforce the way the team works, rather than creating friction or bottlenecks. With a team following an agile, feature-driven workflow, the version control system should explicitly support that workflow.
Ultimately, as development processes evolve, the infrastructure should evolve with them. A version control system that reflects the development process helps to reduce coding errors, increases communications between members, streamline the collaborative process, and improves the overall efficiency and quality of the software being produced.
In the next couple of episodes, we’ll look at how to use well-established practices for using version control, using Git and GitHub as an example, to illustrate how it can support software developed using an agile approach.
(Optional) Solo Exercise: Set up SSH Keypair for use with GitHub
5 mins.
If you haven’t already, set up SSH keypair passwordless access following the SSH Key Setup instructions.
Introduction to Feature Branches
You might be used to committing code directly, but not sure what
branches really are or why they matter? When you start a new Git
repository and begin committing, all changes go into a branch — by
default, this is usually called main (or
master in older repositories). The name “main” is just a
convention — a Git repository’s default branch can technically be named
anything.
So why not just always use the main branch? While it is possible to
always commit to main, it is not ideal when you’re
collaborating with others, or when you are working on new features or
want to experiment with your code and you want to keep main clean and
stable for your users and collaborators.
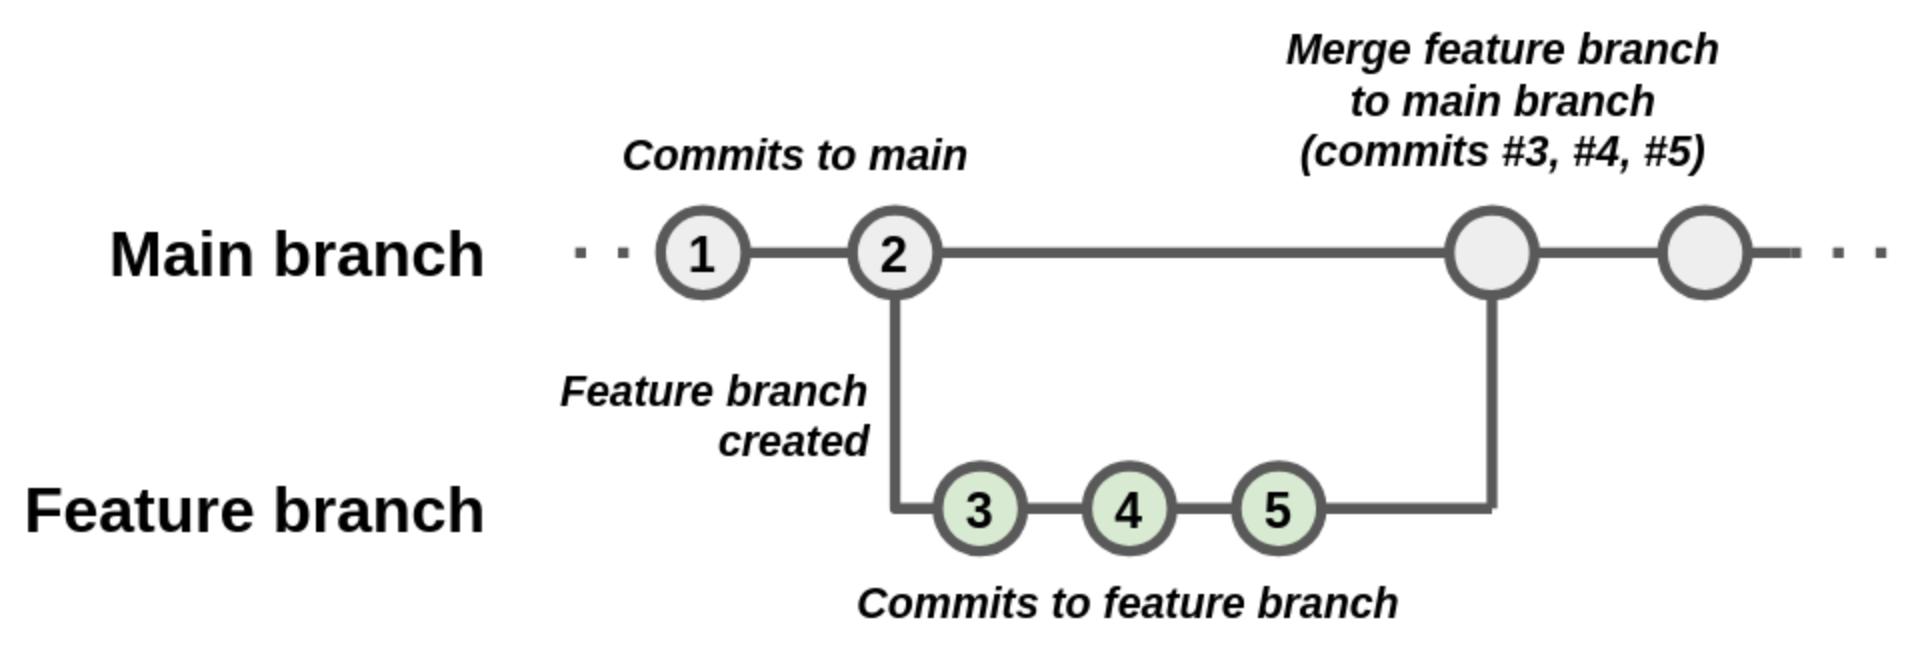
Creating and working on a separate branch, often called a “feature”
branch, allows developers to “branch off” development from a particular
commit in the repository, enabling them to make changes (as new commits)
to a branch without disrupting the main branch. When this
separate development has been tested and is judged to be ready, the
commits on this branch are then merged into the main
branch.
You should consider starting a new branch whenever you are working on a distinct feature or fixing a specific bug.
Group Exercise: Pros and Cons of Developing Code on Feature Branches
5 mins.
As a group, discuss list some advantages and disadvantages of developing code on feature branches as part of a team. Don’t consider aspects related to merging - this will be covered in a future exercise!
Advantages:
- It enables the main branch to remain stable while you and the team explore and test the new code on a feature branch
- It enables you to keep the untested and not-yet-functional feature branch code under version control and backed up
- You and other team members may work on several features at the same time independently from one another
- If you decide that the feature is not working or is no longer needed - you can easily and safely discard that branch without affecting the rest of the code
Disadvantages:
- Requires that the team understand this approach and how to use it in an agreed and consistent manner
- May become complicated if you need to use features available on another branch in your own branch
- Similarly, if
maincontains many changes not in feature branches, it may diverge considerably from these feature branches
Branch Merging Strategies
When you are ready to bring the changes from your feature branch back into the main branch, Git offers you to do a merge - a process that unifies work done in 2 separate branches. Git will take two (or more - you can merge more branches at the same time) commit pointers and attempt to find a common base commit between them. Git has several different methods of finding the base commit - these methods are called “merge strategies”. Once Git finds the common base commit it will create a new “merge commit” that combines the changes of the specified merge commits. Technically, a merge commit is a regular commit which just happens to have two parent commits.
Each merge strategy is suited for a different scenario. The choice of strategy depends on the complexity of changes and the desired outcome. Let’s have a look at the most commonly used merge strategies.
Fast Forward Merge
A fast-forward merge occurs when the main branch has not diverged from the feature branch, meaning there are no new commits on the main branch since the feature branch was created.
A - B - C [main]
         \
          D - E [feature]
In this case, Git simply moves the main branch pointer to the latest commit in the feature branch. This strategy is simple and keeps the commit history linear - i.e. the history is one straight line.
After a fast forward merge:
A - B - C - D - E [main][feature]Fast forward merge strategy is best used when you have a short-lived feature branch that needs to be merged back into the main branch, and no other changes have been made to the main branch in the meantime.
3-Way Merge with Merge Commit
A fast-forward merge is not possible if the main and the feature branches have diverged.
A - B - C - F [main]
         \
          D - E [feature]
If you try to merge your feature branch changes into the main branch and other changes have been made to main - regardless of whether these changes create a conflict or not - Git will try to do a 3-way merge and generate a merge commit.
A merge commit is a dedicated special commit that records the combined changes from both branches and has two parent commits, preserving the history of both lines of development. The name “3-way merge” comes from the fact that Git uses three commits to generate the merge commit - the two branch tips and their common ancestor to reconstruct the changes that are to be merged.
A - B - C - F - "MergeCommitG" [main]
         \     /
          D - E [feature]
In addition, if the two branches you are trying to merge both changed the same part of the same file, Git will not be able to figure out which version to use and merge automatically. When such a situation occurs, it stops right before the merge commit so that you can resolve the conflicts manually before continuing.
Rebase & Merge
In Git, there is another way to integrate changes from one branch into another: the rebase.
Let’s go back to an earlier example from the 3-way merge, where main and feature branches have diverged with subsequent commits made on each (so fast-forward merging strategy is not an option).
A - B - C - F [main]
         \
          D - E [feature]
When you rebase the feature branch with the main branch, Git replays each commit from the feature branch on top of all the commits from the main branch in order. This results in a cleaner, linear history that looks as if the feature branch was started from the latest commit on main.
So, all the changes introduced on feature branch (commits D and E) are reapplied on top of commit F - becoming D’ and E’. Note that D’ and E’ are rebased commits, which are actually new commits with different SHAs but the same modifications as commits D and E.
A - B - C - F - D' - E' [main]
             \
              D - E [feature]
At this point, you can go back to the main branch and do a fast-forward merge with feature branch.
Rebase is ideal for feature branches that have fallen behind the main development line and need updating. It is particularly useful before merging long-running feature branches to ensure they apply cleanly on top of the main branch. Rebasing maintains a linear history and avoids merge commits (like fast forwarding), making it look as if changes were made sequentially and as if you created your feature branch from a different point in the repository’s history. A disadvantage is that it rewrites commit history, which can be problematic for shared branches as it requires force pushing.
The Golden Rule of Rebasing
Note that you can also do rebasing with branches on the command line. But a word of warning: when doing this, be sure you know what will happen.
Rebasing in this way rewrites the repository’s history, and therefore, with rebasing, there is a GOLDEN RULE which states that you should only rebase with a local branch, never a public (shared) branch you suspect is being used by others. When rebasing, you’re re-writing the history of commits, so if someone else has the repository on their own machine and has worked on a particular branch, if you rebase on that branch, the history will have changed, and they will run into difficulties when pushing their changes due to the rewritten history. It can get quite messy, so if in doubt, do a standard merge!
Squash & Merge
Squash and merge squashes all the commits from a feature branch into a single commit before merging into the main branch. This strategy simplifies the commit history, making it easier to follow. This strategy is ideal for merging feature branches with numerous small commits, resulting in a cleaner main branch history.
A - B - C - F - "SquashCommitG" [main]
         \
          D - E [feature]
Note that unlike the 3-way merge, SquashCommitG only has
one parent, F, so does not preserve the link to the commits
on the feature branch upon which SquashCommitG is based.
This has caused some to consider squash commits harmful, since that part
of the commit history is lost.
For this reason, squash commits are handy when you want to clean up a
commit history from a short-lived feature branch prior to merging to
main, but problematic with longer lived branches or when
maintaining commit history is important.
Summary
Here is a little comparison of the three merge strategies we have covered so far.
| Fast Forward | Rebasing | 3-Way Merge | Squash Merge | |
|---|---|---|---|---|
| History | Maintains linear history | Maintains linear history | Non-linear history (commit with 2 parents) | Linear history (commit with 1 parent) |
| Effect on main | No new commits on main | New commits on main | New commits on main | One new commit on main |
| Merge commit? | Avoids merge commits | Avoids merge commits | Uses merge commits | Avoids merge commits |
| When it works | Only works if there are no new commits on the main branch | Works for diverging branches | Works for diverging branches | Works for diverging branches |
| Rewrites history? | Does not rewrite commit history | Rewrites commit history | Does not rewrite commit history | Does not rewrite commit history |
Group Exercise: Merging - What are the Risks?
5 mins.
In general, as a group identify the risks are with merging code from branches in a team environment.
Here are several non-exhaustive reasons:
- A merge may introduce errors that cause the software to break or fundamentally change its behaviour in ways that are unintended but not immediately obvious
- There may be a variability in the quality or style of written code that leads to inconsistency across the codebase
- Team members may not be aware of important changes being made in other branches that will affect their work
- Work may be unknowingly duplicated, or introduce conflicting solutions, e.g. where there are logical overlaps between coding tasks in different branches
- The reasoning behind changes may be unclear
- Long-lived branches may become too divergent from the
mainbranch, complicating the process of merging changes from such branches - Similarly, implementing and then merging multiple feature branches simultaneously becomes exponentially more difficult
The benefits of using feature branches are generally considered to vastly outweight such drawbacks, and as we’ll see in the next episode, there are features we can introduce to using feature branches that aim to mitigate these drawbacks by introducing additional steps that increase communication among team members.
- Infrastructure and tooling used by a team must support agreed healthy development processes and practices but not unnecessarily dictate them
- Once you’ve set up personal SSH access to GitHub from a machine, you do no need to use passwords
- Separate features or bug fixes should be developed on separate repository branches and merged to the main branch when ready
- Developing code on feature branches enables the main branch to remain working and clear of unfinished features or bug fixes, and prevents confusion across separate development activities
- A fast-forward merge simply adds commits to the end of a destination branch
- A 3-way merge with merge commit creates a new commit on the destination branch comprised of the commits on the feature branch
- A rebase and merge rewrites the history
Content from 1.6 Collaborative Workflow: Pull Requests and Code Reviews
Last updated on 2025-10-15 | Edit this page
Overview
Questions
- How can infrastructure support collaborative development of code across a team?
- What is a pull request and why are they useful?
- How do I submit a pull request on GitHub?
- How are code reviews useful?
- What are the different types of code review?
- How do I review a pull request on GitHub?
- What’s the process for merging a pull request?
Objectives
- Define a pull request and identify some reasons for using pull requests
- Bullet-point some advantages and limitations of working in a feature-branch workflow
- Clone our team’s repository onto our machines
- Submit a pull request in GitHub
- Review a pull request
- Merge a pull request into its base branch
So far we’ve looked at different ways we can work on separate strands of development in branches and then merge them. Since they are independent, it’s sometimes difficult to know what the overall effect will be when they are finally merged.
Software development thrives on collaboration, even when much of the coding is done individually. Getting input from others can have a big impact on the quality, maintainability, and effectiveness of your work, often requiring only a small investment of time. Since there is rarely a single “perfect” way to solve a problem, working with others allows you to share knowledge, skills, and perspectives, leading to better solutions and new insights. Through collaboration, you can learn new techniques, discover tools and infrastructure that streamline development, and help build a shared understanding that benefits the wider team or community.
In this episode we’ll look at bringing together the use of feature branches and code review into a well-established collaborative development approach called feature branch workflow that aims to realise these benefits.
Introduction to Code Review
Types of Code Review
There are several types of code review, each suited to different contexts and goals.
An informal review involves casually asking a colleague for input or advice. This type of review is often used to improve understanding, share skills, or get help with problem-solving, rather than enforce specific standards. Some examples include over-the-shoulder code review (when one developer talks the other developer through the code changes while sitting at the same machine), and pair programming (when two developers work on the code at the same time with one of them actively coding and the other providing real-time feedback).
A contribution-oriented review occurs when changes or additions to a codebase are reviewed as they happen - commonly used in version-controlled software development workflows like GitHub’s pull requests which we’ll look at in this episode. This approach is a bit more formal (e.g. structured pull requests with approval workflows) and tool-assisted, and focuses on ensuring understanding, clarity, maintainability, and code quality.
Taken to the extreme, a more rigorous method is a formal code review, such as a Fagan inspection, where a team examines a codebase, or parts of it, systematically, following strict criteria to identify defects or ensure conformance to standards. While this method can be highly effective, it is resource-intensive and a less common practice.
Code Review Practices & Processes
In this episode, we will focus on code review practices centered around code modifications and contributions. The aim is to integrate code review into the research software development process in a way that is lightweight, low-stakes, and easy to adopt. Even a short initial code review can have a significant impact. As highlighted in “Best Kept Secrets of Peer Code Review” by Jason Cohen, the first hour of review is the most critical and productive, with diminishing returns thereafter.
The goal is to strike a practical balance: invest enough time to offer useful, actionable feedback without turning reviews into a bottleneck. When reviewing code, focus on:
- Code quality - is the code clear and readable? Do functions serve a single purpose? Is it well-structured and consistent with the rest of the project?
- Best practices and conventions - is the project’s coding style followed? Are tests and documentation included and up to date?
- Efficiency and minimalism - does the change duplicate existing functionality (found elsewhere in the code or in a third-party library)? Is it limited to what’s required by the issue or ticket?
- Knowledge sharing: ask clarifying questions (do not assume you understand everything or know best) and offer respectful, specific feedback. This helps everyone learn and builds team trust.
Given the value of that first hour, keep your efforts targeted. Do not spend time on:
- Linting or style issues - automated tools or CI pipelines should catch these
- Hunting for bugs, unless something clearly looks wrong — instead, check that tests exist for various cases that should catch bugs
- Fixing unrelated legacy issues that pre-date the change — log those separately to avoid scope creep
- Architectural overhauls — save big-picture changes for design discussions or dedicated meetings to decide whether the code needs to be restructured
- Refactoring everything — provide only a few critical suggestions and aim for incremental improvement, not perfection.
The process is typically iterative, with reviewers and contributors engaging in a cycle of discussion, updates, and re-review to address questions and refine changes before integration. If a conversation is taking place in a code review that has not been resolved by one or two back-and-forth exchange, then consider scheduling a conversation, or a pair programming session to discuss things further (and record the outcome of the discussion - e.g. in the pull requests’s comments).
Pull Requests and Code Reviews
In our previous exercise we focused on writing code in an individual
setting on feature branches. However if we allowed everyone to develop
and merge code whenever, wherever, and however they wanted, without any
kind of coordination, the result would likely be a chaotic and
potentially non-functional mess. Using feature branches helps to some
extent, keeping strands of development separate but in many cases, when
it comes time to merge our branch into the main branch, it
would be really useful to have a way to review code before it’s
finally merged to verify that these changes are well considered and
implemented.
Fortunately version control hosting infrastructures like GitHub support an additional step in the use of feature branches, the pull request: the changes in a feature branch are proposed in a pull request, and then the pull request is reviewed by another team member (or maybe several). If the pull request is judged to be a suitable set of changes, the pull request is accepted and the changes are merged using a branch merging strategy as discussed.
Why is it Called “Pull Request”?
It may seem a bit strange that it’s referred to as a pull request, since what we’re really doing is requesting a merge, so perhaps “push request” may make more sense.
However, consider it from the repository perspective:
- A pull request is you requesting the target repository to grab your changes and merge them
- A push request would be the target repository requesting you to push your changes
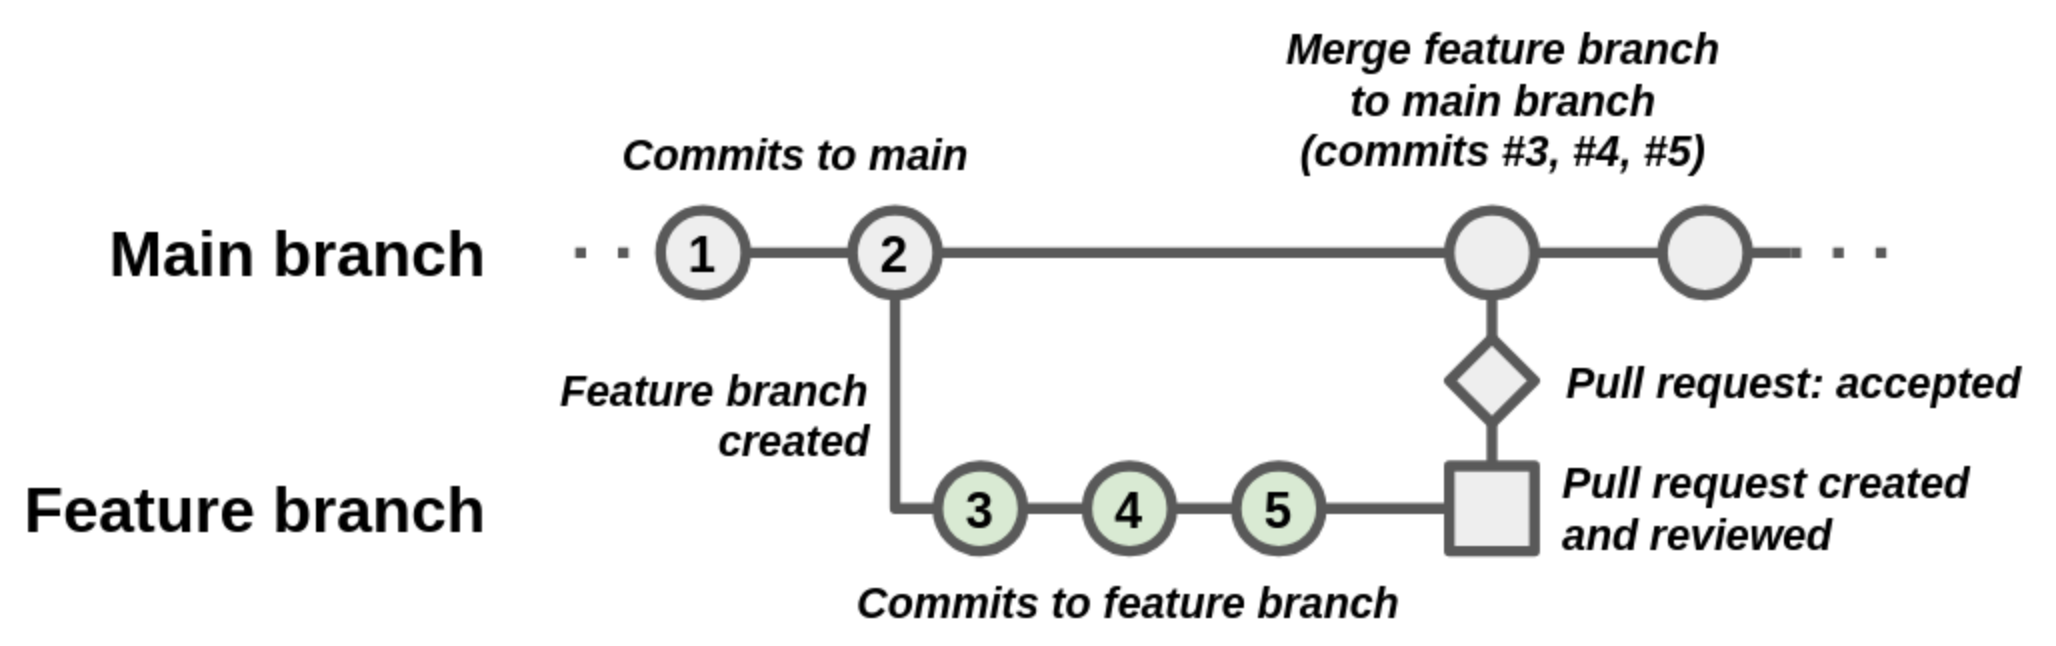
However, if the review identifies issues that indicate that it is unsuitable to be merged, the pull request is rejected. This does not necessarily mean the pull request has to be closed. Development on the feature branch of that pull request may continue, with further commits to address the points brought up in the review, and then the pull request reviewed again at a later time and perhaps accepted and merged.
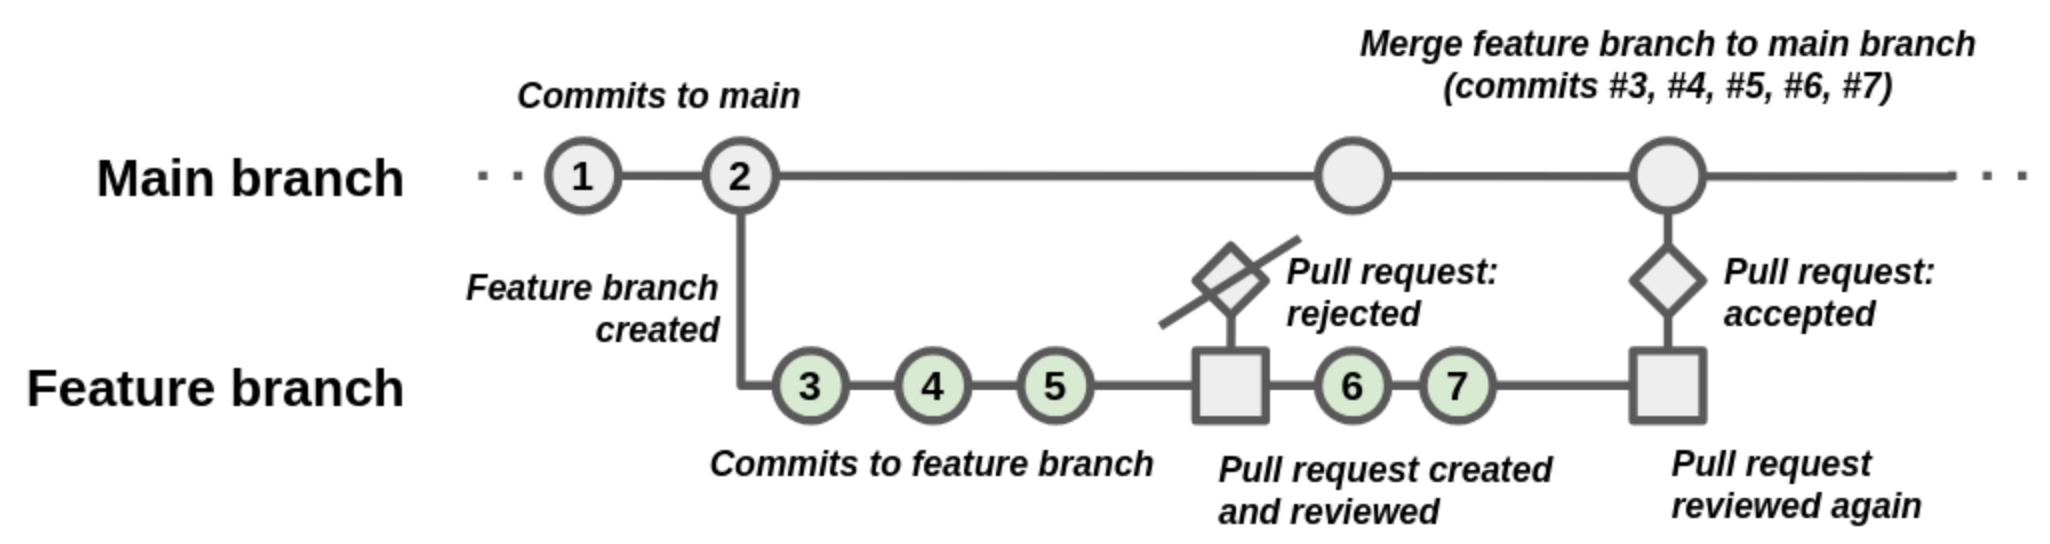
In a sense, a pull request is a verification check - or insurance
policy - against merging bad commits to the main
branch.
This approach is known as feature branch workflow.
For example, on a Mac:
OUTPUT
Cloning into 'coffee-analysis'...
remote: Enumerating objects: 16, done.
remote: Counting objects: 100% (16/16), done.
remote: Compressing objects: 100% (15/15), done.
remote: Total 16 (delta 4), reused 11 (delta 1), pack-reused 0 (from 0)
Receiving objects: 100% (16/16), 83.40 KiB | 1.08 MiB/s, done.
Resolving deltas: 100% (4/4), done.
user@mymachine:$ cd coffee-analysis/
user@mymachine:coffee-analysis$ git status
On branch main
Your branch is up to date with 'origin/main'.

nothing to commit, working tree clean
Preparing Some Example Work
In order for us to try out feature branch workflow as a team, let’s first create some issues on our group repository to represent some small tasks we’ll do using that approach.
Group Exercise: Make Work for Yourselves!
5 mins.
The group repository contains a draft README with a typical set of section headings that should be added:
- Description - what are the motivations for the software, the problem it aims to solve, and its key functions?
- Pre-requisites - what software or other dependencies are required to use this software?
- Installation - how do you install or deploy the software so it can be used?
- Usage - what are a basic set of instructions for using the software for its intended purpose?
- Running Tests - how do you run the automated unit tests?
- Authors/Maintainers - who are the authors and maintainers of the software? e.g. including yourselves, and your contact information?
- Licence - what is the licence for the software?
- Acknowledgements - what other projects, software or people should be acknowledged as part of this work?
As a group:
- Select a number of sections equal to the number of members in your group, and divide them up so everyone gets a section to write
- For each member select someone else who will review their pull request - make a note of this for later!
- Each member then creates an issue on the group repository describing
the task of writing that section, ensuring the issue has a sufficient
description, has a
Documentationlabel set, and is assigned to that member.
For example:
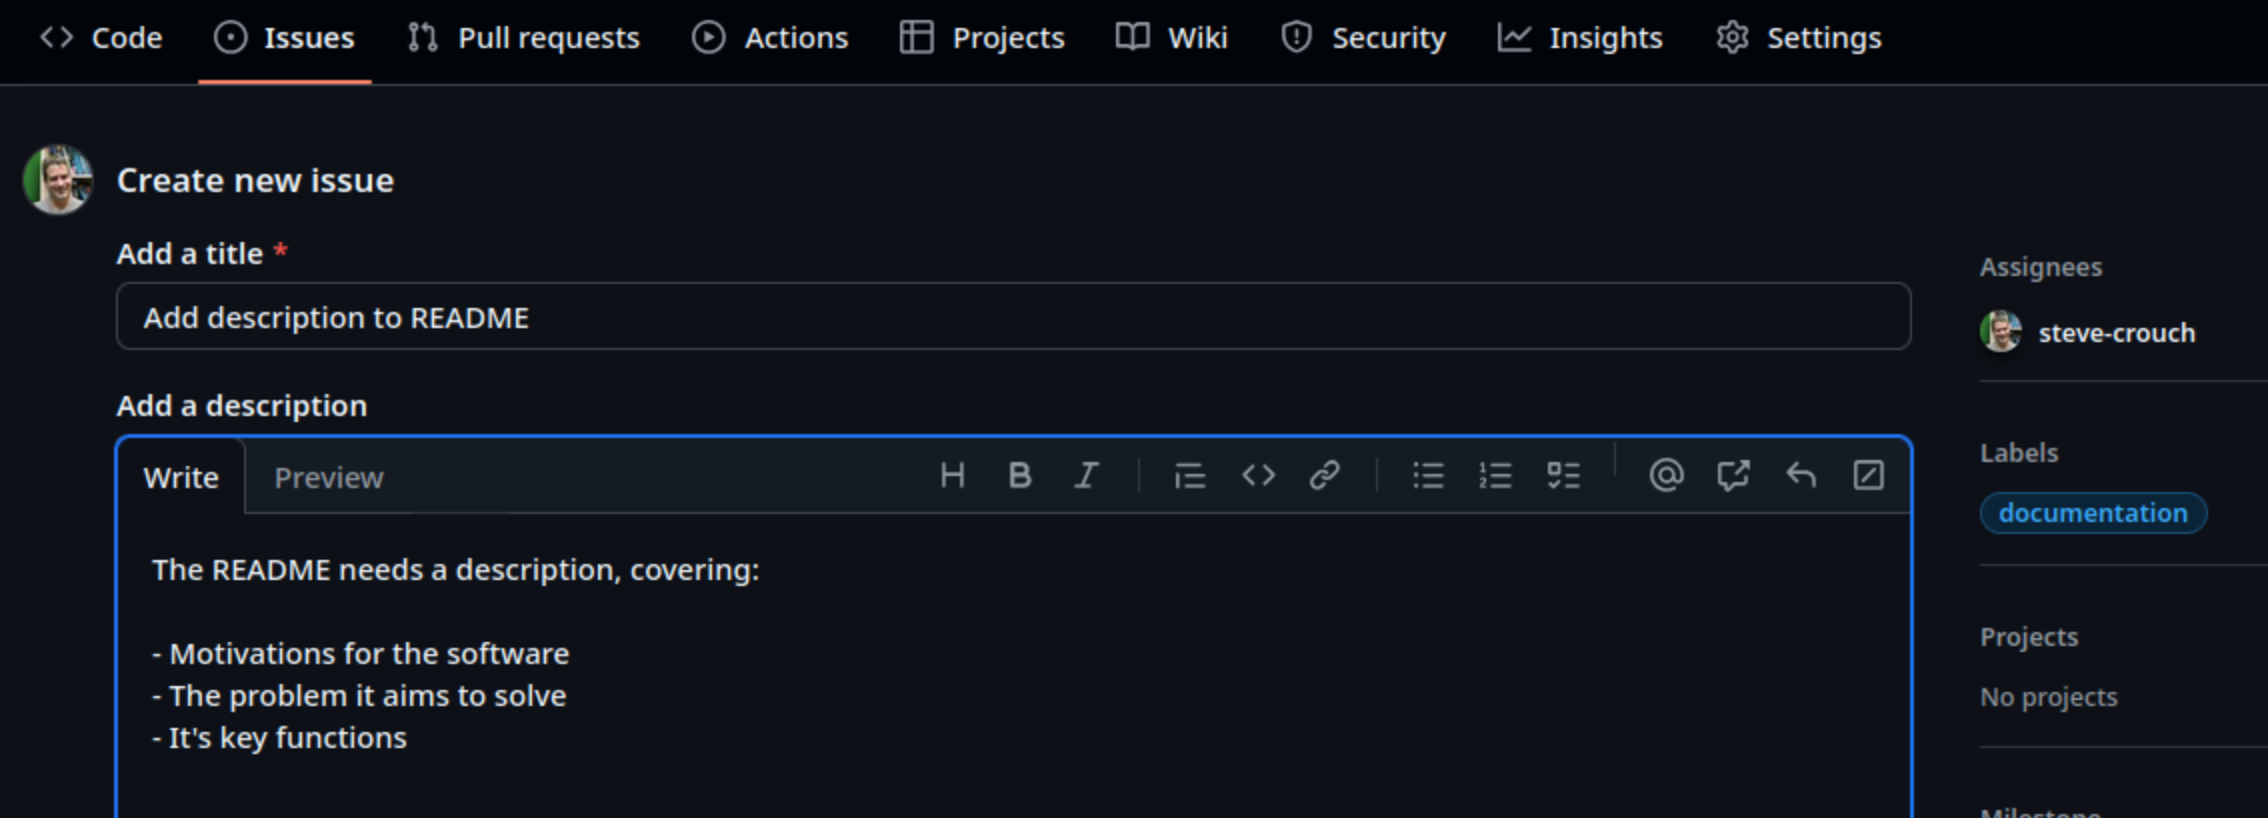
Next, based on your assigned task, we’ll use feature branch workflow on our cloned group repository.
Ensure you have a terminal open, and you’re currently in the root directory of your group repository.
- First, create a new branch for that issue, referencing the issue
number in the branch name,
e.g.
git branch 123-readme-description - Switch to that branch,
e.g.
git switch 123-readme-description - Use a code editor to edit the
README.mdfile and very briefly write content for that section as per your assigned issue - Intentionally introduce a spelling mistake or other smaller issue into the text, and save the file
- Add the changes to the Git staging area,
e.g.
git add README.md - Commit the changes, referencing the issue number in the commit
message prefixed with a
#symbol, e.g.git commit -m "#123 - Add description" - Push the changes to the remote group repository,
e.g.
git push -u origin 123-readme-description
If you go to the repository’s main branches page (e.g. https://github.com/github-username/coffee-analysis/branches) you should see your new branch listed, and eventually those of your other team members.
Submitting a Pull Request
Let’s each create a pull request now, based on our changes.
- First, go the
Pull requeststab at the top of the group repository main page, and selectNew pull request - In the
Compare changespage that comes up: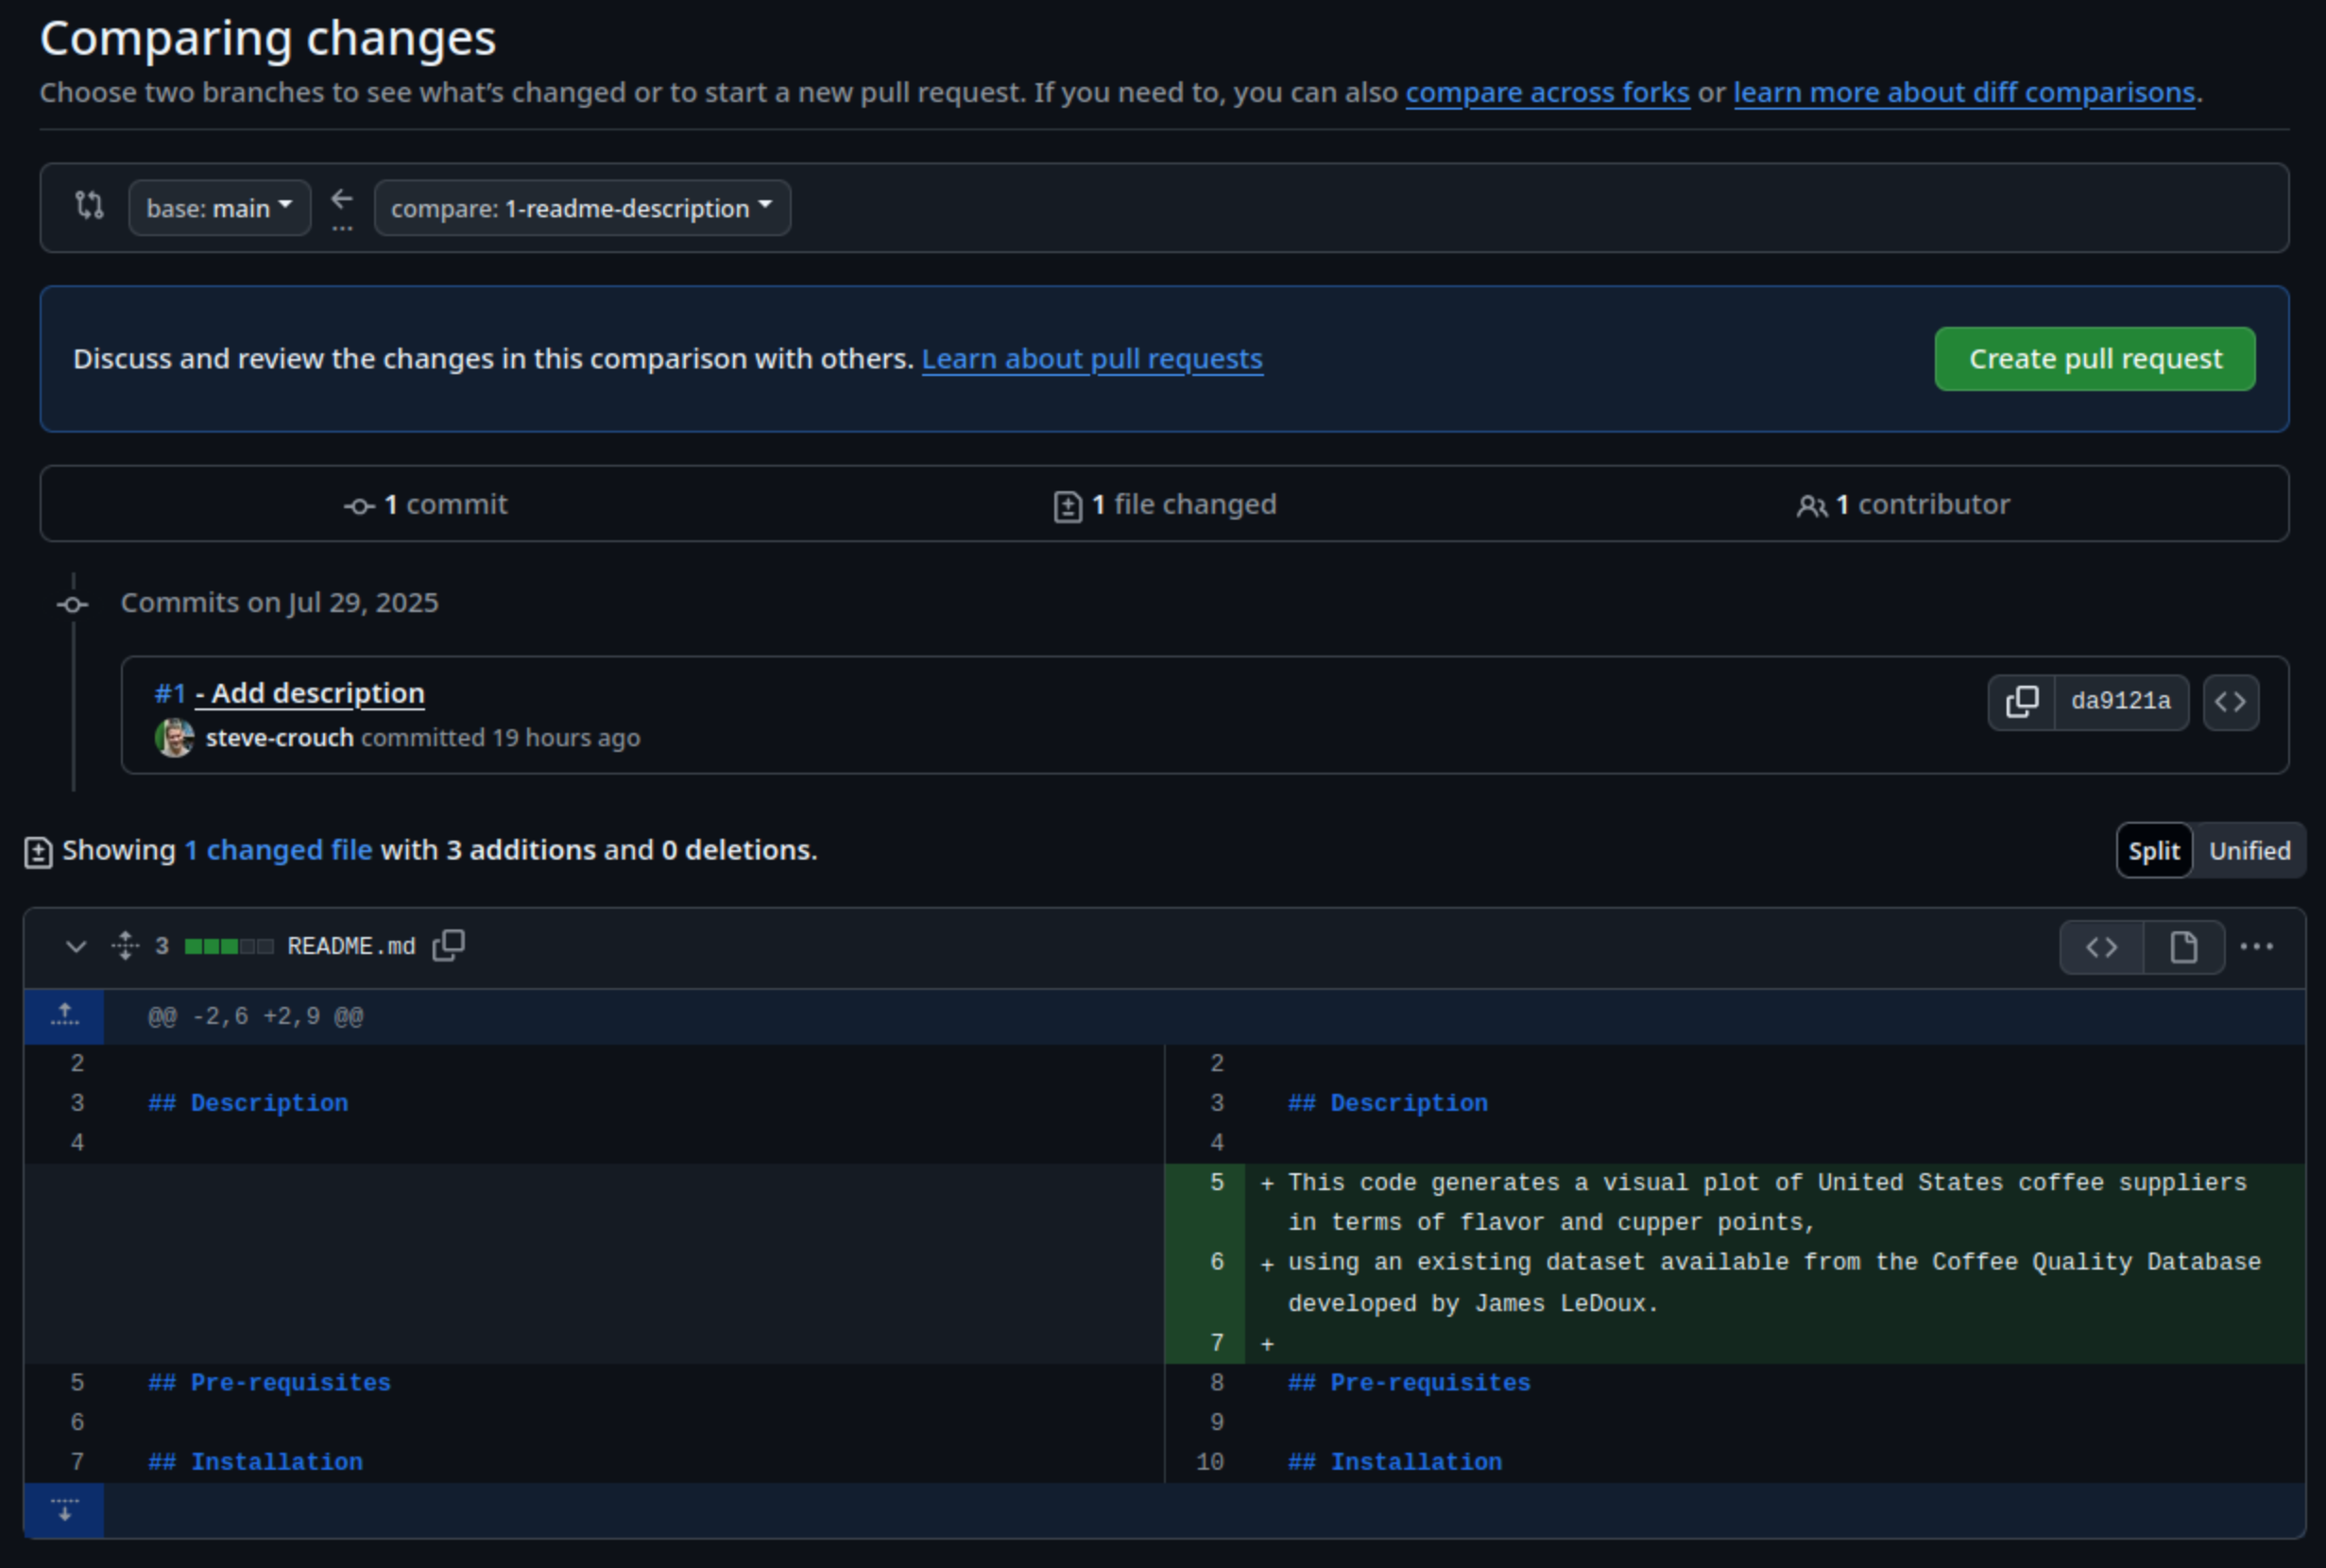
- Select
compare:and select your new branch, e.g.123-readme-descriptionYou should now see a summary of the changes between the new branch and themainbranch, i.e. a single commit and the new README content you pushed earlier - Select
Create pull request
- Select
- In the
Open a pull requestpage that appears: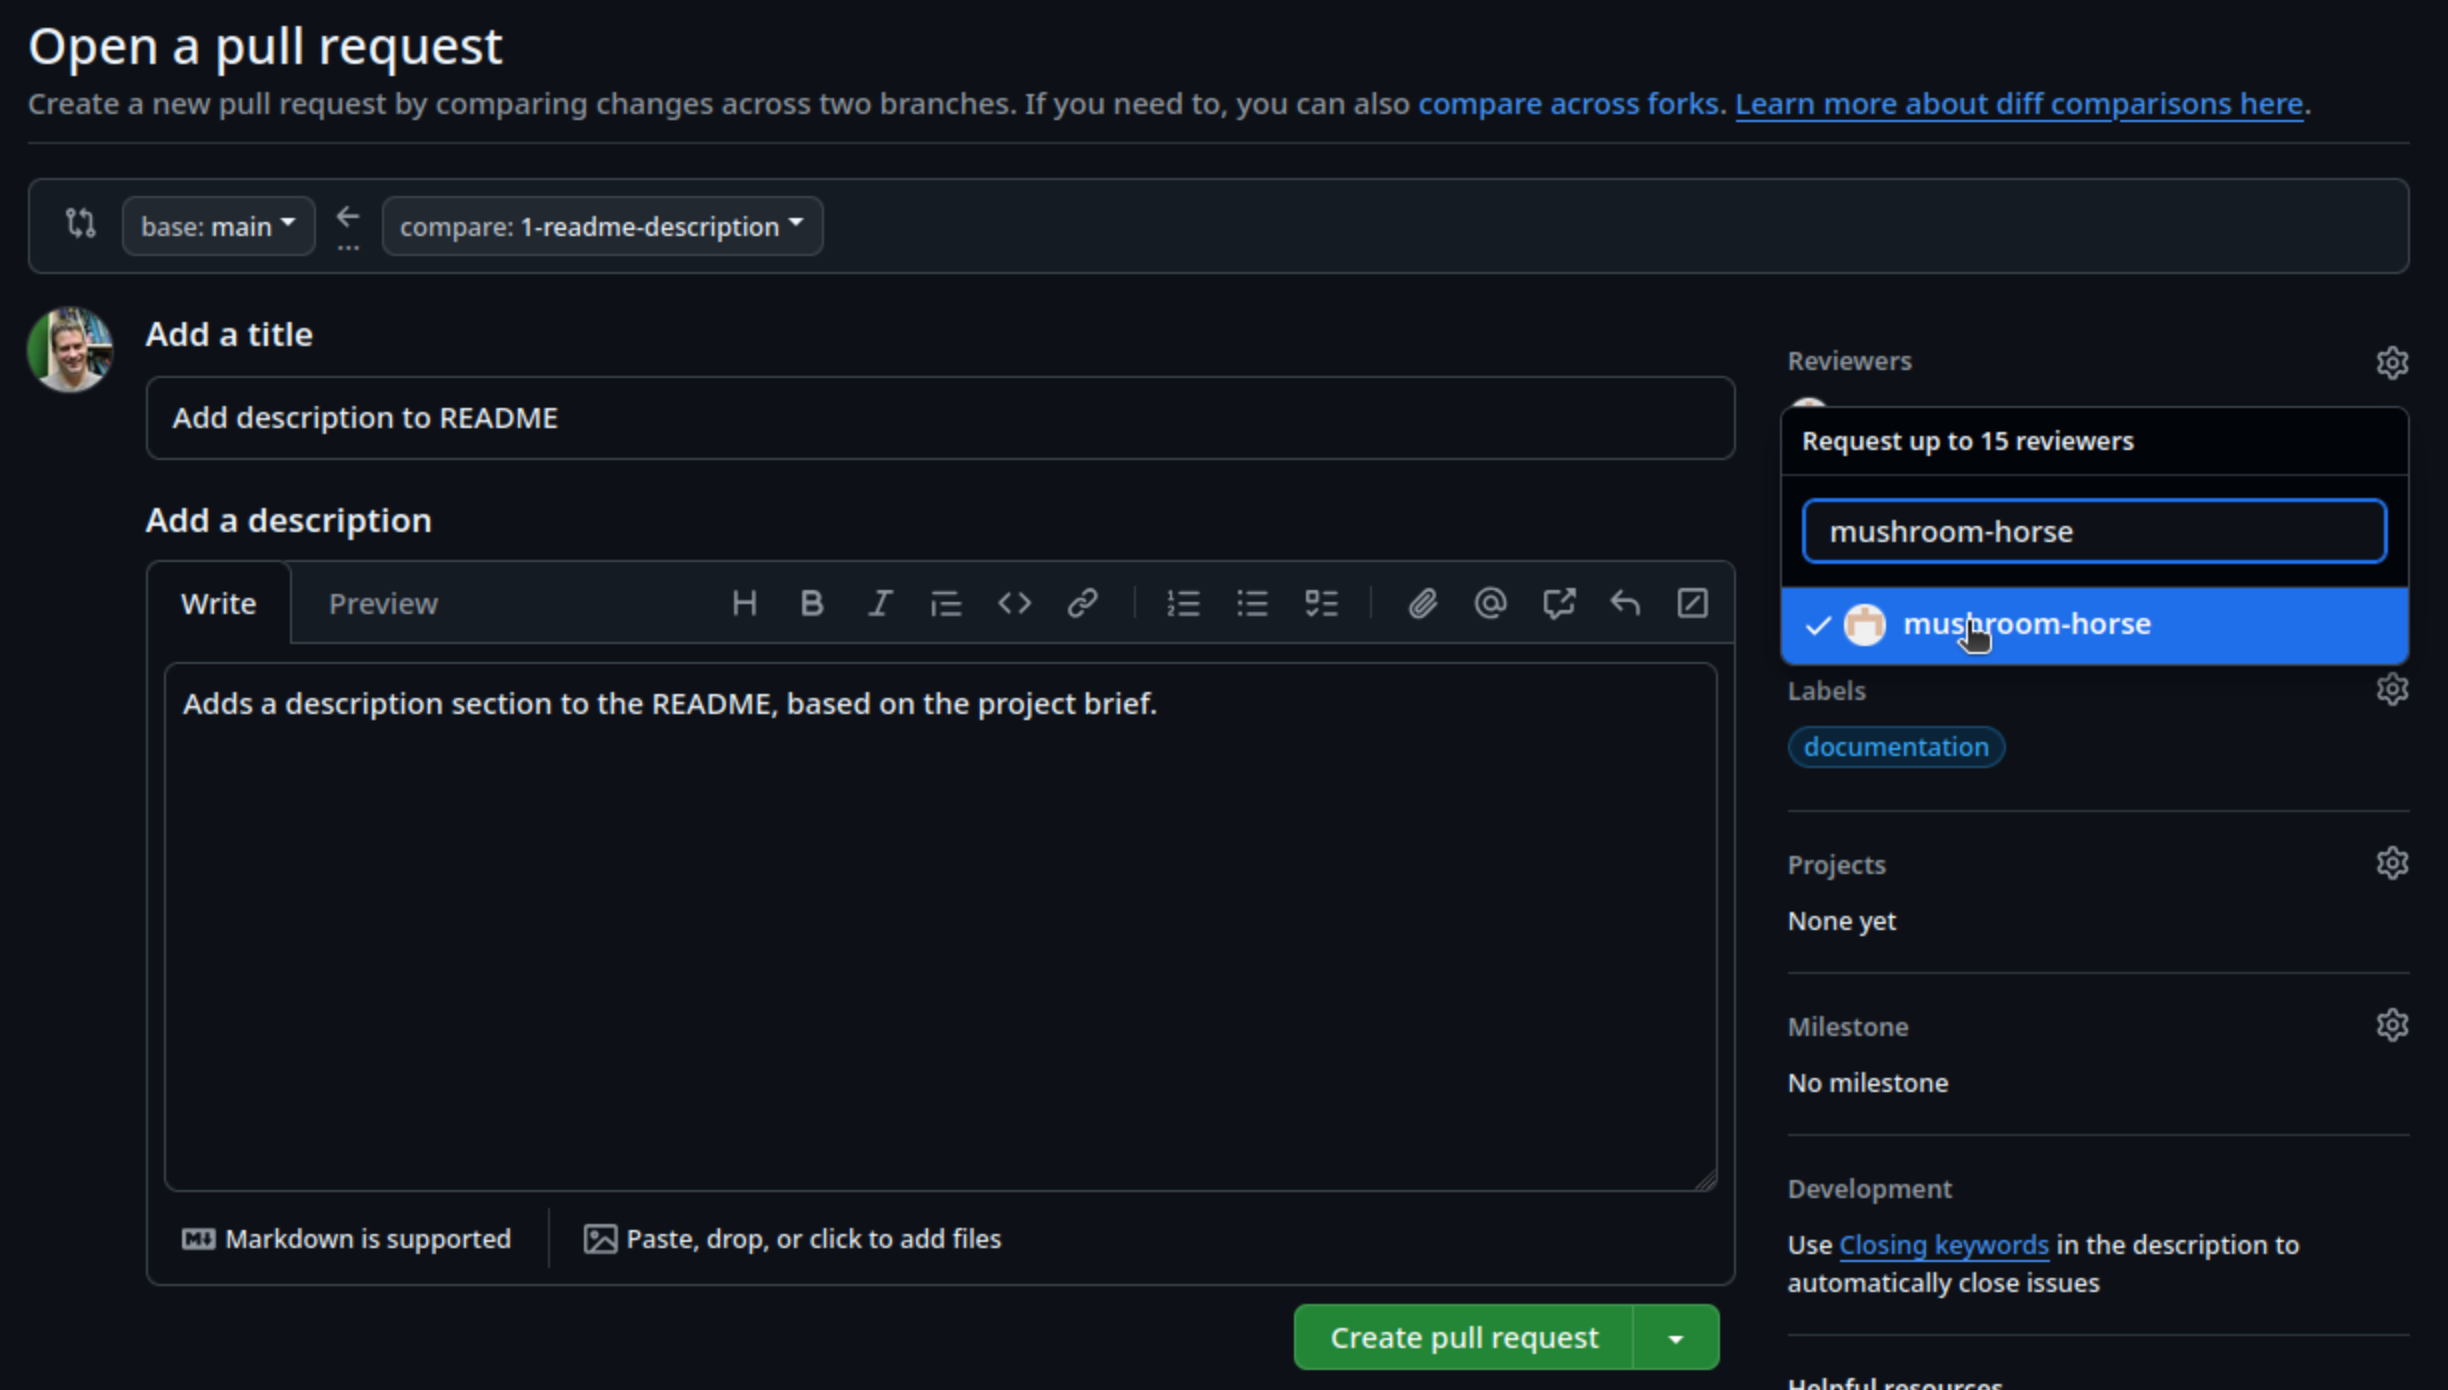
- Enter a fitting title, brief description, and label
- Select
Reviewersand add the GitHub account for the other group member who will review your pull request - Select
Create pull request
You’ll then see a summary of the pull request, including a summary of
any conflicts with the base (main) branch, of which there
should be none. There’s also an option to merge the pull request - but
don’t do this yet, since you’ll need to wait for your pull request to be
reviewed!
Interestingly, even though we have created this PR to do a merge, we could continue developing our code on this new branch indefinitely if we wanted. We could make and push new commits to this branch, which would show up here, and we then merge at a future date. This may be particularly useful if we need to have a longer discussion about the PR as it is developing. The discussion would be captured in the comments for the PR, and when ready, we then merge the PR.
How Long should PRs be Open?
Which raises the question, of how long should PRs be open, or
branches for that matter? To some degree, this depends on the nature of
the changes being made But branches in Git are designed, and should be
wherever possible, short-lived and deleted when no longer required. The
longer a branch is open, the more potential changes could be made to the
main branch. Then when it comes time to merge the branch, we may get a
lot of conflicts we need to manage. So generally, it’s a good idea to
keep your branches open for a day or two, a few days maximum, before
creating a PR and doing a merge if you can. Note that we can also see
this PR, as well as any others, by selecting the
Pull request tab.
Reviewing Code
Next, you’ll be reviewing someone else’s pull request from your group, so let’s look at that pull request:
- Go to the
Pull requestspage on the group repository - Select the pull request from the other member who you’ve been assigned to review
This will present an overview of the pull request (PR), including on separate tabs:
-
Conversation- an overview of the PR, including comments and other activities associated with the PR, as well as a summary at the end, indicating the overall status in terms of reviews requested, and whether there are any merge conflicts with the base branch (mainin this case) -
Commits- a list of all commits on the feature branch that have yet to be merged into the base branch -
Checks- whether there are any automated checks implemented in GitHub Actions and their status -
Files changed- the list of files and their line-by-line changes for this PR
If you select the Files changed tab, of if you select
Add your review from the Conversation page
which takes you to the same tab, you can then begin your review.
By default, the presented view indicates a “unified” view.
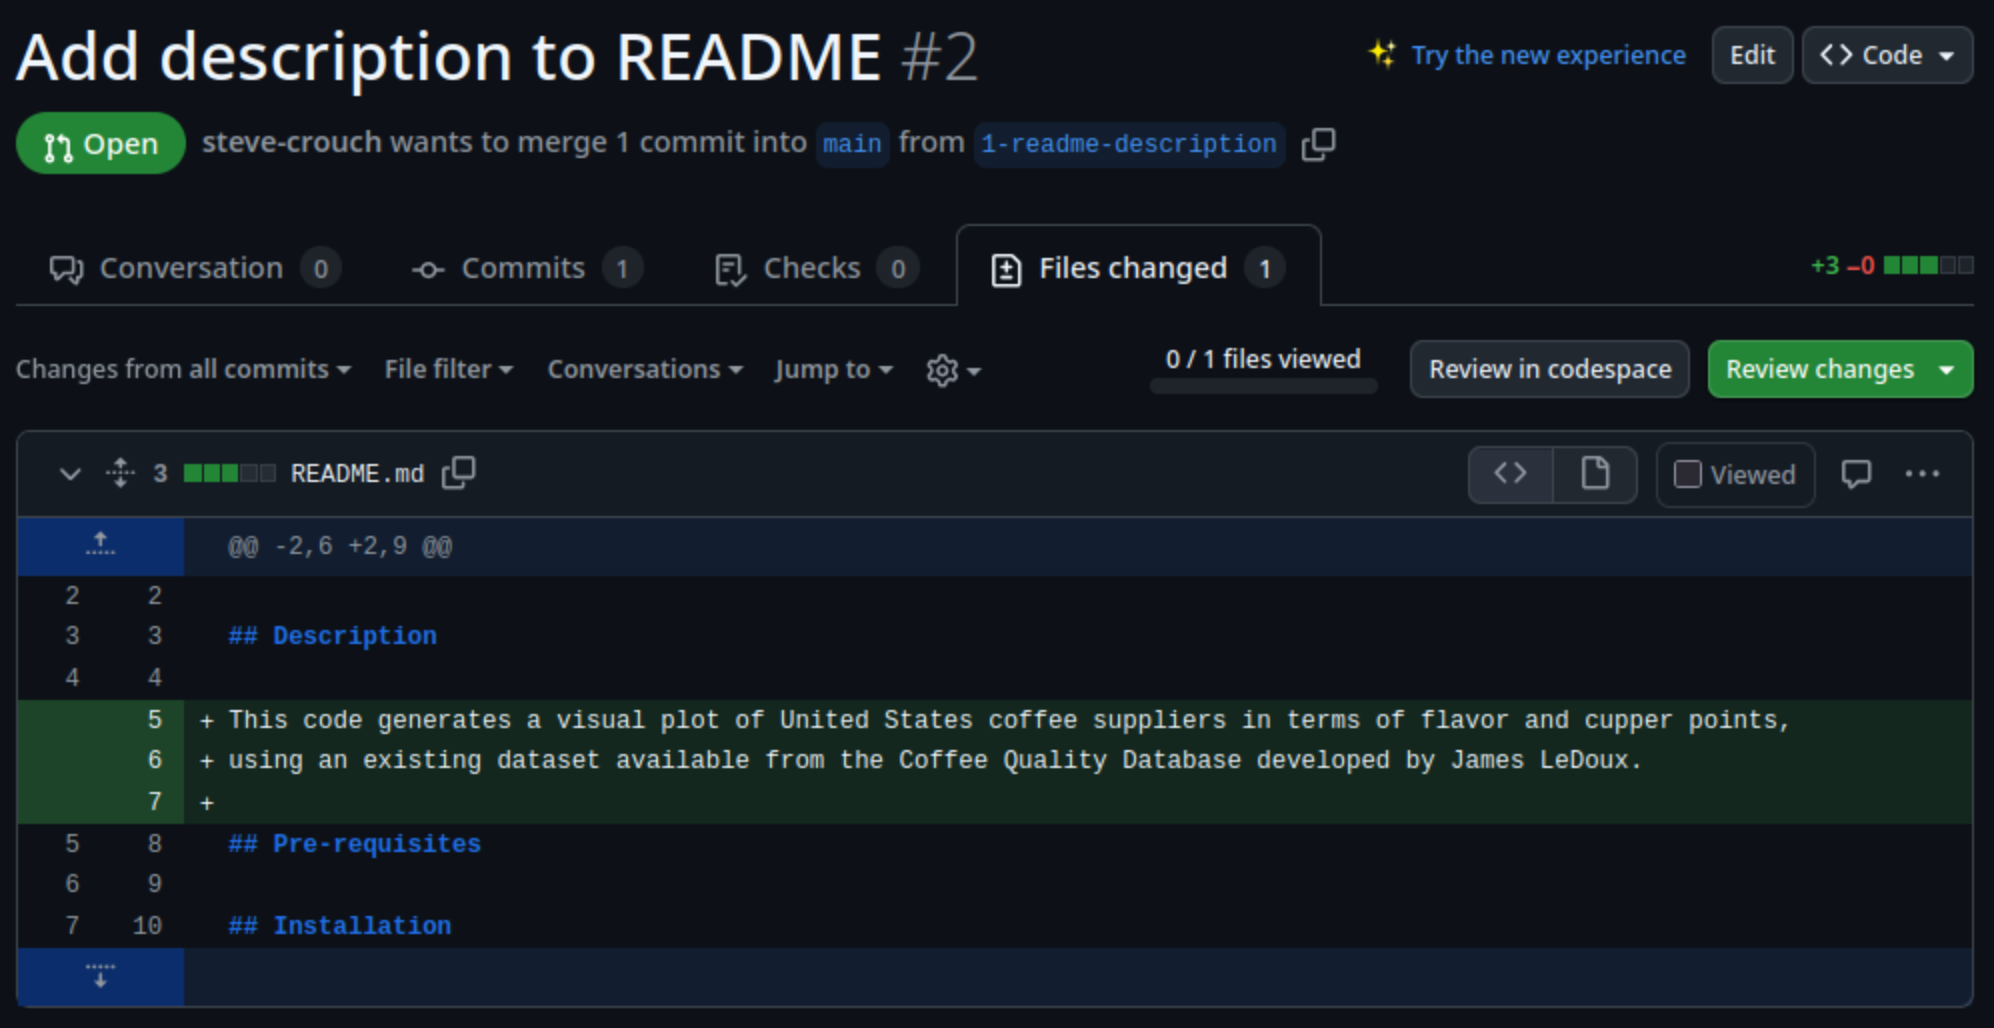
This shows deletions highlighted in red, and additions highlighted in green.
Another view is the “split” view of these changes, which is
selectable by clicking on the cog-like icon and selecting
Split:

This provides a side-by-side alternative, with the older version on the left, and the newer version on the right. In this case, you should see a number of green highlighted lines on the right side of this view, indicating the added lines.
When providing a review, we have the option of adding comments or suggestions inline to the proposed changes. By hovering over a line and selecting the ‘+’ symbol at the start of the line, we’re able to add a comment on that line, for example if we spotted a spelling or grammatical mistake, or in the case of code, a programmatic problem or other issue.
Solo Exercise: Conduct a Review of Your Assigned PR!
5 mins.
Briefly review the content added by your colleague for their assigned
section, and if you identify an issue, add comments for content on a
particular line using +, adding a comment, and selecting
Start a review. Feel free to add other comments as
necessary.
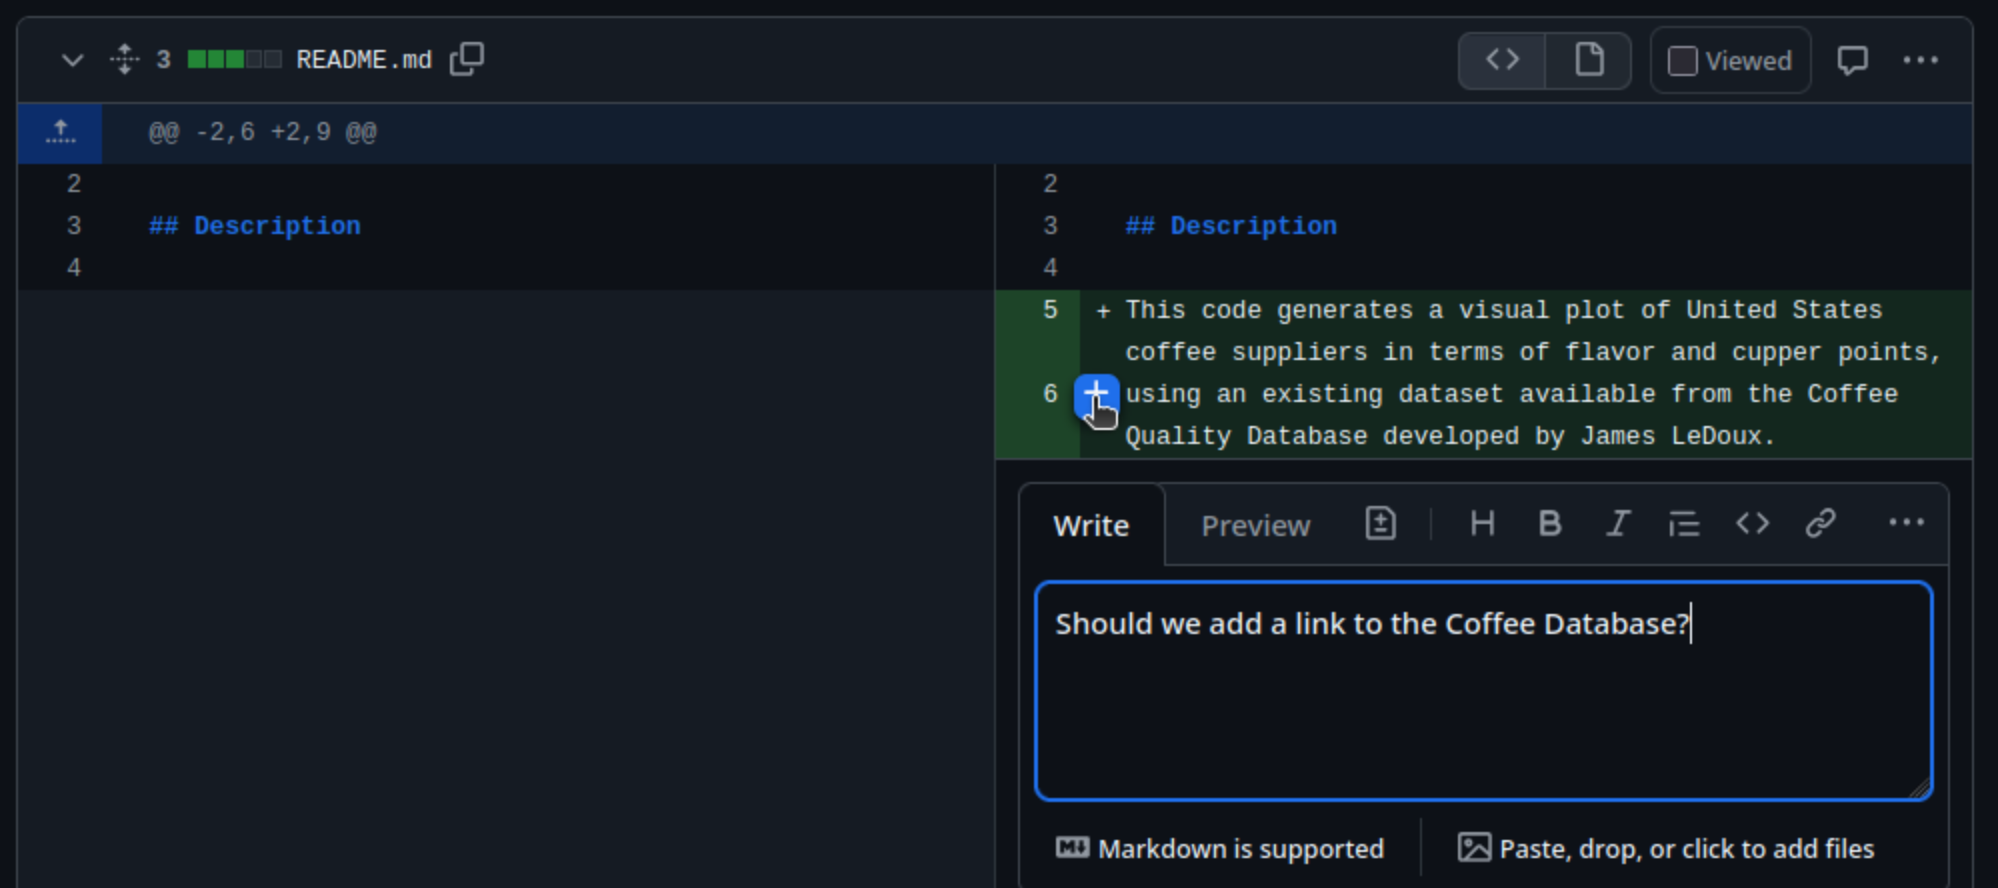
When you’ve completed your review, select
Finish your review, leave an overall comment on your
thoughts about the PR, and select one of:
-
Comment- where you’re just leaving a comment and aren’t requesting any changes -
Approve- no comments are changes are necessary -
Request changes- feedback must be addressed before it can be merged
Finally, select Submit review.
Addressing Feedback
As owner of your PR, the next step involves addressing any feedback
made by the reviewer. Return to the PR you created earlier, and take a
look at the comments that will appear in the Conversation
tab. You may need to scroll down to see them.
Solo Exercise: Address your Colleague’s Feedback
Merging the Pull Request
With the review feedback addressed, we are now ready to merge the
pull request to the main branch. The bottom of the
Conversation tab will show a
Merge pull request button, and a summary of whether there
is a conflict with the base branch:
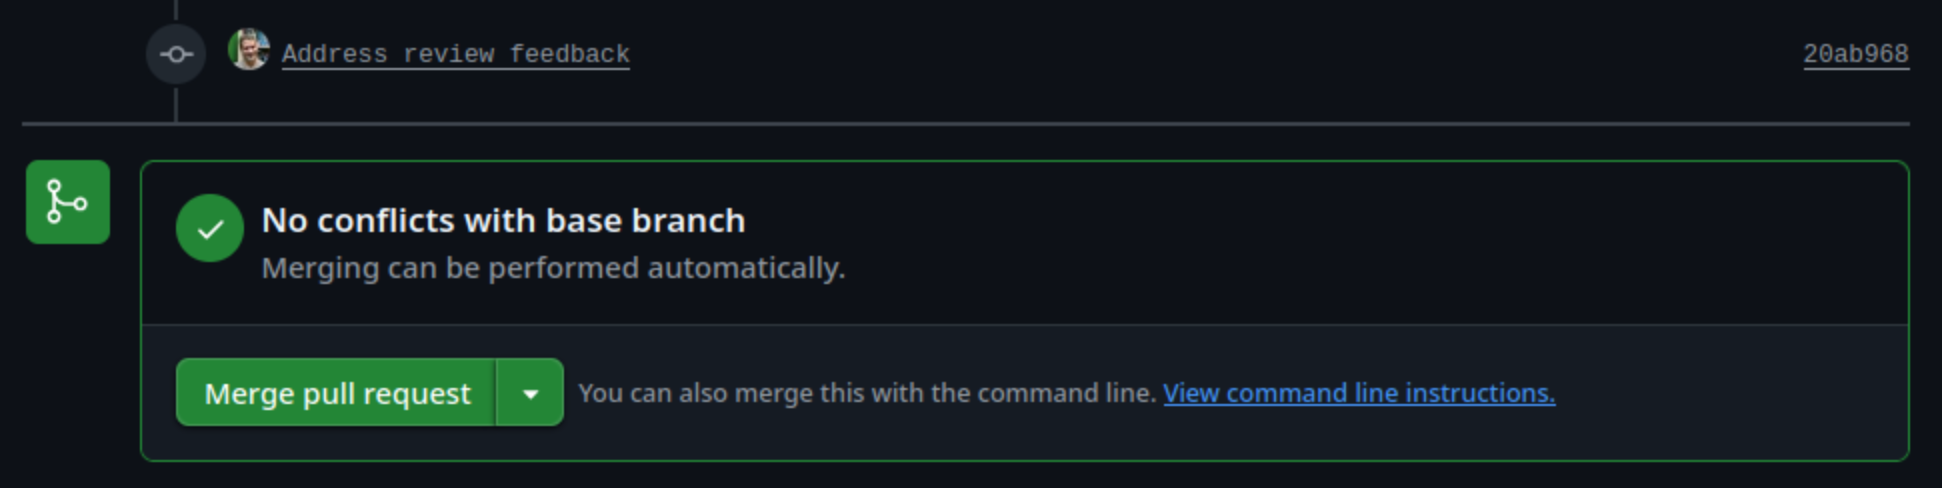
Selecting the drop-down will present you with a number of options for
how to perform the merge, which includes the merge options discussed
previously - create a merge commit, squash and merge, and rebase and
merge. Ensure this Create a merge commit is selected for
now.
Finally, select Merge pull request, add a commit message
that describes it, and Confirm merge to complete the
merge.
- Working collaboratively is a cornerstone of successful software development
- Code reviews can be short and informal, contribution-oriented, or formal
- The first hour of code review matters most
- Code review helps to increase code quality, ensure practices and conventions are met consistently, and increase codebase knowledge across the team
- If feature branches end up being unproductive “dead ends”, they can simply be deleted
- GitHub supports code review as part of pull requests
- Aim to close pull requests as soon as is convenient, to avoid increased divergence from the main codebase
Content from Day 2: Technical Skills and Best Practices within an Agile Way of Working
Last updated on 2025-04-10 | Edit this page
Overview
Questions
- FIXME
Objectives
- FIXME
- FIXME
Content from 2.1 Introduction to Automated Testing
Last updated on 2025-10-15 | Edit this page
Overview
Questions
- Why should I test my code?
- What is the role of automated testing?
- What are the different types of automated tests?
- What is the structure of a unit test?
- What is test “mocking”?
- How can I run unit tests?
Objectives
- Explain the reasons why testing is important
- Describe the three main types of tests and what each are used for
- Describe the practice of test “mocking” and when to use it
- Obtain example code repository and run existing unit tests
- Describe the format of a unit test written for the Pytest testing framework
Testing is a critical part of writing reliable, maintainable code — especially in collaborative or research environments where reproducibility and correctness are key.
In this session, we will explore why testing matters, and introduce different levels of testing — from small, focused unit tests, to broader integration and system tests that check how components work together. We will also look at testing approaches such as regression testing (to ensure changes do not break existing behavior) and property-based testing (to test a wide range of inputs automatically). Finally, we will cover mocking, a technique used to isolate code during tests by simulating the behavior of external dependencies.
Introduction to testing
Code testing is the process of verifying that your code behaves as expected and continues to do so as it evolves. It helps catch bugs early, ensures changes do not unintentionally break existing functionality, and supports the development of more robust and maintainable software. Whether you’re working on a small script or a large application, incorporating testing into your workflow builds confidence in your code and makes collaboration and future updates much easier.
Why test your code?
Being able to demonstrate that a process generates the right results is important in any field of research, whether it is software generating those results or not. So when writing software we need to ask ourselves some key questions:
- Does the code we develop works as expected?
- To what extent are we confident of the accuracy of results that software produces?
- Can we and others verify these assertions for themselves?
If we are unable to demonstrate that our software fulfills these criteria, why would anyone use it?
As a codebase grows, debugging becomes more challenging, and new code may introduce bugs or unexpected behavior in parts of the system it does not directly interact with. Tests can help catch issues before they become runtime bugs, and a failing test can pinpoint the source of the problem. Additionally, tests serve as invocation examples for other developers and users, making it easier for them to reuse the code effectively.
Having well-defined tests for our software helps ensure your software works correctly, reliably, and consistently over time. By identifying bugs early and confirming that new changes do not break existing functionality, testing improves code quality, reduces the risk of errors in production, and makes future development and long-term maintenance faster and safer.
Types of Testing - Levels
Testing can be performed at different code levels, each serving a distinct purpose to ensure software behaves correctly at various stages of execution. Together, these testing levels provide a structured approach to improving software quality and reliability.
Unit testing is the most granular level, where individual components—like functions or classes—are tested in isolation to confirm they behave correctly under a variety of inputs. This makes it easier to identify and fix bugs early in the development process.
Integration testing builds on unit testing by checking how multiple components or modules work together. This level of testing helps catch issues that arise when components interact — such as unexpected data formats, interface mismatches, or dependency problems.
At the highest level, system testing evaluates the software as a complete, integrated system. This type of testing focuses on validating the entire application’s functionality from end to end, typically from the user’s perspective, including inputs, outputs, and how the system behaves under various conditions.
Types of Testing - Approaches
Different approaches to code testing help ensure that software behaves as expected under a range of conditions. When the expected output of a function or program is known, tests can directly check that the results match fixed values or fall within a defined confidence interval.
However, for cases where exact outputs are not predictable — such as simulations with random elements — property-based testing is useful. This method tests a wide range of inputs to ensure that certain properties or patterns hold true across them.
Another important approach is regression testing, which helps detect when previously working functionality breaks due to recent changes in the code. By rerunning earlier tests, developers can catch and address these regressions early, maintaining software stability over time.
Mocking
When running tests, you often want to focus on testing a specific piece of functionality, but dependencies on external objects or functions can complicate this, as you cannot always be sure they work as expected. Mocking addresses this by allowing you to replace those dependencies with “mocked” objects or functions that behave according to your instructions. So, mocking is a testing approach used to isolate the unit of code being tested by replacing its dependencies with simplified, controllable versions — known as mocks.
Mocks mimic the behavior of real components (such as databases, APIs, or external services) without requiring their full functionality or availability. This allows developers to test specific code paths, simulate error conditions, or verify how a unit interacts with other parts of the system. Mocking is especially useful in unit and integration testing to ensure tests remain focused, fast and reliable.
For example, if a function modifies data and writes it to a file, you can mock the file-writing object, so instead of creating an actual file, the mocked object stores the “written” data. This enables you to verify that the data written is as expected, without actually creating a file, making tests more controlled and efficient.
Creating a Copy of the Example Code Repository
For this lesson we’ll need to create a new GitHub repository based on the contents of another repository.
- Once logged into GitHub in a web browser, go to https://github.com/softwaresaved/industry-skills-testing
- Select
Use this template, and then selectCreate a new repositoryfrom the dropdown menu - On the next screen, ensure your personal GitHub account is selected
in the
Ownerfield, and fill inRepository namewithindustry-skills-testing - Ensure the repository is set to
Public - Select
Create repository
You should be presented with the new repository’s main page. Next, we
need to clone this repository onto our own machines, using the Bash
shell. So firstly open a Bash shell (via Git Bash in Windows or Terminal
on a Mac). Then, on the command line, navigate to where you’d like the
example code to reside, and use Git to clone it. For example, to clone
the repository in our home directory (replacing
github-account-name with our own account), and change
directory to the repository contents:
Examining the Example Code
Next, let’s take a look at the code, which is in the
industry-skills-testing/mymath directory, called
factorial.py, so open this file in an editor.
The example code is a basic Python implementation of Factorial. Essentially, it multiplies all the whole numbers from a given number down to 1 e.g. given 3, that’s 3 x 2 x 1 = 6 - so the factorial of 3 is 6.
We can also run this code from within Python to show it working. In the shell, ensure you are in the root directory of the repository, then type:
PYTHON
Python 3.10.12 (main, Feb  4 2025, 14:57:36) [GCC 11.4.0] on linux
Type "help", "copyright", "credits" or "license" for more information.
>>>
Then at the prompt, import the factorial function from
the mymath library and run it:
Which gives us 6 - which gives us some evidence that this function is working. Of course, in practice, our functions may well be more complicated than this, and of course, they may call other separate functions. Now we could just come up with a list of known input numbers and expected outputs and run each of these manually to test the code, but this would take some time. Computers are really good at one thing - automation - so let’s use that and automate our tests, to make it easy for ourselves.
Setting up a Virtual Environment for pytest
So how do we run these tests? Well, we need to install a Python
package called pytest, since the unit tests have been
written using it. Typically, we’d use a virtual environment for
this.
What Are Virtual Environments?
Virtual environments are an indispensible tool for managing package dependencies across multiple projects, and could be a whole topic itself. In the case of Python, the idea is that instead of installing Python packages at the level of our machine’s Python installation, we’re going to install them within their own “container”, which is separate to the machine’s Python installation. Then we’ll run our Python code only using packages within that virtual environment.
There are a number of key benefits to using virtual environments:
- It creates a clear separation between the packages we use for this project, and the packages we use other projects.
- We don’t end up with a machine’s Python installation containing a clutter of a thousand different packages, where determining which packages are used for which project often becomes very time consuming and prone to error.
- Since we are sure what our code actually needs as dependencies, it becomes much easier for someone else (which could be a future version of ourselves) to know what these dependencies are and install them to use our code.
- Virtual environments are not limited to Python; for example there are similar tools for available for Ruby, Java and JavaScript.
So in summary, we need to:
- Create a new virtual environment to hold Python packages
- Activate that new virtual environment
- Install
pytestinto our new virtual environment
So, from a Bash prompt:
Then to activate it:
BASH
[Linux] source venv/bin/activate
[Mac] source venv/bin/activate
[Windows using Command Prompt] venv\Scripts\activate
[Windows using Git Bash] source venv/Scripts/activate
If you are using Windows with a Command Prompt, remember to use
\ instead of / in file paths.
To install pytest:
If we wish to deactivate a virtual environment, we can use
deactivate on the command line, and reactivate it later
using the same command we did before.
Running the Tests
As it turns out, this code repository already has a test. Navigate to
the repository’s tests directory, and open a file called
test_factorial.py:
Now, we using a Python unit test framework called
pytest. There are other such frameworks for Python,
including unittest (which is built-in to Python) and
nose, but pytest is regarded as the most
popular.
In this example, we have a single unit test, which we’ve called
test_3. Within that test method, we are essentially doing
what we did when we ran it manually earlier: we’re running factorial
with the argument 3, and checking it equals 6. We use a Python
assert statement to verify the two are the same, and if
not, the test will fail.
So how do we run this test? In the shell, we can run this test by ensuring we’re in the repository’s root directory, and running:
OUTPUT
============================= test session starts ==============================
platform linux -- Python 3.10.12, pytest-8.4.1, pluggy-1.6.0
rootdir: /home/steve/test/ist
collected 1 item

tests/test_factorial.py .                                                [100%]

============================== 1 passed in 0.00s ===============================
So what happens? The single dot next to the test script filename means the single test we have was successfully run, so our test passes!
But how does unittest know what to run exactly? Unit test frameworks
like pytest follow a common pattern of finding tests and
running them. When we give a single file argument to
pytest, it searches the Python file functions starting with
test_, and runs them. So we could add more tests to this
file in the same way, and it would run each of these tests in turn.
Testing for Failure
We’ve seen what happens if a test succeeds, but what happens if a
test fails? Let’s deliberately change our test to be wrong and find out,
by editing the tests/test_factorial.py file, changing the
expected result of factorial(3) to be 10, and
saving the file.
We’ll rerun our tests slightly differently than last time:
In this case, we add -v for more verbose output, giving
us detailed results test-by-test.
OUTPUT
============================= test session starts ==============================
platform linux -- Python 3.10.12, pytest-8.4.1, pluggy-1.6.0 -- /home/steve/test/ist/venv/bin/python
cachedir: .pytest_cache
rootdir: /home/steve/test/ist
collected 1 item

tests/test_factorial.py::test_3 FAILED                                   [100%]

=================================== FAILURES ===================================
____________________________________ test_3 ____________________________________

    def test_3():
>       assert factorial(3) == 10
E       assert 6 == 10
E        +  where 6 = factorial(3)

tests/test_factorial.py:6: AssertionError
=========================== short test summary info ============================
FAILED tests/test_factorial.py::test_3 - assert 6 == 10
============================== 1 failed in 0.02s ===============================
In this instance we get a FAILED instead of a
. for our test, and we see an AssertionError
that 6 is not equal to 10, which is clearly
true.
Let’s now change our faulty test back by editing the file again,
changing the 10 back to 6, and re-run our
tests:
OUTPUT
============================= test session starts ==============================
platform linux -- Python 3.10.12, pytest-8.4.1, pluggy-1.6.0 -- /home/steve/test/ist/venv/bin/python
cachedir: .pytest_cache
rootdir: /home/steve/test/ist
collected 1 item

tests/test_factorial.py::test_3 PASSED                                   [100%]

============================== 1 passed in 0.00s ===============================
This illustrates an important point with our tests: it’s important to make sure your tests are correct too. So make sure you work with known ‘good’ test data which has been verified to be correct!
- Testing code is the process of verifying that your code behaves as expected and continues to do so as it evolves
- Code complexity often increases beyond our ability to fully understand it
- Code testing allows us to discover the existence of issues before they become a potentially much larger issue when using the code in its intended environment
- Unit tests verify in isolation that a small code component, such as a function or class, behaves correctly with known inputs
- Integration tests verify correct behaviour of multiple components or modules working together, at a higher level
- System tests evaluate software as a complete, integrated system, focuses on validating the entire application’s functionality from end to end, typically from a user’s perspective
- Test mocking involves replacing a code component, such as a function or class, with a simplified, controllable version - known as a mock - to make testing easier by mimicing how the real component works
- Tests written in
pytestare defined as functions that return either true or false, and have a function name beginning withtest_ - Using
pytest, we can run a set of tests usingpython -m pytestfollowed by a specific file containing a set of tests, or a directory containing many test files with filenames beginning withtest_ - We can use
-vwhen runningpytestto produce more verbose output that explicitly lists each test that is run
Content from 2.2 Writing Unit Tests
Last updated on 2025-10-15 | Edit this page
Overview
Questions
- How do I write a unit test?
- When should I use a regression test?
- When should I write and re-run unit tests throughout development?
- What makes a good test?
Objectives
- Implement and run unit tests to verify the correct behaviour of program functions
- Describe how and when testing fits into code development
- Write a regression test to identify if an unwanted code behaviour returns
Solo Exercise: Add a New Test
3 mins.
Add two new tests based on the first test, instead testing that
calling factorial with 5 equals the expected result of
120, and re-run the tests.
Add to tests/test_factorial.py:
And then we can run it exactly as before, in the shell:
OUTPUT
============================= test session starts ==============================
platform linux -- Python 3.10.12, pytest-8.4.1, pluggy-1.6.0 -- /home/steve/test/ist/venv/bin/python
cachedir: .pytest_cache
rootdir: /home/steve/test/ist
collected 2 items

tests/test_factorial.py::test_3 PASSED                                   [ 50%]
tests/test_factorial.py::test_5 PASSED                                   [100%]

============================== 2 passed in 0.00s ===============================
We can see the tests pass. So the really useful thing here, is we can rapidly add tests and rerun all of them. Particularly with more complex codes that are harder to reason about, we can develop a set of tests into a suite of tests to verify the codes’ correctness. Then, whenever we make changes to our code, we can rerun our tests to make sure we haven’t broken anything. An additional benefit is that successfully running our unit tests can also give others confidence that our code works as expected.
Updating and Re-testing our Implementation
Let’s illustrate another key advantage of having unit tests. Let’s
assume during development we find an error in our code. For example, if
we run our code with -1:
We get a nonsensical answer of 1, since for negative numbers, factorial is undefined. So this isn’t desired behaviour!
Implementing a Fix
Therefore, in our implementation we explicitly don’t want to process negative numbers, so we can add what is known as a precondition beforehand, and this approach to checking function input data prior to processing it is considered good practice.
Let’s add the following after the function’s docstring in
mymath/factorial.py, and before
factorial = 1:
So if we run it with a negative input from within the Python interpreter, we should see the error:
OUTPUT
Traceback (most recent call last):
  File "<stdin>", line 1, in <module>
  File "/home/steve/factorial-example/mymath/factorial.py", line 9, in factorial
    raise ValueError('Only use non-negative integers.')
ValueError: Only use non-negative integers.
Re-testing our Existing Code
We now have our updated implementation, but we need to make sure it all still works as intended. Fortunately, we have our set of tests, so let’s run them again:
OUTPUT
============================= test session starts ==============================
platform linux -- Python 3.10.12, pytest-8.4.1, pluggy-1.6.0 -- /home/steve/test/ist/venv/bin/python
cachedir: .pytest_cache
rootdir: /home/steve/test/ist
collected 2 items

tests/test_factorial.py::test_3 PASSED                                   [ 50%]
tests/test_factorial.py::test_5 PASSED                                   [100%]

============================== 2 passed in 0.00s ===============================
And they work, which gives us some confidence - very rapidly - that our updated implementation is behaving exactly the same as before. So again, each time we change our code, whether it’s making small or large changes, we retest and check they all pass.
Adding a New “Regression Test”
But since we’ve amended our code to correct for a known issue, what would be helpful would be to have a test that checks for the existence of this issue. This would verify that the fix is behaving correctly, and also would be a check to ensure the behaviour of the code has not regressed to a previous bad state. These types of test, which we introduced briefly before, are known as regression tests.
But how do we write a regression test for this as a unit test, since this is an exception, and not a value? Fortunately, unit test frameworks have ways to check for this.
Let’s add a new test to tests/test_factorial.py:
So here, we use pytest’s built-in raises()
(instead of assert) to test for a ValueError
exception occurring when we run factorial(-1). We also use
Python’s with here to test for this within the call to
factorial().
Re-testing with all our Tests
So if we re-run our tests again, we should see them all succeed:
You should see:
OUTPUT
============================= test session starts ==============================
platform linux -- Python 3.10.12, pytest-8.4.1, pluggy-1.6.0 -- /home/steve/test/ist/venv/bin/python
cachedir: .pytest_cache
rootdir: /home/steve/test/ist
collected 3 items

tests/test_factorial.py::test_3 PASSED                                   [ 33%]
tests/test_factorial.py::test_5 PASSED                                   [ 66%]
tests/test_factorial.py::test_negative PASSED                            [100%]

============================== 3 passed in 0.00s ===============================What makes a Good Test?
Of course, we only have 3 tests so far, and it would be good to have more But what kind of tests are good to write? With more tests that sufficiently test our code, the more confidence we have that our code is correct. We could keep writing tests for e.g., 10, 15, 20, and so on. But these become increasingly less useful, since they’re in much the same “space”. We can’t test all positive numbers, and it’s fair to say at a certain point, these types of low integers are sufficiently tested. So what test cases should we choose?
We should select test cases that test two things:
- The paths through our code, so we can check they work as we expect. For example, if we had a number of paths through the code dictated with if statements, we write tests to ensure those are followed.
- We also need to test the boundaries of the input data we expect to use, known as edge cases.
For example, if we go back to our code. we can see that there are some interesting edge cases to test for:
- Zero?
- Very large numbers (as we’ve already seen)?
- Strings?
All good candidates for further tests, since they test the code in different ways, and test different paths through the code.
Commit and Push our Changes to GitHub
For the next episode, we’ll need our changes in our remote GitHub repository.
Let’s first commit our new set of tests to our local repository:
Next, in a separate commit, let’s commit our updated
factorial implementation, and then push both commits to our
remote repository on GitHub:
Brief Summary
So we now have the beginnings of a test suite! And every time we change our code, we can rerun our tests. So the overall process of development becomes:
- Add new functionality (or modify new functionality) to our code
- Potentially add new tests to test any new functionality
- Re-run all our tests
- Running automated tests is generally a rapid process that takes far less time than testing code manually
- When we change our code, re-run existing tests to ensure we haven’t broken anything or otherwise compromised the desired behaviour of our code
- When we change our code, consider if a new test should be added to verify it works correctly
- If we fix an error in our code, consider adding a regression test to identify if it returns
Content from 2.3 Using Continuous Integration
Last updated on 2025-10-15 | Edit this page
Overview
Questions
- What is automation in the context of software development, and why is it beneficial?
- How does Continuous Integration (CI) enhance the software development process?
- What tasks can be automated using CI?
- How do I define a CI workflow to automate running a set of unit tests when a change is made to a code repository?
- How do I monitor the progress of a running or completed workflow?
Objectives
- Understand the concept of automation and its role in improving efficiency and consistency in software development
- Describe the benefits of using Continuous Integration (CI) for further automation of testing
- Use continuous integration to automatically run unit tests when changes are committed to a version control repository
- View the results of running tests automatically using CI
Doing tasks manually can be time-consuming, error-prone, and hard to reproduce, especially as the software project’s complexity grows. Using automation allows computers to handle repetitive, structured tasks reliably, quickly, and consistently, freeing up your time for more valuable and creative work.
By automating these actions, you save time, reduce the chance of human error, and ensure that processes are reproducible and consistent. Automation also provides a clear, documented way to understand how things are run, making it easier for others to replicate or build upon your work.
Introduction to Continuous Integration
Building on the concept of automation, Continuous Integration (CI) is the practice of regularly integrating code changes into a shared code repository and automatically running tasks and key checks each time this happens (e.g. when changes are merged from development or feature branch into main, or even after each commit). This helps maintain code quality and ensures new contributions do not break existing functionality.
A variety of CI services and tools, like GitHub Actions, GitLab CI, or Jenkins, make it easy to set up automated workflows triggered by code changes.
CI can also be extended into Continuous Delivery (CD), which automates the release or deployment of code to production or staging environments.
Principles of CI
Software development typically progresses in incremental steps and requires a significant time investment. It is not realistic to expect a complete, feature-rich application to emerge from a blank page in a single step. The process often involves collaboration among multiple developers, especially in larger projects where various components and features are developed concurrently.
Continuous Integration (CI) is based on the principle that software development is an incremental process involving ongoing contributions from one or more developers. Integrating large changes is often more complex and error-prone than incorporating smaller, incremental updates. So, rather than waiting to integrate large, complex changes all at once, CI encourages integrating small updates frequently to check for conflicts and inconsistencies and ensure all parts of the codebase work well together at all times. This becomes even more critical for larger projects, where multiple features may be developed in parallel - CI helps manage the complexity of merging such contributions by making integrations a regular, manageable part of the workflow.
Common CI Tasks
CI enables automation of a number of tasks, including:
- Compiling (or otherwise building) code
- Running a test suite across multiple platforms to catch issues early and checking test coverage to see what tests are missing
- Verifying that the code adheres to project, team, or language style guidelines using tools known as code linters
- Building documentation pages from docstrings (structured documentation embedded in the code) or other source pages
These steps are typically executed as part of a structured sequence known as a CI pipeline or workflow.
While there can be a learning curve when first setting up CI, a wide variety of tools are available, and the core principles are transferable between them, making these valuable and broadly applicable skills.
CI Services & Tools
There are a wide range of CI-focused workflow services and different tools available to support various aspects of a CI pipeline. Many of these services have Web-based interfaces and run on cloud infrastructure, providing easy access to scalable, platform-independent pipelines. However, local and self-hosted options are also available for projects that require more control or need to operate in secure environments. Most CI tools are generally language- and tool-agnostic; if you can run a task locally, you can likely incorporate it into a CI pipeline.
Popular cloud-based services that host and run workflows include:
While self-hosted or hybrid solutions include:
Beyond CI - Continuous Deployment/Delivery
You may frequently come across the term CI/CD, which refers to the combination of Continuous Integration (CI) and Continuous Deployment or Delivery (CD).
Whilst CI focuses on integrating and testing code changes, CD extends the process by automating the delivery and deployment of software. This can include building installation packages for various environments and automatically deploying updates to test or production systems. For example, a web application could be redeployed every time a new change passes the CI pipeline (an example is this website - it is rebuilt each time a change is made to one of its source pages).
CD helps streamline the release process for packages or applications, for example by doing nightly builds and deploying them to a public server for download, making it easier and faster to get working updates into the hands of users with minimal manual intervention.
Defining a CI Workflow for GitHub Actions
How to Describe a Github Actions Workflow?
Now before we move on to defining our workflow in GitHub Actions, we’ll take a very brief look at a language used to describe its workflows, called YAML.
Originally, the acronym stood for Yet Another Markup Language, but since it’s not actually used for document markup, it’s acronym meaning was changed to YAML Aint Markup Language.
Essentially, YAML is based around key value pairs, for example:
Now we can also define more complex data structures too. Using YAML
arrays, for example, we could define more than one entry for
first_scaled_by, by replacing it with:
Note that similarly to languages like Python, YAML uses spaces for indentation (2 spaces is recommended). Also, in YAML, arrays are sequences, where the order is preserved.
There’s also a short form for arrays:
We can also define nested, hierarchical structures too, using YAML maps. For example:
YAML
name: Kilimanjaro
height:
  value: 5892
  unit: metres
  measured:
    year: 2008
    by: Kilimanjaro 2008 Precise Height Measurement Expedition
We are also able to combine maps and arrays, for example:
YAML
first_scaled_by:
  - name: Hans Meyer
    date_of_birth: 22-03-1858
    nationality: German
  - name: Ludwig Purtscheller
    date_of_birth: 22-03-1858
    nationality: Austrian
So that’s a very brief tour of YAML, which demonstrates what we need to know to write GitHub Actions workflows.
Enabling Workflows for our Repository
So let’s now create a new GitHub Actions CI workflow for our new repository that runs our unit tests whenever a change is made.
Firstly, we should ensure GitHub Actions is enabled for repository. In a browser:
- Go the main page for the
industry-skills-testingrepository you created in GitHub. - Go to repository
Settings. - From the sidebar on the left select
General, thenActions(and under that,General). - Under
Actions permissions, ensureAllow all actions and reusable workflowsis selected, otherwise, our workflows won’t run!
Creating Our First Workflow
Next, we need to create a new file in our repository to contain our
workflow, and it needs to be located in a particular directory location,
since GitHub Actions expects workflows to be contained within the
.github/workflows directory. Let’s create that director and
subdirectory now. From the repository root directory:
Create and edit a new file in this directory called
main.yml, which will hold our workflow.
So first let’s specify a name for our workflow that will appear under GitHub Actions build reports, and add the conditions that will trigger the workflow to run:
So here our workflow will run when changes are pushed to the repository. There are other events we might specify instead (or as well) if we wanted, but this is the most common.
GitHub Actions are described as a sequence of jobs (such as building our code, or running some tests), and each job contains a sequence of steps which each represent a specific “action” (such as running a command, or obtaining code from a repository).
Let’s define the start of a workflow job we’ll name
build-and-test:
We only have one job in this workflow, but we may have many. We also specify the operating systems on which we want this job to run. In this case, only the latest version of Linux Ubuntu, but we could supply others too (such as Windows, or Mac OS).
When the workflow is triggered, our job will run within a
runner, which you can think of as a freshly installed
instance of a machine running the operating system we indicate (in this
case Ubuntu).
Let’s now supply the concrete things we want to do in our workflow. We can think of this as the things we need to set up and run on a fresh machine. So within our workflow, we’ll need to:
- Check out our code repository
- Install Python
- Install our Python dependencies (which is just
pytestin this case) - Run
pytestover our set of tests
We can define these as follows:
YAML
    steps:

    - name: Checkout repository
      uses: actions/checkout@v4

    - name: Set up Python 3.11
      uses: actions/setup-python@v5
      with:
        python-version: "3.11"
We first use GitHub Actions (indicated by
uses: actions/), which are small tools we use to perform
something specific. In this case, we use:
-
checkout- to checkout the repository into our runner -
setup-python- to set up a specific version of Python
Note that the name entries are descriptive text and can
be anything, but it’s good to make them meaningful since they are what
will appear in our build reports as we’ll see later.
YAML
    - name: Install Python dependencies
      run: |
        python3 -m pip install --upgrade pip
        python3 -m pip install -r requirements.txt

    - name: Test with pytest
      run: |
        python -m pytest -v tests/test_factorial.py
Here we use two run steps to run some specific commands,
to install our python dependencies and run pytest over our
tests, using -v to request verbose reporting.
What about other Actions?
Our workflow here uses standard GitHub Actions (indicated by
actions/*). Beyond the standard set of actions, others are
available via the GitHub
Marketplace. It contains many third-party actions (as well as apps)
that you can use with GitHub for many tasks across many programming
languages, particularly for setting up environments for running tests,
code analysis and other tools, setting up and using infrastructure (for
things like Docker or Amazon’s AWS cloud), or even managing repository
issues. You can even contribute your own.
Checking Workflow Progress
We’ve committed our workflow, so how do we know its actually running?
Since the workflow is triggered on each git push, if we go
back to our main repository page, we should see either of the following
next to the most recent commit displayed just above the directory
contents:
- An orange circle - the CI workflow is currently running
- A green tick - the CI workflow has successfully completed
- A red cross - the CI workflow has failed due to an error
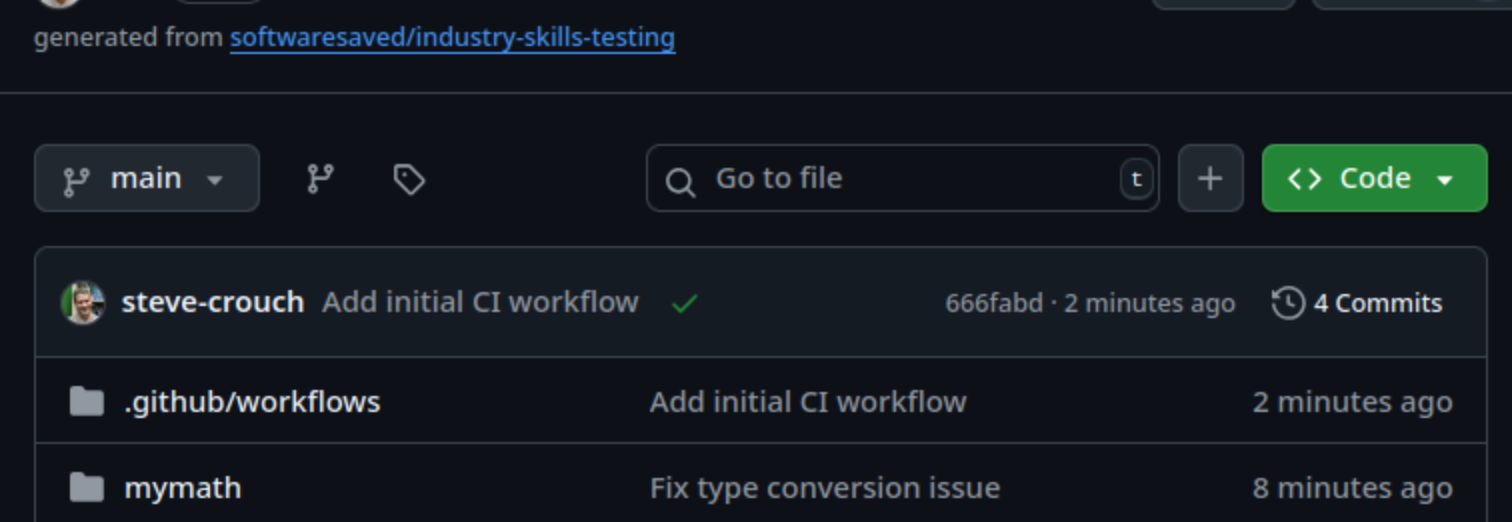
For more detail we can check the progress of a running workflow by
selecting Actions in the top navigation bar. This page also
shows a historical log of any other previous workflow runs too.
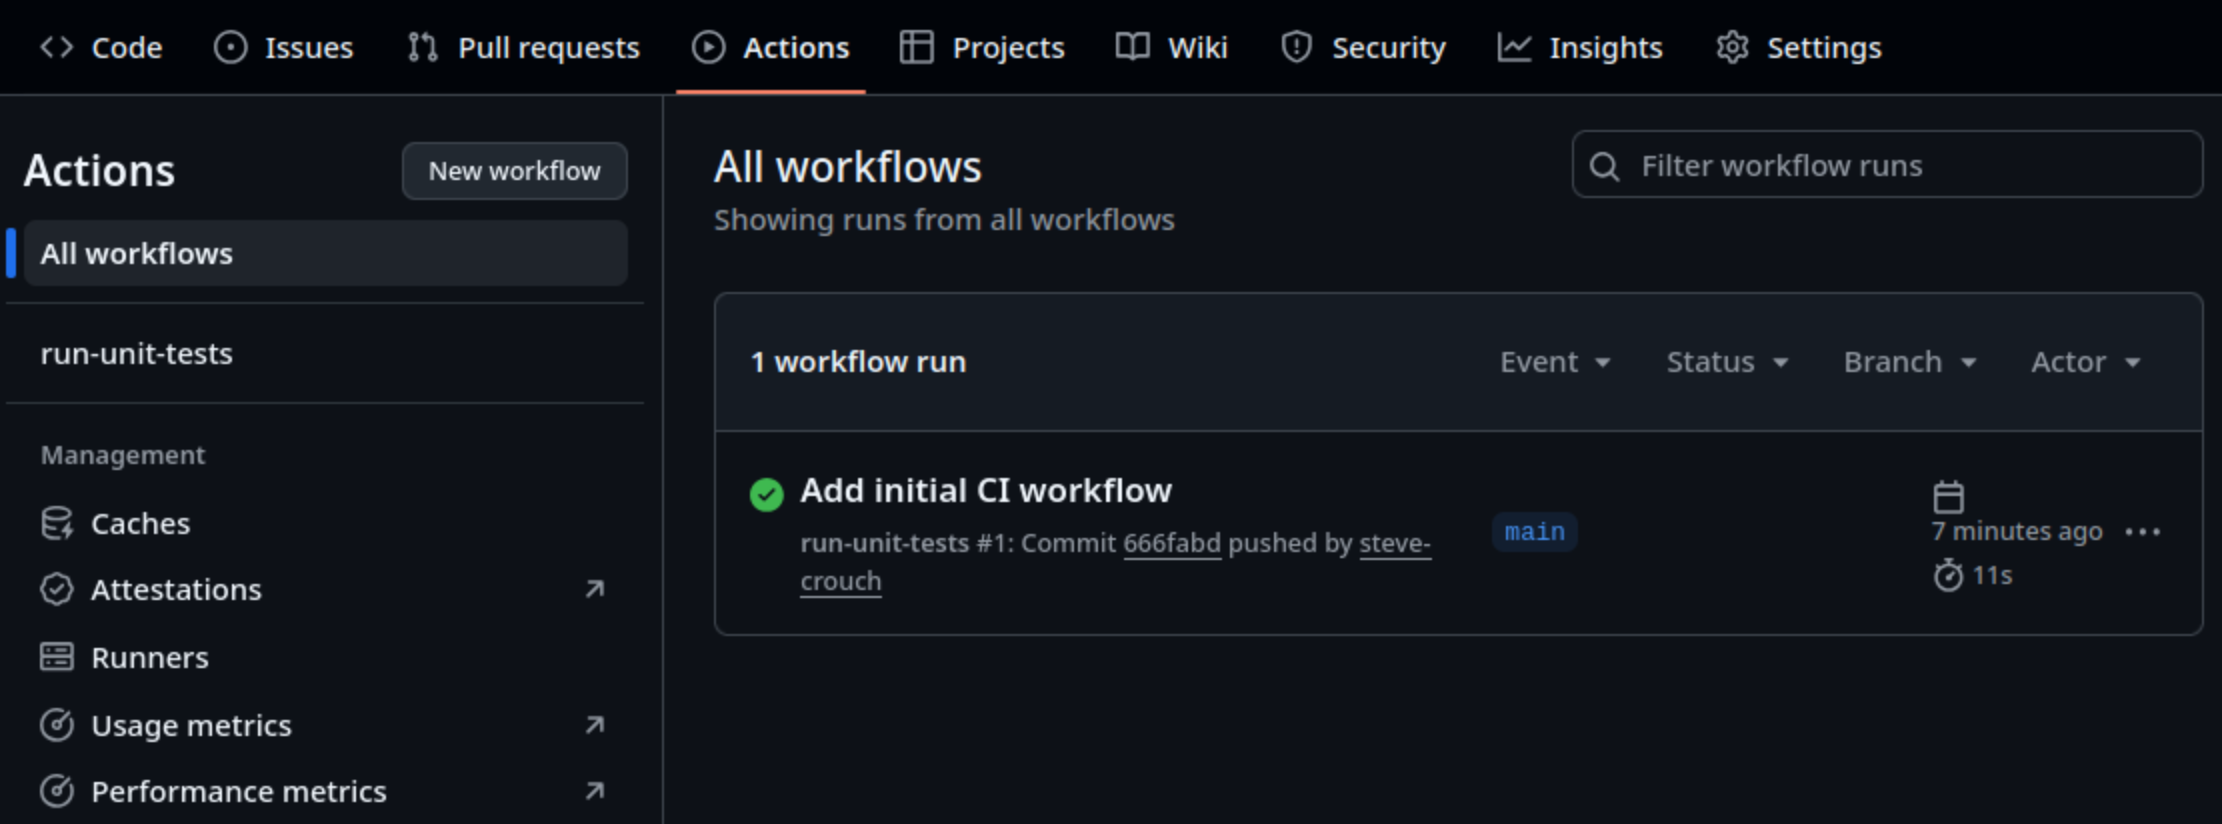
We can also view a complete log of the output from workflow runs, by
selecting the first (and only) entry at the top of this list. This will
then display a list of our jobs (in this case only
build-and-test). If we select build-and-test
we’ll see an in-progress log of our workflow run, separated into
separate collapsed steps that we may expand to view further detail. Each
of the steps is named from the name labels we gave each
step. Note that the workflow may still be running at this point, so not
all steps may be complete yet.
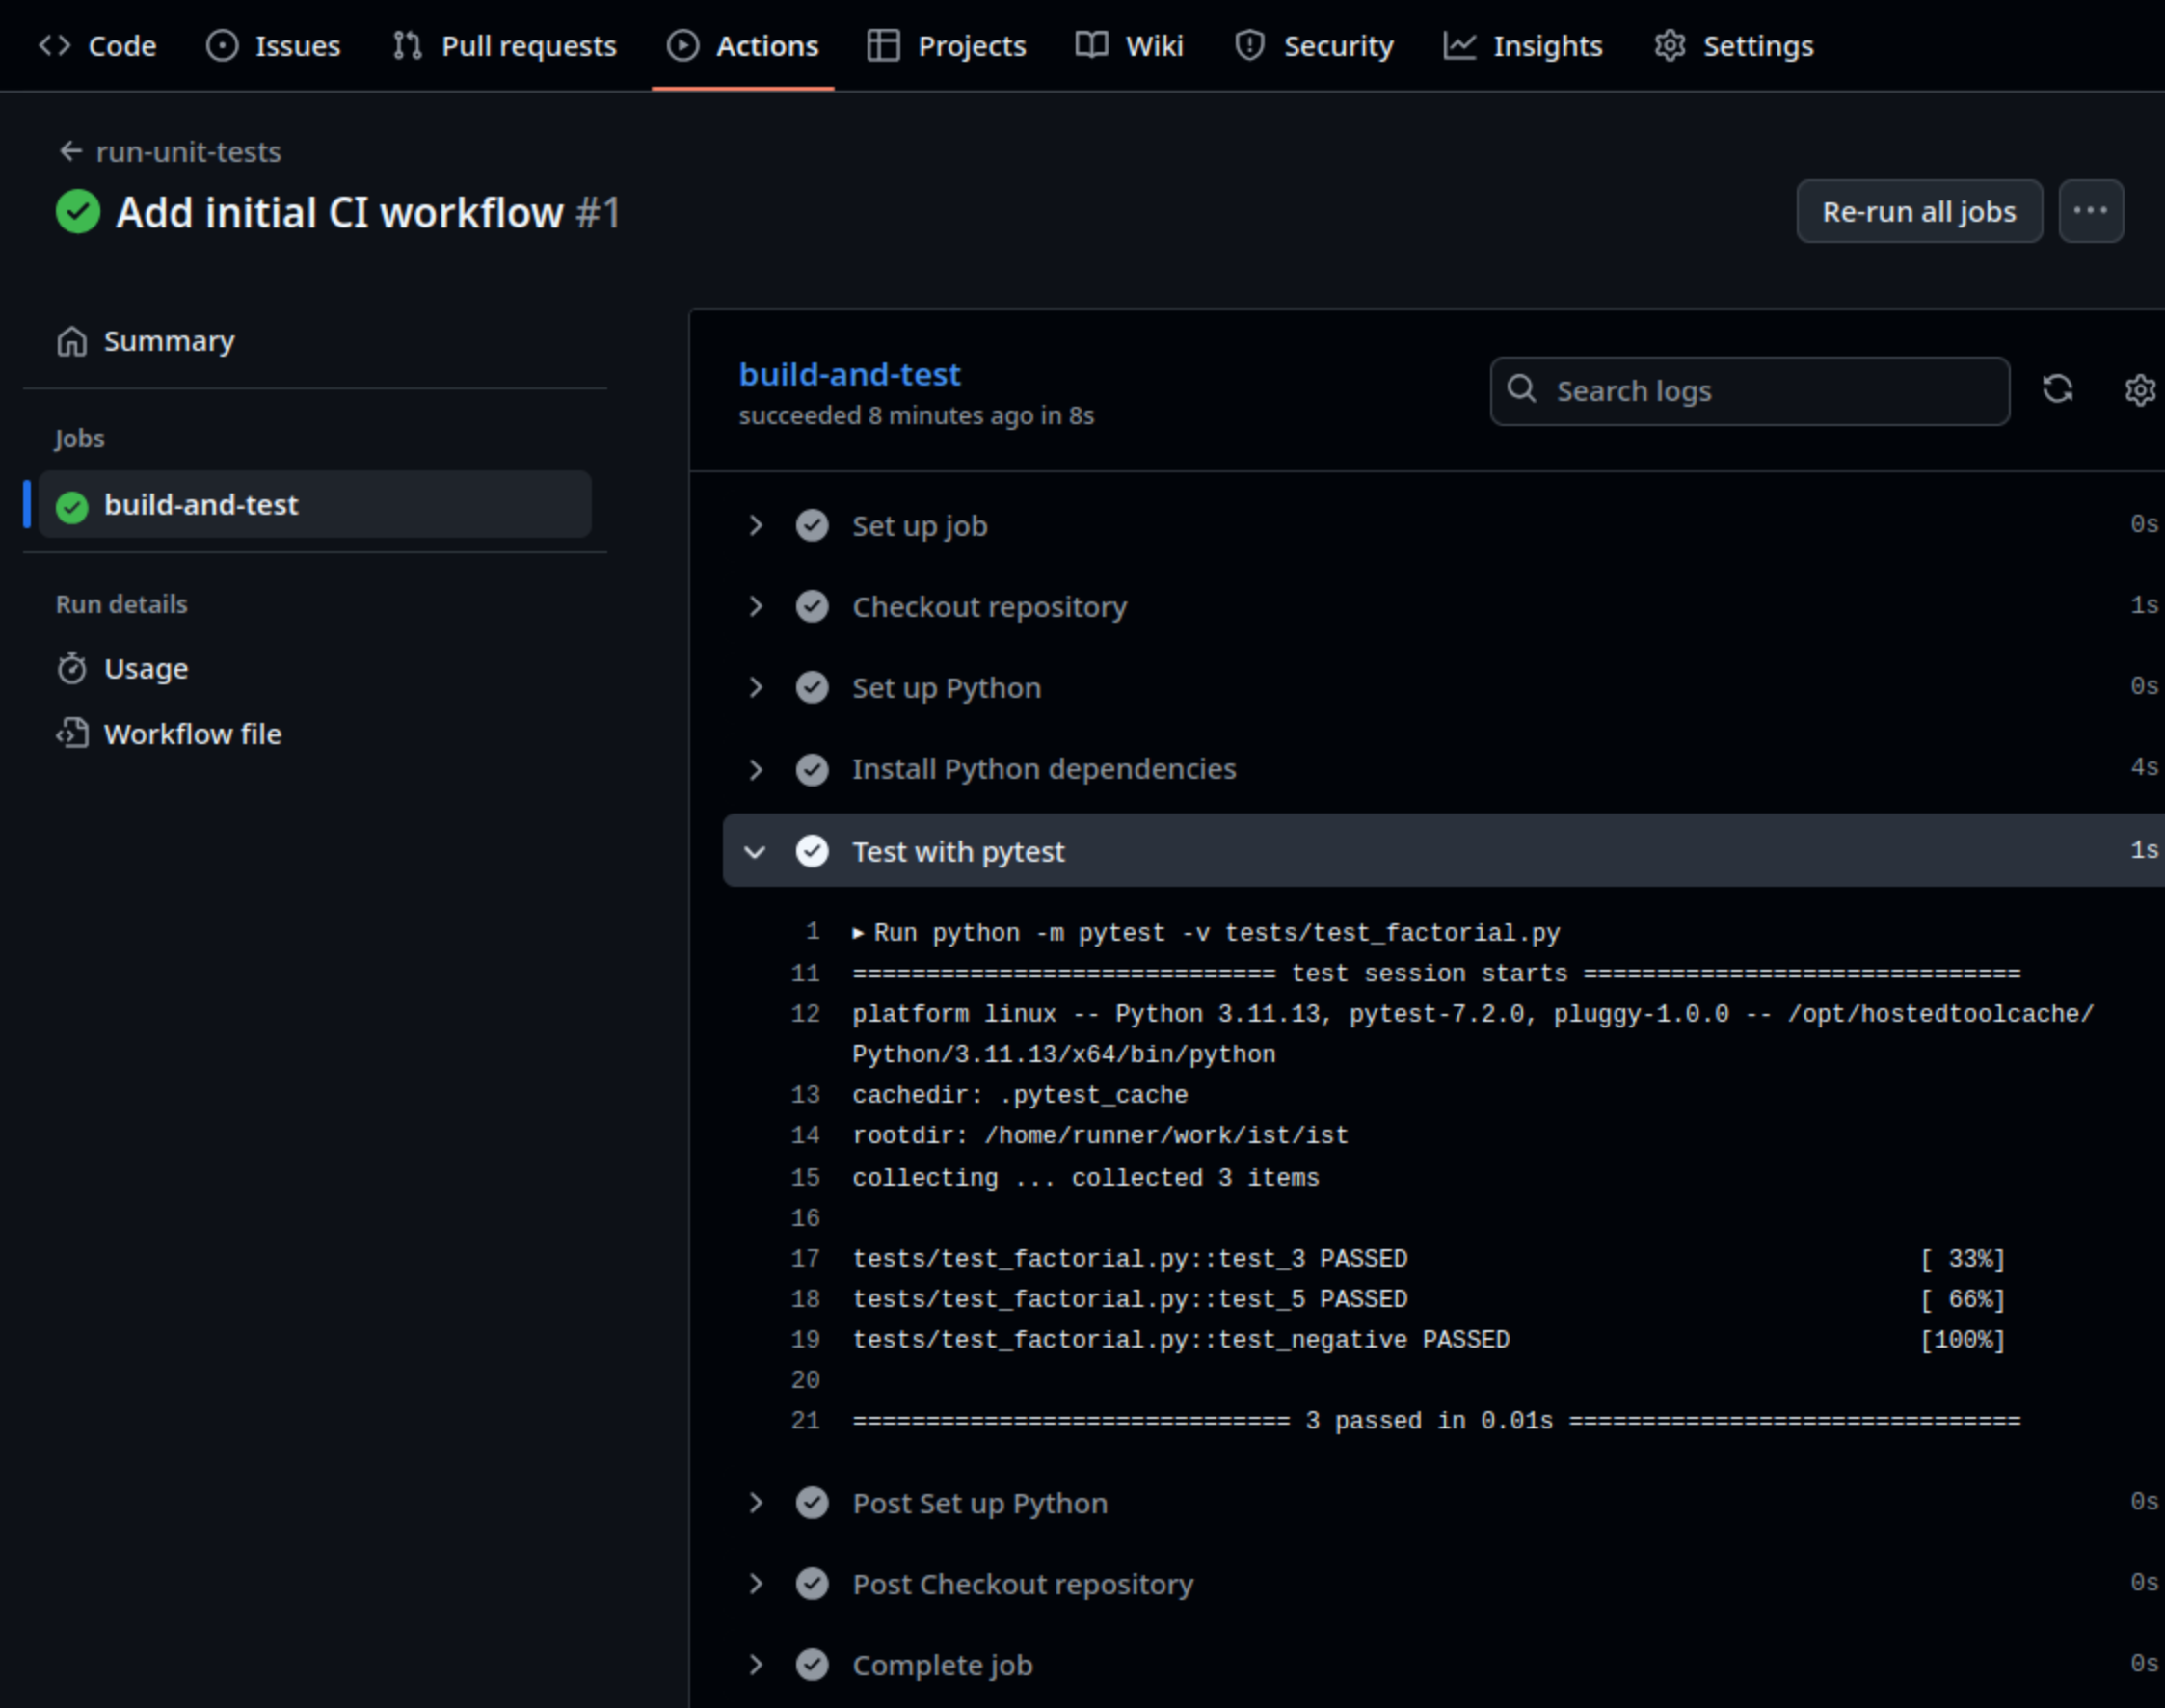
If we drill down by selecting the Test with pytest
entry, we’ll get a breakdown of the thing we’re really interested in,
that shows us that our tests were successful!
Triggering our Workflow with Code Changes
Now if we make a change to our code, our workflow will be triggered and these tests will run, so let’s make a change.
In GitHub (or on the command line if you prefer), edit the source
code file mymath/factorial.py, add an additional line
before return factorial. Then save the file (if editing
locally), and commit the change.
If we return to the GitHub Actions workflow list and select the most recent workflow run, we should see the workflow execute successfully as before - so we know our change hasn’t broken anything.
Summary
Our workflow will now be triggered every time a change to our code is pushed to our GitHub repository, which means that our code is now always being checked against our tests. Although we must remember to check the workflow log for this to have value. We also need to be sure that our tests sufficiently verify the behaviour of our code as it evolves, so we should ensure we update our tests as necessary, and adding new tests as required to verify new functionality.
- Automation saves time and improves reproducibility by capturing repeatable processes like testing, linting, and building code into scripts or pipelines
- Continuous Integration (CI) is the practice of automatically running tasks and checks each time code is updated, helping catch issues early and improving collaboration
- Integrating smaller, frequent code updates is more manageable and less error-prone than merging large changes all at once
- CI pipelines can run on many platforms and environments using cloud-based services (e.g. GitHub Actions, Travis CI) or self-hosted solutions (e.g. Jenkins, GitLab CI)
- GitHub Actions workflows are defined using YAML
- A GitHub Actions workflow defines a sequence of jobs, and each job contains a sequence of steps, which each represent a specific “action” or task to perform
- GitHub Actions log the progress of a build which can be viewed in GitHub
Content from 2.4 The Agile Development Process
Last updated on 2026-03-13 | Edit this page
Overview
Questions
- What are the two key principles of Scrum Theory?
- What are the five Scrum Values?
- How do the Scrum Pillars relate to each other?
- What are the responsibilities of each of the Scrum Team roles?
- What are the commitments for each of the three Scrum Artifacts?
Objectives
- Explain the Philosophy of Scrum
- List and briefly describe the five Scrum Values
- List and briefly describe the three Scrum Pillars
- Describe the responsibilities of the three Scrum roles
- Describe the primary artifacts and stages within Scrum and how they relate as a process
- Describe the purpose of the sprint backlog and how it is used throughout a sprint
- Define Definition of Done
‘Scrum is a lightweight framework that helps people, teams and organizations generate value through adaptive solutions for complex problems’ - The Scrum Guide
Scrum Philosophy
Scrum is an iterative and incremental approach.
Scrum is intentionally minimalist. It defines only what is essential to implement Scrum theory, encouraging teams to build on it and adapt it to their context.
Scrum is deliberately incomplete.It doesn’t provide detailed instructions, but instead provides a structure to guide interactions and relationships.
Scrum can be used alongside or around existing practices, processes and frameworks.
Just as important as the visible elements of Scrum, such as the Scrum Team Roles, Events and Artifacts, are the underlying values and philosophy of Scrum. For Scrum to work effectively, you need to adopt a mindset and way of working that is underpinned by certain values and actions.
These are defined in the Scrum Guide as the Principles, Values and Pillars.
They can be depicted as a temple with the key principles of Empiricism and Lean Thinking as the foundations, the Values as the steps, and the Pillars holding up the roof of the temple. The Scrum Events (i.e. everything that happens in the Sprint) can be thought of as part of the ‘roof’, and will only run effectively when the pillars, steps, and foundations are in place.
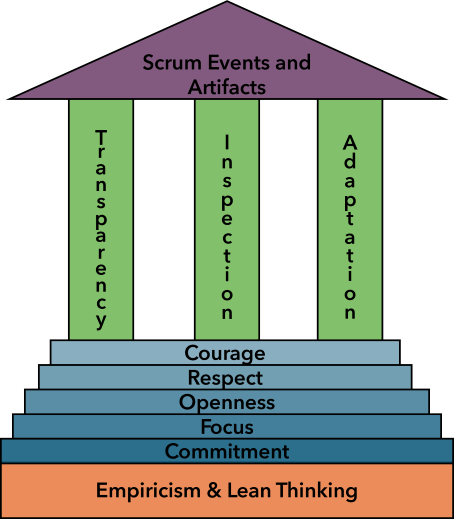
Key Principles of Scrum Theory
There are two key principles of Scrum Theory:
- Empiricism: Decisions are based on observation and experience, not speculation. Work is guided by evidence and continuous learning.
- Lean Thinking: Focus on delivering value while eliminating waste i.e. doing only what matters most.
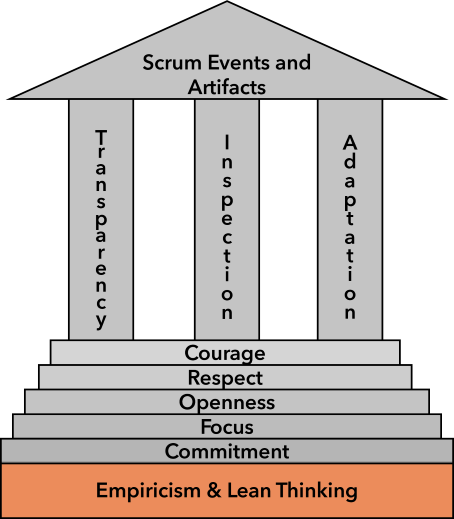
Solo Exercise: Fill in the Blanks
3 mins.
We’ve just introduced some key concepts of Scrum philosophy. To reinforce your learning, think about the information you’ve just read (or heard) and fill in the blanks to create sentences that accurately describe the philosophy of Scrum.
- It is intentionally __________, meaning it provides only the essential structure and leaves room for adaptation.
- Scrum is based on __________, which means knowledge comes from experience and decisions are based on observation.
- It also draws on __________ thinking, which emphasizes reducing waste and maximizing value.
- Scrum is both __________ and __________, allowing teams to inspect and adapt regularly.
- incomplete
- empiricism
- lean
- iterative, incremental
Scrum Values
Scrum isn’t only about what is done but how it is done. Scrum has five values that encourage a healthy and productive working environment. These guide the Scrum Team’s work, actions and behaviour.
- Commitment - the Scrum Team commits to achieving its goals and supporting each other
- Focus - the primary focus of the Scrum Team is the work of the sprint to make the best possible progress toward the Sprint Goal.
- Openness - the Scrum Team and its stakeholders are open about the work and the challenges. This builds trust and surfaces problems early.
- Respect - Every team member is valued as capable and autonomous. Scrum works best in an environment of mutual respect.
- Courage - Scrum Team members need courage to tackle hard problems and speak truthfully.
Scrum only works when the team adopts the values it was built to support.
“Scrum is the framework I built to put those values into practice. There is no methodology.” - Jeff Sutherland (co-creator of Scrum)
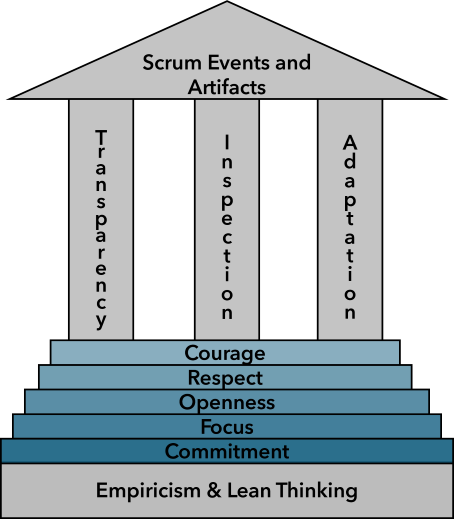
Pair Exercise: Scrum Values in Practice
3 mins.
Discuss the following questions with your partner:
- Which Scrum Value do you think you would find hardest to put into practice?
- Why?
- How could a team support each other in developing that Scrum Value?
Scrum Pillars
The effectiveness of Scrum relies on three core pillars, which are built on top of the foundations of Empiricism and Lean Thinking, and the steps of Scrum Values:
Transparency: the process and work must be visible to those performing the work and stakeholders. Transparency is essential for effective inspection and adaptation.
Inspection: the progress toward goals must be inspected to detect problems quickly.
Adaptation: when problems are identified through inspection, the team must adapt to minimise any further deviation from the goal.
The pillars are interconnected and each one is critical to Scrum - without transparency, inspection is misleading. Without inspection, adaptation is impossible.
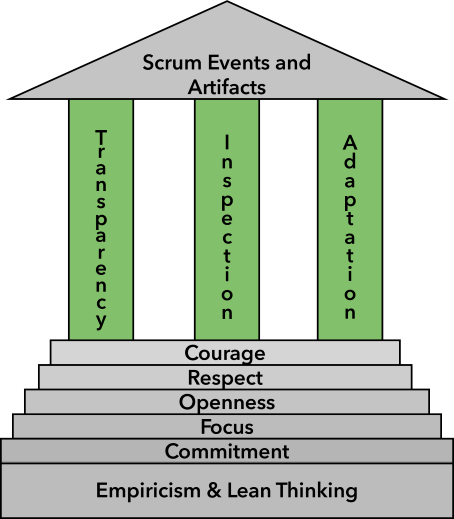
Consequences of a Lack of Transparency: From Inconvenience to Devastation
Manipulating Burndown Charts
An anecdote of Scrum ineffectiveness from Scrum.org describes how a team deliberately altered their burndown chart to align exactly with the ideal progress line on the chart. The Scrum Team said that they were “manipulating the numbers so that the management does not bother them”.
The empirical data was falsified, going against one of the key principles of Scrum theory. This meant that the Scrum Team and wider organisation couldn’t accurately inspect or adapt, making Sprint Planning and Review totally ineffective activities.
Horizon IT British Post Office Scandal
The Post Office’s Horizon accounting software, introduced in 1999, contained numerous bugs (e.g., duplicating ledger entries, phantom shortfalls) that erroneously implicated hundreds of subpostmasters in fraud.
The software company Fujitsu and the Post Office were aware of these serious issues as early as 1999–2002 but concealed them from the public, subpostmasters, and even prosecution courts. They denied errors and pressured individuals to cover unexplained deficits, while claiming system reliability in court.
This highlights the disastrous consequences that a lack of transparency can have.
Group Exercise: What happens when the Pillar of Transparency Crumbles?
3 mins.
Discuss in small groups the following questions:
What’s an example of “transparency” you’ve seen - or failed to see - in a previous project?
How did it affect the outcome?
Scrum Artifacts and Commitments
The Scrum Artifacts are tangible items that provide transparency about the work being done. They are the Scrum Team’s source of truth. They make visible what’s being worked on, why it matters, and how close you are to delivering value.
There are three key Artifacts in Scrum: the Product Backlog, Sprint Backlog and Increment. Each Artifact comes with a commitment that helps to keep the team focused and aligned
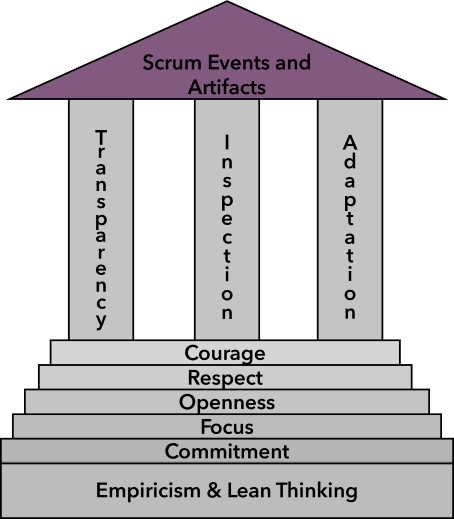
Product Backlog
The Product Backlog is an ordered list of everything the product might need including features, fixes, experiments, and improvements. It evolves constantly based on things like feedback, market shifts, and changing stakeholder goals.
- The Product Backlog belongs to the Product Owner, but anyone can contribute ideas.
- Helps the team to understand what might come next in the product’s development.
- Refined continuously so that items are clear, provide value and ready when needed.
Commitment: Product Goal
The Product Goal is the long-term vision for the product, a clear destination that the team is moving toward over time.
Designing a Board Game: The Solent Voyage
Imagine you have an idea to create a board game ‘The Solent Voyage’, about a ship that sailed from Southampton in Roman times.
The Product Goal is like your big vision:
“Create a complete, balanced, and fun strategy board game that 4 friends can play in under an hour.”
You may not know all the mechanics or artwork details yet, but you know what success looks like: something playable, sharable, and maybe even publishable.
The Product Backlog is your ever-evolving list of features and ideas:
- Create player roles and abilities
- Draft simple turn mechanics for the game
- Design custom mechanics for each role’s combat, trade, and movement
- Write the a comprehensive rulebook
- Decide win/lose conditions
- Sketch a rough paper game board
- Design custom artwork for the board
- Print the game board onto high quality material
- Create quick example cards
- Design and print cards
- Build a scoring system
- Run a short 20-minute test with two players
- Run a full test with four players
- Gather feedback from players
- Create custom miniatures for each character
Some items are critical (like the rules), others are stretch goals (like custom miniatures).
Sprint Backlog
The Sprint Backlog is the plan for the current block of work and is created at the start of each Sprint, during the Sprint Planning Meeting. It includes:
- A Sprint Goal.
- A subset of the items from the Product Backlog that will be worked on during this Sprint.
- An actionable plan for delivering a working increment by the end of the Sprint.
The Sprint Backlog is owned and maintained by the Developers. It is likely to evolve as the team learns more about the current work but should always stay grounded in the Sprint Goal.
Commitment: Sprint Goal
The Sprint Goal is a single objective for the current Sprint and should be the primary focus of the Scrum Team.
The Start of the Solent Voyage
You’re not building the whole game at once - during the first Sprint, you’re aiming for a step towards the overall goal.
For example, your Sprint Goal might be: “Test the basic turn system with 2 players using paper placeholders.”
From this Sprint Goal you would create your Sprint Backlog, which would include all the tasks needed to achieve this goal.
If you completed all the items in the Sprint Backlog, you would still be far from achieving the Product Goal, but your Sprint Goal is a stepping stone in the right direction.
Group Exercise: Sprint Backlog for the Sail Away
3 mins.
You have the Sprint Goal: “Test the basic turn system with 2 players using paper placeholders.”
Discuss in your group:
Which items would you select from the Product Backlog for this Sprint?
Your Sprint Backlog might include:
- Draft simple turn mechanics for the game
- Create quick example cards
- Sketch a rough paper game board
- Decide win/lose conditions
- Run a short 20-minute test with two players
- Gather feedback from players
Increment
The Increment is the result of the Scrum Team’s work during the Sprint and is a working, usable part of the product that meets any quality criteria that have been agreed.
The Increment should be:
- Integrated with the rest of the product
- Tested
- Reviewed
- Potentially releasable
The Increment includes the sum of all previous Increments and so it increases in value after every Sprint.
Commitment: Definition of Done
The Definition of Done is a a formal description of the state that the Increment should be in to meet the quality measures required for the product.
You could think of the increment as being like a brick in a wall. The Definition of Done would be a checklist to ensure that the brick is strong, stable, and usable in the wall.
The Maiden Voyage
At the end of the Sprint, your team has a working prototype. The artwork might be rough and the game play might be unbalanced, but it can be played and evaluated.
That’s your Increment: an overly simple and incomplete, but usable, version of the game that brings you closer to your Product Goal.
If the Increment meets the Definition of Done, it will become part of the growing, evolving game.
Next Sprint, you might improve the experience further, possibly by expanding the the map area for the game, balancing roles, or designing better cards.
Group Exercise: Voyage Complete?
5 mins.
The Definition of Done is an important checklist of the quality standards that each Increment must meet.
Discuss and write down a possible Definition of Done for the Solent Voyage project?
The Definition of Done in this case might be:
- The rules are clear enough to play without additional explanation.
- The components labelled and functional.
- The test players complete a game.
- Any bugs or confusing moments were documented.
Scrum Team
The Scrum Team has a simple structure, with no sub-teams and no hierarchies, just one self-managing unit working toward a common goal.
A Scrum Team includes:
- Developers (usually 3-9 people)
- One Product Owner
- One Scrum Master
Why no hierarchy?
Because Agile processes do best when teams make decisions and adapt quickly, without waiting for permission from higher-ups.
Developers
In a software development project, most developers will probably be software engineers, but developers could also be designers, testers, data analysts or any other role doing work to turn ideas into a working product.
- They are committed to quality, and collectively responsible for delivering Done work.
- They decide how to accomplish the Sprint Goal.
- They collaborate, inspect, and adapt.
You could think of developers as the engine of the team.
Product Owner
The Product Owner is responsible for maximising the value delivered by the Scrum Team. The Product Owner is one single person, but they may represent a group of clients or other stakeholders.
- Owns and manages the Product Backlog by ordering and refining it to ensure clarity for the rest of the Team
- Represents the user perspective and works according to the business goals for the product.
- Decides what gets built next but not how it gets built
You could think of the Product Owner as the compass, ensuring that the Scrum Team is always pointing toward the highest-value outcome.

Scrum Master
The Scrum Master ensures that the Scrum framework is understood and carried out correctly.
A servant leader, not a manager or a taskmaster.
Helps the team to remove blockers, improve flow, and reflect on what has gone well and what could be improved.
Supports the Scrum Team in applying Scrum effectively.
You could think of the Scrum Master as a coach, empowering the Scrum Team to work as effectively as possible.
Roles Aren’t Always Fixed
In practice, Scrum Team roles are often flexible. Each person doesn’t necessarily only take one role.
For instance:
The Scrum Master role might rotate between several developers.
One person could even take on all three roles for a solo project.
Scrum defines the roles but teams can adapt them to fit their context.
Group Exercise: Getting in the Mindset of a Scrum Team Member
5 mins.
Pick one of the Scrum Team roles and discuss within your group:
- What challenges might you face in the role?
- What skills or mindset would you need to succeed in the role?
References
- Scrum is an iterative, incremental, minimalist, and deliberately
incomplete framework emphasizing empiricism and lean thinking.
- Scrum is built upon five core values: commitment, focus, openness,
respect, and courage.
- Scrum relies on the three interconnected pillars of transparency,
inspection, adaptation.
- A Scrum Team consists of Developers, a Product Owner, and a Scrum
Master.
- Scrum makes use of three main artifacts which are the Product Backlog, Sprint Backlog, and Increment.
- The Sprint Backlog includes a sprint goal, a subset of items from the Product Backlog selected for the current sprint, and an actionable plan for completing them.
- The Increment is the usable output from a sprint that must meet the
Definition of Done, which is a checklist of quality standards for the
Increment.
- Scrum roles and structures are defined but adaptable and teams should adjust them to fit their context.
Content from 2.5 Anatomy of an Agile Sprint
Last updated on 2026-03-13 | Edit this page
Overview
Questions
- What three questions would you ask during a Sprint Planning Meeting?
- What should be the outcome of a Sprint Planning Meeting?
- What are the three main points that a developer would cover during the Daily Scrum Meeting?
Objectives
- Outline the key steps to a Sprint Planning Meeting
- Outline the key steps to a Daily Scrum Meeting
- Describe the purpose, objectives and format of the main Scrum meetings
- Participate in a Sprint Planning Meeting to create a Sprint Backlog
Events of a Sprint
A Sprint in Scrum is a fixed-length event, usually between one week and one month in length. All work that is needed to achieve the Product Goal is contained within Sprints.
There are four Scrum Events within a Sprint:
- Sprint Planning Meeting
- Daily Scrum Meeting
- Sprint Review
- Sprint Retrospective
All of the Scrum Events are designed to enable transparency and to give formal opportunities to inspect and adapt Scrum artifacts.
In relation to the diagram in the previous section, Scrum Events can be thought of as part of the temple roof. Scrum Events need to be supported by the Scrum principles, values and pillars to work successfully.
Sprint Planning Meeting
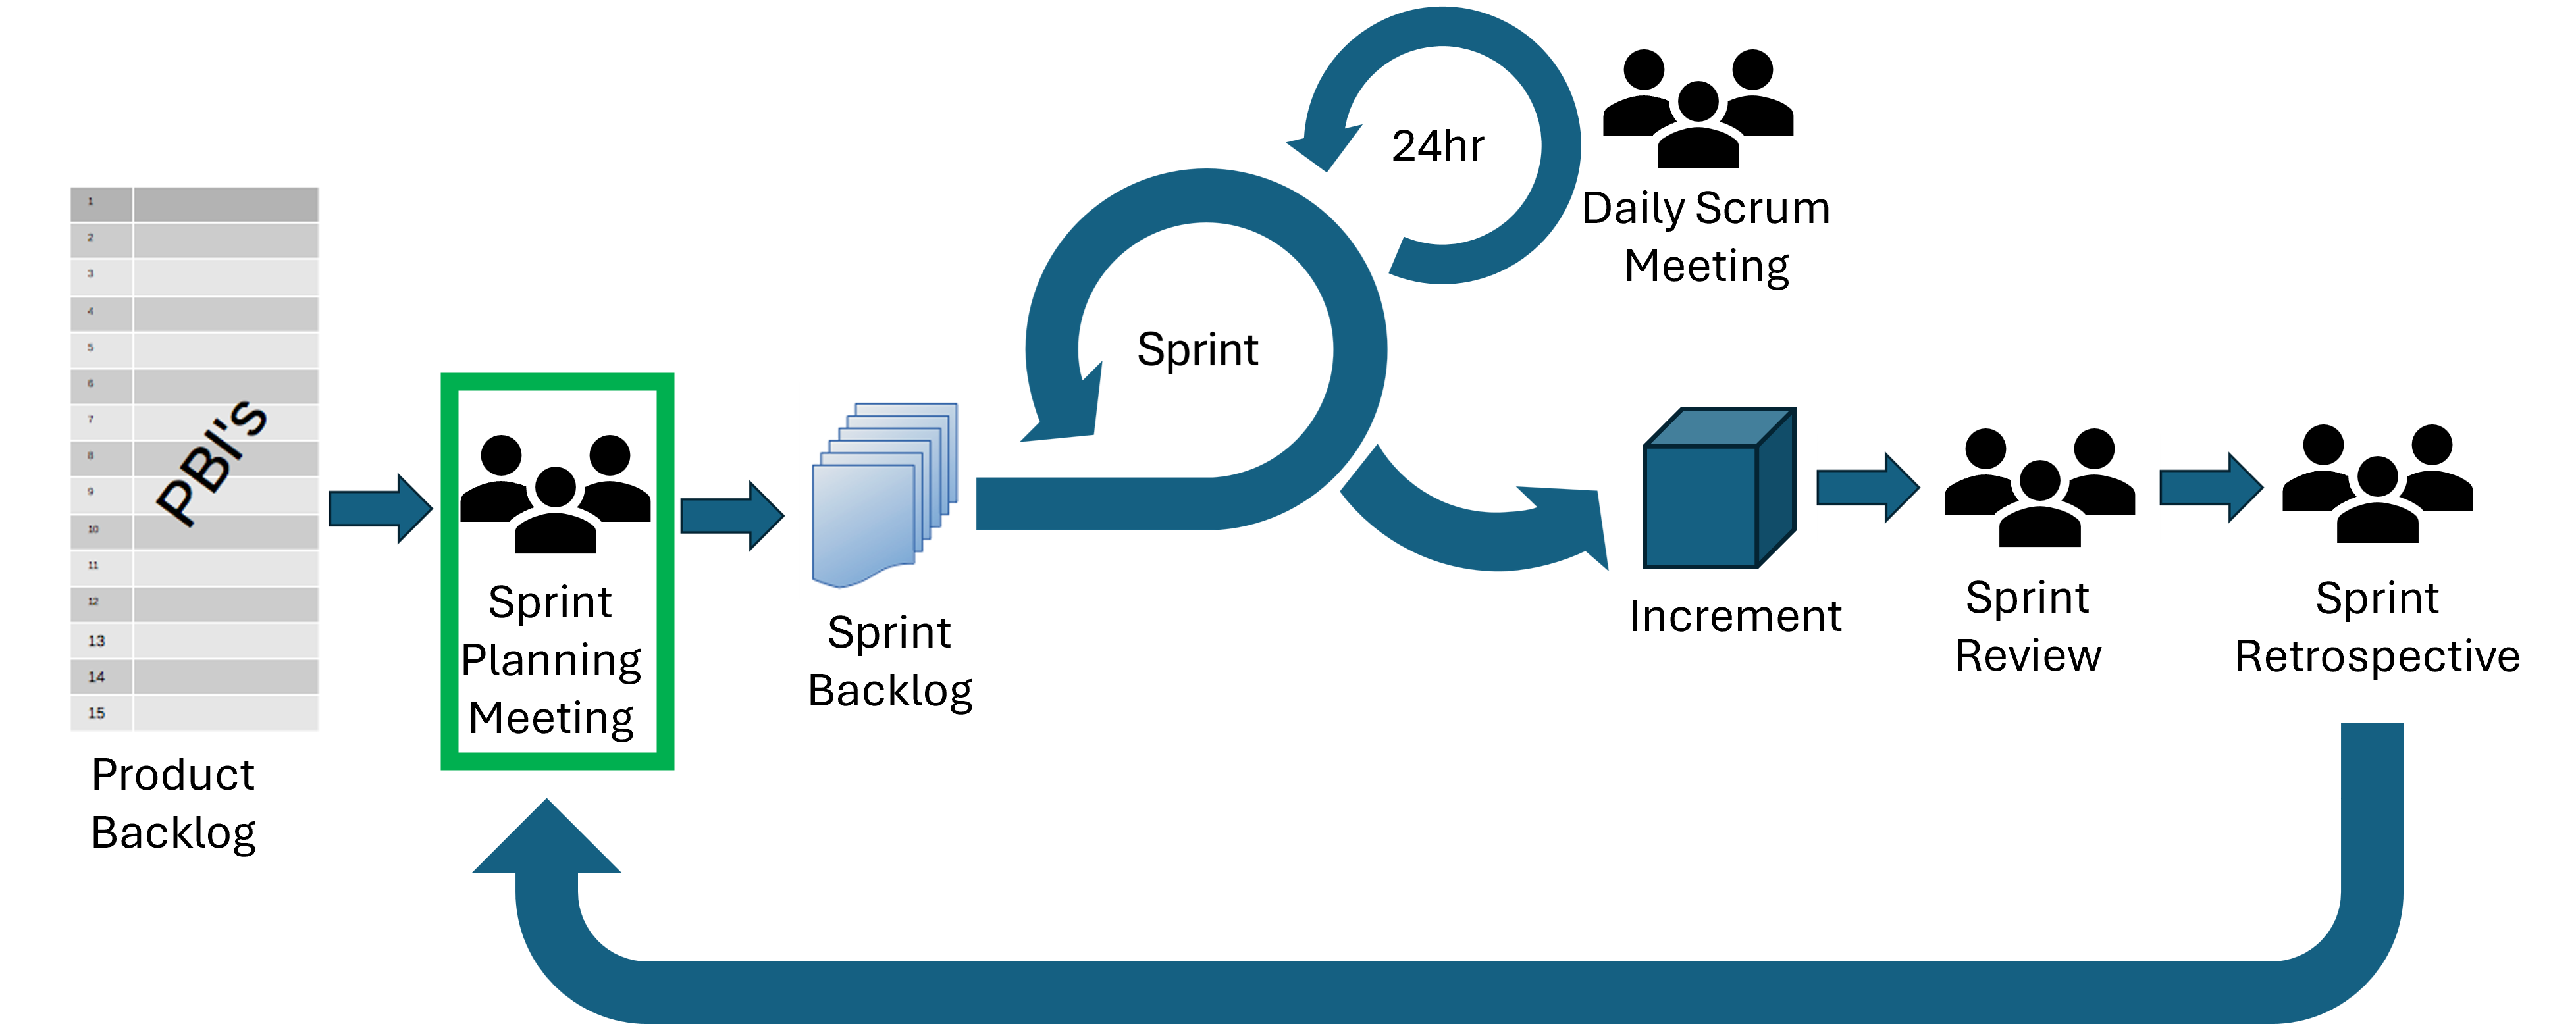
The Sprint Planning Meeting is the kickoff meeting for the Sprint. During this meeting the Scrum Team will decide what’s most important, how much can realistically get done, and how you’ll make it happen.
The Product Owner, Scrum Master and Developers all attend the Sprint Planning meeting. Other people may also be invited to attend to provide advice.
Sprint Planning needs to answer three questions:
-
Why is this Sprint valuable?
- The Product Owner explains how this Sprint will add value. For example, what improvements or new features will benefit the users.
- Based on this, the Scrum Team collaboratively decides on the Sprint Goal, which should be a single, unifying goal for the Sprint.
- The Sprint Goal must be finalised before the end of the Sprint Planning Meeting.
-
What can be Done this Sprint?
- Next, the Developers work with the Product Owner to select the highest-priority Product Backlog items that they feel confident they can complete. This might involve refining or breaking down the items to make sure the whole Scrum Team knows what’s involved.
- Estimating the amount of work that will fit into one Sprint can be difficult but basing the estimates on past performance, upcoming capacity and the Definition of Done can improve the accuracy of estimates.
-
How will the chosen work get done?
- For each item selected from the Product Backlog, the Developers plan the specific tasks needed to turn ideas into a working Increment.
- Often, Developers will break large items into smaller, more manageable chunks that will take one day or less.
- The Developers decide how to do the work. The Developers are in charge of this, no one else can tell them how to build the solution.
The output from your Sprint Planning Meeting should be your Sprint Backlog including:
- A Sprint Goal
- The subset of items from the Product Backlog that you will work on this Sprint
- A plan for delivering the Increment by the end of the Sprint
A Sprint Planning Meeting should be an absolute maximum of eight hours for a one month Sprint, and should be shorter for shorter Sprints. Time-boxing the meeting keeps the discussion focussed and allows the Scrum Team to start making delivering value fast.
Group Exercise: Puppy Playdate Planner
10 mins.
Read the following scenario about the Puppy Playdate Planner app and discuss the questions at the end.
Sprint Planning Meeting Scenario
Imagine your Scrum Team is working on the Puppy Playdate Planner app. The Product Goal is: “Help puppy owners connect and organise playdates easily.”
During Sprint Planning, the team agreed on this Sprint Goal: “Enable creation of puppy profiles and the functionality to search for nearby puppies.”
They selected these Product Backlog items for the Sprint:
- Puppy profiles (breed, age, personality, photo upload)
- Location-based search for nearby puppy owners
- Basic UI for profile creation and search results
The Developers planned these tasks:
- Design user interface wireframes and mockups
- Develop backend APIs for profiles and search
- Implement photo upload and location filtering
- Write unit and integration tests
- Conduct peer reviews and usability testing
The Scrum Master noticed that the team did not discuss messaging or playdate scheduling features and expressed concern that the Product Owner hadn’t clarified their priority or timing.
Some Developers were unsure how much work they could complete due to unfamiliarity with the photo upload and location technologies.
The Scrum Master reminded the team to consider the Definition of Done and ensure the Increment would be fully integrated and tested.
Questions:
1. Which aspects of the Sprint Planning Meeting went well?
2. Which aspects of the Sprint Planning Meeting could be improved?
1. What aspects of the Sprint Planning went well?
- Clear Sprint Goal aligned with the Product Goal.
- Thoughtful breakdown of Product Backlog items into concrete tasks.
- Inclusion of testing and peer reviews highlights focus on quality.
- Scrum Master emphasised the Definition of Done, reinforcing standards.
- Open discussion of team capacity and challenges with new technologies.
2. What aspects of this Sprint Planning Meeting could be improved?
- Discuss important features that will be developed in later sprints, such as messaging and scheduling, to make sure that they can be integrated into the current work.
- Check with the product owner on feature prioritisation and roadmap.
- Plan to manage risks related to unfamiliar technologies.
- Discuss dependencies for each task to make sure no developer is likely to become blocked.
- Form a mitigation strategy for uncertainties in capacity estimation.
- Express the Sprint Goal in terms of user outcomes, instead of focusing on features, for example: “Allow puppy owners to create profiles and easily find playdate partners nearby to start connecting.”
Daily Scrum Meeting
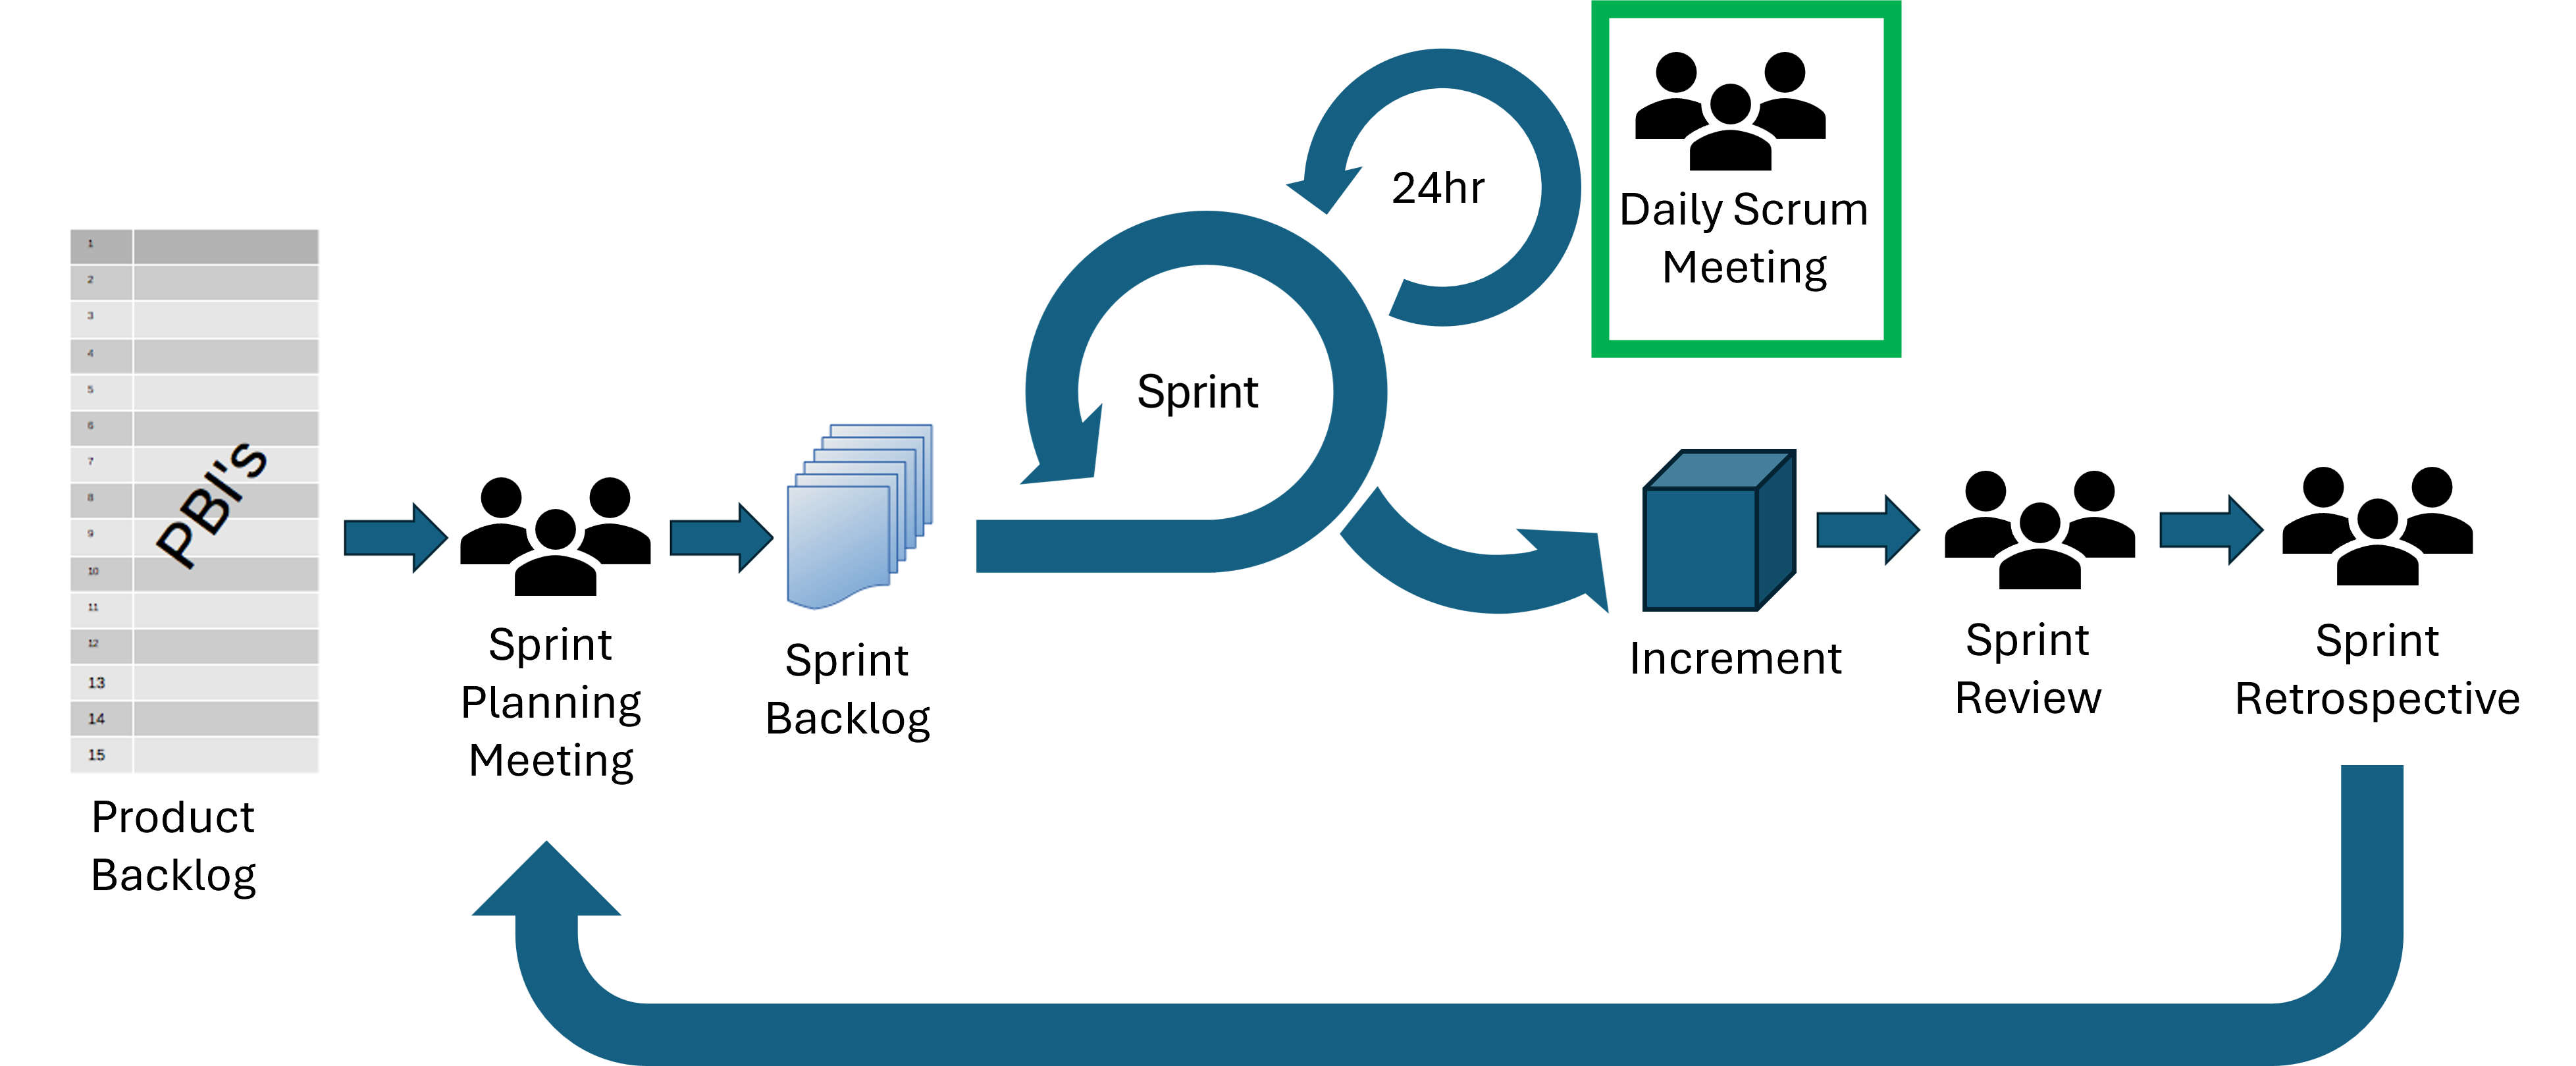
The Scrum Team meet each day to inspect progress toward the Sprint Goal, adapt the Sprint Backlog and adjust plans for upcoming work.
The Daily Scrum Meeting helps the Scrum Team:
- See progress toward the Sprint Goal
- Surface and solve problems faster
- Make quick decisions
- Reduce the need for additional meetings
- Keep momentum going with clear next steps
This meeting should usually last no longer than 15 minutes and is usually held in the same time and place every working day of the Sprint. The Daily Scrum can take any structure and use any techniques as long as it focuses on progress toward the Sprint Goal and produces a plan for the next day of work.
Usually each developer would cover:
- What you did yesterday
- What you plan to do today
- Anything that’s blocking you
During a Daily Scrum Meeting, focus on exchanging information with others in the group not just talking about what you’ve been doing.
The Daily Scrum Meeting isn’t the only time that Developers can discuss and adjust their plans. Developers can also meet throughout the day to re-adjust plans or to have more detailed discussions.
Group Exercise: Exchange and Unblock
10 mins.
In this challenge, you’re going to practice conducting a Daily Scrum Meeting in groups of four.
Assign one person to the Scrum Master role, they are responsible for keeping the meeting to time and ensuring everyone get a chance to say everything they need to. The whole meeting must be under five minutes long.
Assign the three other group members to developer roles: Developer 1, Developer 2, or Developer 3.
Each developer should read the information under their section below but none of the others. This information may be important to others in the Scrum Team.
During the meeting, the developers should exchange information so that all developers end the meeting with no blockers, a clear plan for their day and are aware of any dependencies or issues.
Useful information exchanged and possible outcomes from the meeting:
- Developer 1 learns that Developer 2 has created the API endpoint
that they need and that it’s likely to be ready later today.
- Developer 3 could take some of the user interface element tasks from Developer 1 (if they have the relevant skills).
- Developer 2 plans some co-working time with the developer(s) working on the user interface elements.
- Developer 2 understands that the calculation tests are currently expected to fail due to the updated calculation implemented by Developer 3.
- Developer 3 might look at the sprint backlog and see which tasks they could take.
- I’m planning to develop a user interface for viewing user information from our app. However, I can see that the API endpoint for fetching user information isn’t complete yet. Any idea when that will be ready? This is a high priority task.
- Today I’ve also planned to create user interface components for the registration, login, and admin dashboard. These are lower priority tasks.
- I have more tasks than I can realistically get through today.
- Yesterday I developed an API endpoint for fetching user information. I need to check this passes all relevant tests and will merge later today if so.
- I’m planning work on changing the method of authentication for our app to make it more secure for users but I want to make sure that this doesn’t break the front-end of the app. How can we make sure that doesn’t happen?
- I noticed that some of the tests related to the calculations are failing, does anyone know why this is?
- Yesterday I changed one of the calculations in the app (as was planned for this Sprint), the test is based on the old calculation and is expected to now fail, I need to update the test to reflect the calculation change.
- I don’t think I have enough tasks to fill my day - can anyone suggest what I should work on next?
References
- A Sprint is a fixed-length event in Scrum, usually between one week and one month in length.
- The four Scrum Events are Sprint Planning Meeting, Daily Scrum
Meeting, Sprint Review, and Sprint Retrospective.
- Sprint Planning answers: Why is this Sprint valuable? What can be
done? How will the work get done?
- The outcome from the Sprint Planning Meeting is the Sprint Backlog containing the Sprint Goal, subset of Product Backlog items, and a plan for delivering the Increment.
- The Daily Scrum Meeting is a 15-minute meeting for the Scrum Master
and Developers to inspect progress, adjust plans, and resolve
blockers.
- All Scrum Events promote transparency, inspection, and adaptation to
improve product and team effectiveness.
Content from 2.6 Working with Clients
Last updated on 2025-10-15 | Edit this page
Overview
Questions
- How can I communicate technical ideas clearly to non-technical clients?
- What should I do when the client’s needs or requests are vague or unclear?
- How do I help the client decide what features to prioritise?
- How do I manage client expectations around time, budget, and quality?
- What makes a good client kickoff meeting, and how should I lead it?
- What should be included in an agenda for a kickoff meeting?
Objectives
- Collaborate with clients to refine and prioritise product backlog items.
- Develop a focused, outcome-driven agenda for a client meeting.
- Conduct a productive and professional client kickoff meeting.
- Apply communication and negotiation techniques in a technical context.
Communicating with Clients
One of the most important skills for a software engineer working in industry is the ability to communicate effectively with clients. At the end of this episode, you will conduct a meeting with one of the helpers who will be role playing as the client for the Coffee Beans Analysis Project.
Clear communication builds trust, prevents expensive misunderstandings, and ensures that the business goals and technical implementation are aligned.
While this course is focused on software engineering, the points that we’ll cover can be applied to any project.
Speaking the Same Language
Scenario: You’re in a meeting with a client and explain, “We’re planning to refactor the backend and upgrade the framework so we can implement the auth flow asynchronously. That should make deployments cleaner.” The client nods politely but later admits they didn’t understand a word. They leave the meeting unclear on what’s being done, why it’s needed, or how it affects their goals.
This kind of miscommunication is surprisingly common. It stems from the Expert Awareness Gap (also known as the Curse of Knowledge), a disconnect between experts and non-experts, where the expert unintentionally assumes that others share their knowledge, context, or mental models, when they do not. This is because experts internalise concepts so deeply that they become automatic and invisible to them. In this context, software engineers may assume non-technical stakeholders share their understanding of technical concepts that have become second nature. As a result, clients may feel confused, excluded, or unsure how to make informed decisions.

To bridge this gap, and build shared understanding, try the following techniques:
Use analogies or plain language.
For example, instead of saying “we’re refactoring the code,” try “we’re tidying up the code to make it easier and safer to change in the future.”Expand acronyms even if they seem obvious.
Don’t assume clients know what CI/CD (Continuous Integration / Continuous Deployment), API (Application Programming Interface), or JWT (JSON Web Token) mean. A good rule is to expand any acronym at least the first time you use it.Connect technical changes to client value.
For instance, rather than saying “we’re upgrading the framework,” say “we’re upgrading the framework to reduce bugs and give us access to modern features that improve security and performance.”Frame decisions in terms of the client’s goals.
When discussing trade-offs, explain how technical choices affect things like user experience, compliance, or costs.Use visuals to support understanding.
Diagrams, such as flowcharts, can help convey complex ideas without relying on jargon.
By learning to speak the client’s language you build their trust, enable better decision making, and avoid frustration on both sides.
Pair Exercise: Explain a Technical Topic
7 mins.
Practice overcoming the expert awareness gap by explaining a familiar topic clearly to someone with no background in it.
Individually, think of a topic that you know a lot about. For example, it could be the subject of your research, a programming language or framework that you’ve used extensively, or a hobby or skill that you have a lot of experience with (e.g. playing the clarinet, wild swimming, golf).
Check with your partner that they know little or nothing about this topic.
Take two minutes each to explain your topic to your partner as if they have no prior knowledge.
After listening, the partner should ask questions to clarify anything they don’t understand.
Swap roles and repeat the exercise so both of you get a chance to explain and to listen.
Setting Realistic Expectations
Scenario: In a client meeting, a developer says, “Yes, we should be able to add that feature by the end of the sprint.” The client is pleased. However, a week later, it becomes clear that the feature is more complex than expected, other tasks are behind schedule, and the team now has to explain the delay. The client feels frustrated and blindsided and this impacts the trust they have in your development team.
This is a classic example of unrealistic expectations, often caused by optimism, pressure to please, or fear of disappointing the client in the moment.
Setting realistic expectations is one of the most important parts of client communication. It helps prevent misunderstandings, reduces stress, and builds long-term trust.

Under-promise, over-deliver
Clients would rather be pleasantly surprised than disappointed. Estimate conservatively, it’s better to deliver something early or with extra polish than to miss a deadline.Build in contingency time
Always allow for the unexpected. Think carefully about what could go wrong (technical complexity, team availability, integration issues), and factor that into your estimates.Avoid committing on the spot
Don’t feel pressured to promise something immediately. It’s entirely professional to say:
“Let me check with the team and get back to you this afternoon.”Be honest about trade-offs and limitations
For example:
“We can deliver this in two weeks, but without automated testing. If you want it tested properly, we’ll need an extra week.”
Watch Out for Scope Creep

Scope creep, also known as requirement creep, happens when new features or changes are added during the project without adjusting time or budget. If this isn’t managed, it can derail progress and increase risk.
Help clients make informed decisions by explaining:
The Project Management Triangle
You can have two of the following:
Fast, Cheap, or Good - but rarely all three at once.Impact of changes
Rather than saying “That’s not possible,” present options:
“We can do X by Friday, or Y by next week. What’s more important to you?”Cost of adding features
Be clear about how additional features may delay delivery, increase complexity, or reduce testing time.Stay neutral and solution-focused
Avoid blame or emotional language. Stick to the facts and guide clients toward trade-offs based on their priorities.
By setting realistic expectations from the start, you’re managing risk, building your client’s confidence in your team and keeping the project on track.
Group Exercise: Responding to Scope Creep
10 mins.
Your team has already agreed with the client on the project’s scope and timeline. You’re midway through the first sprint when the client sends an email saying:
“We’ve been thinking, and we’d really like to add a feature that allows users to share their progress with friends. Can we fit that in before the demo next week?”
This new feature was not in the original backlog and has design, development, and testing implications.
Discuss your response to the client, using the principles outlined above, and then draft a short email that:
- Acknowledges the client’s request positively and professionally;
- Explains the impact of the new feature on timeline, scope and/or risk;
- Presents options (e.g. delay another feature, extend the deadline, or push the feature to the next iteration);
Tracking Velocity
In this context, velocity describes the amount of work that a team delivers in a set period.
You would track how many tasks your team has completed in previous Sprints and use this as a baseline for how many tasks of a similar size can be completed in the current sprint. This gives you an evidence-based approach to expectation setting.
Tracking velocity can help you to set realistic timelines based on what your team has actually delivered in the past. It can also help you to build trust with the client through transparency and predictability.
Timeboxing
Timeboxing is where you allocate a fixed amount of time to an issue and stop when that time is up, regardless of whether the issue has been resolved. Timeboxing can be useful when the work is exploratory or uncertain because it:
- makes transparent to the client how much time is being allocated to learning or discovery, which may not be clear from observable progress on the product.
- helps avoid analysis paralysis (getting stuck on one issue indefinitely)
- controls the risk when the outcome is uncertain
For example: “Since we’re not yet sure how complex this integration is, we’ll allocate 2 days to investigate. We’ll regroup after that to decide the next steps based on what we learn.”
Sprints are a example of timeboxing. You might also timebox a product backlog item within a Sprint.
Discussing Prioritisation
Scenario: A client approaches your team with a vision for a meal-planning app. They want grocery shopping integration, dietary preference tracking, AI-generated recipes, video tutorials, and a sleek mobile interface, all delivered within eight weeks. You explain that the scope is too large for the timeline, but the client insists each feature is essential. Without clear prioritisation, the team attempts to build everything and ends up delivering an unstable app that fails to meet user expectations. The client is disappointed, and trust is damaged.
This kind of situation is common. Clients are often enthusiastic and ambitious, but may not understand the trade-offs involved. That’s why clear prioritisation discussions are essential.

Why Prioritisation Matters
There’s rarely enough time or budget to build every requested feature. Prioritisation helps focus resources on what truly matters, ensuring that:
- The product can launch on time.
- Key user needs are met early.
- The team can iterate and improve based on real feedback.
Introducing the concept of the Minimum Viable Product (MVP) can help clients shift from “everything now” to “what’s essential first.”
The MVP: A Strategic Starting Point
The MVP is a basic, working version of the product that delivers the product’s core value. It’s not the final product, but it’s enough to test with users and validate the idea.
For instance, imagine that the client wants you to build a car. The core value is a structure with wheels that can get you from A to B, so the MVP might be a skateboard.
Tools for Prioritisation: MoSCoW
Use the MoSCoW method to help clients classify features:
- Must haves – Essential for the product to function.
- Should haves – Important, but not critical for launch.
- Could haves – Desirable extras, only if time allows.
- Won’t haves (for now) – Deferred until a later phase.
This framework encourages honest, collaborative conversations about what really matters, and helps avoid overcommitting.
Facilitating Prioritisation
- Use visuals (roadmaps, feature lists) to support the discussion.
- Frame prioritisation in terms of client goals: “Which features will help you learn the most from your first users?”
- Be prepared to explain technical dependencies (e.g. why Feature A must come before Feature B).
- Remind clients that starting small doesn’t mean thinking small - a more complex product can be built on top of the MVP but only when the bare essentials are in place.
By leading productive prioritisation conversations, you help clients make better decisions, reduce risk, and increase the likelihood of a successful product launch.
Solo Exercise: From Product Vision to MVP
5 mins.
Your client wants to launch a DIY pizza kit delivered to customers’ homes. The big vision includes:
- Artisan dough, sauce, and toppings
- Vegan and gluten-free options
- A recipe booklet with tips and tricks
- Fancy packaging and branding
- App integration with cooking videos
- Optional dessert add-ons
- Custom topping selections
- Subscription bundles
But:
They have a tight budget and want to test the idea in the first month with a basic version.
Your task is to develop their MVP: What’s the simplest product they can launch that still gives customers the core experience of “making your own pizza at home”?
List the components that should be included in the MVP version of the DIY pizza kit.
Reaching Clarity

Scenario: During a planning meeting, a client tells the team: “We want the site to feel modern and fast.” No one asks for clarification. The designers choose a sleek, minimal style with bold colours, and the developers focus on performance optimisations to reduce load times to under 500ms. However, at the next review, the client is unhappy. By “modern,” they actually meant visually similar to Apple’s aesthetic. And by “fast,” they didn’t mean technical speed, but a user journey with fewer steps. The team now need to rework major parts of the product, wasting both time and budget.
Why Reaching Clarity Matters
Small misunderstandings can grow into major issues if left unchecked. Assumptions on either side can lead to missed expectations, rework, and a loss of client trust. It’s far better to pause and ask than to move forward on unclear instructions.
Methods for Improving Clarity
Ask for specifics when things are vague
Use follow-up questions to make abstract requests concrete.
For example:
“When you say ‘fast’, do you mean page loads under 1 second, or fewer clicks to reach key information?”Probe when clients say, “use your judgement”
If the client doesn’t know exactly what they want, try asking:
“What don’t you want?” or
“Can you show me an example of something you like or something you don’t like?”Summarise and confirm
Restate what you’ve heard to confirm your understanding.
Example:
“So just to confirm, you’d like the dashboard to show data from the last 7 days by default?”Document everything clearly
Use written follow-ups like email recaps or meeting notes to reinforce shared understanding. These also create a useful reference point.Admit when you’re unsure
It’s okay to say:
“I’m not sure I follow, please could you walk me through an example?”
Honesty prevents costly mistakes later.
Group Exercise: Questions about the Coffee Beans Project Brief
15 mins.
Re-read the project brief for the coffee beans project.
First, individually, take a few minutes to think about what is unclear to you in the project brief and formulate a list of questions for the client.
Then, discuss your questions as a group and form a combined list of all your questions.
Designing a Kickoff Meeting
Objectives of a Kickoff Meeting
The three key objectives of a kickoff meeting are:
- Agree prioritised requirements: Work with the client to review and prioritise the product backlog. While the final decision rests with the client, prioritisation should be a two-way conversation. Developers should feel confident advocating for items they believe are critical, especially technical tasks that may not appear important to non-technical stakeholders but are essential for enabling future features or maintaining system stability.
- Set expectations: Establish a shared understanding of what will be delivered, when, and to what standard. This includes clarifying timelines, defining the scope of work for early iterations (such as the MVP), and agreeing on communication channels and response times. Setting clear expectations upfront helps reduce misunderstandings and prevents scope creep later in the project.
- Resolve ambiguity: Clarify any unclear or vague requirements before development begins. This may involve asking the client to define specific terms, provide examples, or explain business rules in detail. The goal is to remove guesswork and ensure that both the development team and the client share the same understanding of what is being built and why.
Anatomy of an Agenda

Every good meeting should have an agenda which maps out the key points that the meeting should cover. A well-structured agenda helps to keep the meeting focused, efficient and productive. An agenda for a kickoff meeting would usually include the following elements:
Introductions & context
- Introduce all participants of the meeting, including their roles and responsibilities.
- Briefly explain why this project is happening.
- Allow the client to describe the problem from their perspective.
- Establish an open and collaborative atmosphere.
Clarification of Brief and Identification of Gaps
Use your list of questions for the client in this section of the meeting
- Review the brief provided by the client.
- Confirm working definitions of any technical language i.e. make sure that any technical language means the same thing to the client and the whole team.
- Highlight areas where the brief is vague, conflicting, or incomplete.
- Ask follow-up questions to understand goals, constraints and assumptions.
- Identify dependencies, risks, or areas where the team needs more detail.
- Record all unanswered questions and agree who will follow up with answers.
Prioritisation and MVP Discussion
- Help the client decide which features are essential for launch and which can wait.
- Use techniques such as MoSCoW to prioritise backlog items.
- Introduce the concept of a minimum viable product if necessary.
Expectations and Timelines
- Agree what will be delivered (after Sprint 1 and in the final presentation).
- Agree on the format of the product you will deliver.
- Discuss delivery phases or sprints and milestone dates (In this case you have two sprints, each about 3 hours in length, and the delivery is on day 5).
Note: Be conservative in time estimates to allow for unforeseen delays.
Summary of decisions
- Recap all major decisions (e.g., MVP scope, timelines).
- Review any open questions and note who will investigate and provide answers, and by when.
- Clarify how and when a summary of this meeting will be shared (e.g., post-meeting email, shared document).
- End the meeting by inviting final questions or concerns and confirming that the client is happy and confident about the plan.
Group Exercise: Agenda Assembly
15 mins.
Create an agenda for a 30 minute kickoff meeting with the client for the Coffee Beans Analysis project.
The agenda should take the form of either a bullet list or a table.
Use the structure above to develop your agenda ensuring it:
- is logically structured.
- each section has a rough timing assigned to it.
- includes key questions or talking points under each section.
- is appropriate for use with a non-technical client.
Chairing the Meeting

In a client meeting, the software development team should take responsibility for leading the meeting.
As an analogy, when an electrician comes to your house, they don’t expect you to explain wiring protocols, instead they ask questions to diagnose the problem and recommend solutions.
Similarly, the development team should guide the meeting to get the clarity they need to do their job. Clients often don’t know what’s important to developers. They may focus on the appearance of the product or general ideas rather than technical details. It’s your job to lead the discussion towards finding the details you need. You could use diagrams, examples, or “what-if” scenarios to help clients think through their needs. Make sure you get the information you need from the meeting. Don’t assume that the client will volunteer all necessary information - you may need to draw it out of them through asking lots of questions.
You would normally have one person to chair the meeting, it’s their job to ensure that the meeting stays on track and follows the agenda. However, for the Coffee Beans Project client meeting, everyone in the should have an opportunity to chair a section of the meeting. Split up the agenda and allocate each section to a different person in your group. See this as an opportunity to practice chairing a meeting - an opportunity which you might not have until several years into your career. There’s absolutely nothing at stake so have fun with it, enjoy the process, and don’t worry if something goes wrong.
Meeting Notes
Meeting notes are a vital output from any client meeting. They protect against miscommunication, enable follow-up, and support future planning.
Meeting notes should capture:
- Decisions: What was agreed in the meeting.
- Ambiguity: Any areas that are still unclear and/or any open questions.
- Actions: Who is doing what and by when. Include actions on the software development team and on the client.
It can be helpful to use consistent formatting across meetings for clarity (e.g., bullet points or a table).
After a real client meeting, it’s good practice to send a summary email containing the meeting notes within 24 hours of the meeting to confirm that everyone is on the same page. You don’t need to do this for the Coffee Beans Project.
Group Exercise: Client Meeting
30 mins + 5 mins to set up meeting.
You have a 30 minute meeting with the owner of the coffee company.
Choose a chair for each section of your meeting and someone to be in charge of note taking throughout the meeting.
Conduct the kickoff meeting for the project according to the agenda you produced earlier. Make sure you get answers to all your questions and agree the priorities for the project with the client.
Group Exercise: Refine the Product Backlog
15 mins.
Refine your product backlog following the client meeting.
Add or edit any product backlog items and adjust the priorities according to the prioritisation you agreed with the client.
Sprint Planning for the Coffee Beans Analysis Project
Now you’ve refined the product backlog, it’s time to conduct your first Sprint Planning Meeting for the first Sprint of the Coffee Beans Analysis Project.
Group Exercise: Sprint Planning for Coffee Beans Analysis
20 mins.
Conduct the Sprint Planning Meeting for Sprint 1 of the Coffee Beans Analysis Project.
Roles
- One person should be Scrum Master. You are the servant leader who helps the group apply Scrum effectively, removes blockers and improves flow for the Scrum Team.
- One person should role play as the Product Owner. You should represent the interests of the client throughout the meeting.
- The rest of the group should be developers. The Scrum Master and acting Product Owner can also be developers.
Questions for Sprint Planning
Remember to answer the following questions during the Sprint Planning Meeting:
- Why is this Sprint valuable?
- What can be Done this Sprint?
- How will the chosen work get Done?
The output from your Sprint Planning Meeting should be your Sprint Backlog including:
- A Sprint Goal
- The subset of items from the Product Backlog that you will work on this Sprint
- A plan for delivering the Increment by the end of the Sprint
References
- IEEE Software Engineering Body of Knowledge (SWEBOK), “Software Engineering Professional Practice”
- Minimum viable product wikipedia
- The Decision Lab - The Curse of Knowledge
- Dev - How to underpromise and underdeliver
- Scope creep wikipedia
- Avoid jargon by translating technical concepts into plain, client-friendly language.
- Clarify vague requests by asking follow-up questions and confirming understanding.
- Use the concept of a Minimum Viable Product to help clients focus on the core of their product.
- Set expectations realistically by under-promising and including contingency time.
- Be transparent about limitations and clearly explain the impact of technical decisions.
- Manage scope creep by showing how new requests affect cost, time, or quality.
- Take the lead in client meetings to ensure key information is gathered.
- Use a clear agenda to guide productive and structured client discussions.
- Record and share meeting notes to capture decisions, questions, and action points.
Content from Day 3: Undertaking our First Sprint
Last updated on 2025-04-10 | Edit this page
Overview
Questions
- FIXME
Objectives
- FIXME
- FIXME
Content from 3.1 How to Conduct an Effective Sprint
Last updated on 2026-03-19 | Edit this page
Overview
Questions
- What is the purpose of a Daily Scrum Meeting?
- How can teams work effectively during a Sprint?
Objectives
- Describe how to run an effective sprint
- Divide set of exemplar tasks effectively across the team
- Approach a sprint feeling inspired and motivated
- Participate in a scrum stand-up meeting
- Implement a feature-branch workflow
- Develop code in accordance with the issues in the Sprint 1 backlog
- Review other team members’ code
- Judge when issues have been completed and can be closed
Working Effectively in a Team
In a professional environment, you will nearly always need to work with other people. In the following video we’ll hear from the Research Software Engineering group at the University of Birmingham about their processes for working effectively in teams.
Video - Working Effectively in a Team (19 mins)
Running an Effective Sprint
A Sprint is a focused period of work during which the Scrum Team collaborates to deliver a usable increment of the product. Success depends on clear communication, taking shared ownership for the product, and steady progress toward the Sprint Goal.
Tasks should be distributed so that everyone can contribute effectively. This does not mean assigning all work at the start and working in isolation. Team members should communicate regularly, help each other when needed, and adjust plans as the Sprint progresses.
Before getting started on the work today, hold a short Daily Scrum Meeting to make sure everyone knows what they’re working on and no one has any problems blocking them from getting started.
Group Exercise: Daily Scrum Meeting
(10 minutes)
In your team, review the Sprint 1 Backlog and discuss:
- Which issue will each person begin working on?
- Are there any dependencies between tasks?
- Does everyone have a clear starting point?
Make sure each team member selects at least one issue to begin working on.
Reminder - Feature Branch Workflow
Remember each task in the Sprint Backlog should correspond to a GitHub issue. When working on an issue:
- Create a new feature branch for that issue
- Implement the required changes
- Submit a pull request for review
- One of your colleagues reviews the pull request
- Respond to feedback and make any required changes
- Once approved, merge the pull request and close the issue
Coffee Beans Analysis Project Sprint 1
You will now begin Sprint 1.
You will have 3 hours to work collaboratively to deliver an Increment that you can demonstrate to the client. Focus on making steady, visible progress and communicating regularly with your team.
- A Sprint is a focused, collaborative effort to deliver a working increment toward the Sprint Goal.
- Work should be organised using issues, feature branches, and pull requests to ensure safe and reviewable changes.
- Regular communication helps teams to stay on track and resolve problems quickly.
- Completing and reviewing issues incrementally helps ensure steady progress and a successful Sprint outcome.
Content from 3.2 Sprint Review
Last updated on 2026-02-19 | Edit this page
Overview
Questions
- How do you conduct a Sprint Review?
- What are some strategies for communicating effectively with clients during a Sprint Review?
- How can you effectively manage change in a software project?
- How can you convert feedback from clients into product backlog items?
Objectives
- Define the key elements of a Sprint review meeting
- Understand how to communicate effectively with a client in a sprint review meeting
- Outline some strategies for dealing with changes in requirements
Sprint Review

A Sprint Review takes place at the end of each sprint and brings the Scrum Team together with clients and other stakeholders. It is an opportunity for everyone involved to see what has been accomplished during the sprint and to reflect on progress together.
During the review, the Scrum Team shares the work they have completed, often by demonstrating new or updated features. Stakeholders are encouraged to ask questions, give feedback, and discuss priorities. This conversation helps the team decide what to focus on next and highlights any changes in requirements or circumstances that could affect future work. The Product Backlog is then updated to reflect these new insights.
A Sprint Review should be a collaborative working session rather than just a presentation.
The Sprint Review would be timeboxed to four hours for a one month Sprint but will be much shorter, only 30 minutes, for our mini Sprint.
Strategies for Communicating Effectively with a Client during a Sprint Review
- Focus on demonstrating real work. Show working features rather than describing them in abstract terms. This helps clients understand progress clearly and gives them confidence in what has been achieved.
- Explain decisions and context. Briefly explain why certain approaches were taken, especially if there were constraints or trade-offs. This helps stakeholders understand the reasoning behind the work and reduces misunderstandings.
- Listen actively to feedback. Pay close attention to what clients say, and avoid interrupting or dismissing their comments. Ask clarifying questions to ensure you understand their perspective. This shows respect and helps avoid incorrect assumptions.
- Avoid becoming defensive. Feedback is intended to improve the product, not criticise individuals. Respond calmly and professionally, even if the feedback is unexpected.
- Be honest about progress and limitations. Be clear about what is complete, what is still in progress, and any challenges the team has encountered. Transparency builds trust and helps stakeholders make informed decisions.
- Confirm shared understanding. Summarise key points and agreed changes at the end of the discussion. This ensures everyone has the same expectations and helps you update the Product Backlog accurately after the meeting.
Group Exercise: Communicating Effectively
(5 minutes)
Read the example statements below. For each one, discuss in your groups whether it is effective or ineffective communication during a Sprint Review.
- “We implemented the login feature. Let us show you how it works.”
- “That requirement was unclear, so we did not implement it.”
- “Can you clarify how you expect users to interact with this feature?”
- “We did it this way because it was easier for us.”
- “This part is not finished yet, but here is our current progress.”
- Effective — Demonstrates real work and invites stakeholder engagement.
- Ineffective — Sounds defensive and shifts blame. A better approach would be to explain the uncertainty 3. earlier and ask for clarification.
- Effective — Shows active listening and a willingness to understand stakeholder needs.
- Ineffective — Focuses on developer convenience rather than user or project value.
- Effective — Honest and transparent about progress, which builds trust.
Managing Change
Feedback from stakeholders during the Sprint Review may highlight new requirements, changes to existing features, or changes to the relative importance of planned work. Changes in requirements are normal and but can be difficult to manage well.
There are some strategies you can use to manage change in a way that keeps the project focused and sustainable:
- Record changes clearly. All requested changes should be documented in the Product Backlog. This ensures that nothing is forgotten and allows the team to review and prioritise changes in an organised way.
- Prioritise changes based on value. Not all changes are equally important. The Product Owner should work with stakeholders to decide which changes will deliver the most value. This helps the team focus their effort where it will have the greatest impact.
- Break changes into manageable chunks. Large or unclear changes should be divided into smaller backlog items. This makes them easier to understand, estimate, and implement, and reduces the risk of misunderstandings.
- Discuss and clarify requirements. Take time to ask questions and confirm what stakeholders need. This reduces the risk of rework and ensures the team is solving the right problem. Keep stakeholders informed about how changes affect timelines, priorities, and scope.
Communicating Effectively About Change
When you’ve invested a lot of time and effort in a piece of work, it can feel really frustrating when the product requirements change and your work needs to be changed or removed from the product. It’s natural to feel this way, but it is equally important to remain professional and open to feedback. Try to reframe the change as part of an ongoing improvement process rather than as something that makes your previous work a waste of time!
Group Exercise: Feedback -> Backlog Items
(5 minutes)
Imagine your group has demonstrated a data processing pipeline that analyses experimental results and produces summary statistics.
The client gives the following feedback:
“This is useful, but we need more flexibility. Different research groups use different file formats, and sometimes the column names are slightly different. We also need to run this on large datasets on our computing cluster, not just locally. Finally, it would help if errors were easier to understand, because students will be using this.”
In your groups, identify at least three concrete Product Backlog items that could be created from this feedback.
Possible backlog items include:
- Add support for configurable input file formats
- Allow column names to be mapped using a configuration file
- Add command-line interface options for specifying input schema
- Enable execution in a non-interactive environment suitable for cluster use
- Improve error messages to clearly explain the cause and possible fixes
- Add input validation with informative feedback for missing or malformed data
- Provide documentation and examples for common use cases
- Add logging to help users diagnose failures
Prepare for the Sprint Review
It’s important to plan the Sprint Review in advance. You’ll have 30 minutes to plan before the Sprint Review later in this session. As a rough structure your Sprint Review plan should include:
Structure for the Meeting
- Inspect the outcome of the Sprint. This may be a demonstration or presentation.
- Discuss the progress toward the Product Goal. How does what you’ve created meet the requirements for the product? What is currently missing?
- Discuss any changes in the environment. This may include changes in the marketplace, customer behavior and customer feedback. Make a note of any changes so that you can include them in the product backlog later on. If the client asks for any changes that you don’t understand or might have problems implementing, make sure you ask them to clarify.
- Discuss what to do next. Consider the current priorities for the project and prepare to update the product backlog after the meeting.
Roles
- Decide who will start the meeting and introduce the demonstration.
- For every element of the product, it’s best if the Developer(s) who worked on that element lead the discussion. It’s usually a bad idea for the Product Owner to lead the discussion on all the topics.
- Make sure you keep notes on the Sprint Review. It can be helpful to assign the role of note taker to one person.
Prepare for the Sprint Review
Take 30 minutes to prepare for the Sprint 1 Review.
- Prepare your demonstration and decide who will present each element
- Write a structure (or agenda) for the meeting
- Consider how your progress has moved the project toward the Product Goal
- Prepare any questions you have for the client
- Decide who will take on each role
Sprint 1 Review Meeting
Teams conduct the Sprint Review meeting with the clients (30 mins).
Update Product Backlog
Teams spend 15 minutes updating the Product Backlog (15 mins).
- A Sprint Review occurs at the end of a sprint and brings together the Scrum Team, clients, and stakeholders to inspect completed work and adapt future plans.
- Demonstrating real work and explaining context helps stakeholders understand progress and provide meaningful feedback.
- Active listening, asking clarifying questions, and avoiding defensiveness are essential for professional communication.
- Changes to requirements are normal; they should be documented, prioritised, and broken into manageable backlog items rather than implemented mid-sprint.
- Reframing changes as part of an ongoing improvement process helps manage frustration and maintain professionalism.
- The Product Owner maintains the Product Backlog, incorporating stakeholder feedback and updating priorities.
- Planning the Sprint Review supports a smoother and more productive meeting.
References
Content from 3.3 Sprint Retrospective
Last updated on 2026-02-19 | Edit this page
Overview
Questions
- What is the primary purpose of a Sprint Retrospective?
- Who participates in a Sprint Retrospective?
- How can reflecting on estimates of effort improve future sprint planning?
- Why is it important to identify assumptions that affected the Sprint
Objectives
- Define the key elements of a Sprint retrospective
- Listen and respect other team members’ opinions
- Reflect on how the prioritisation strategy worked
- Reflect on what went well and what could be improved
- Collate actual effort expended across team, compare against estimated
- Calculate and visualise an effort burndown chart based on expended effort
Introduction to Sprint Retrospectives
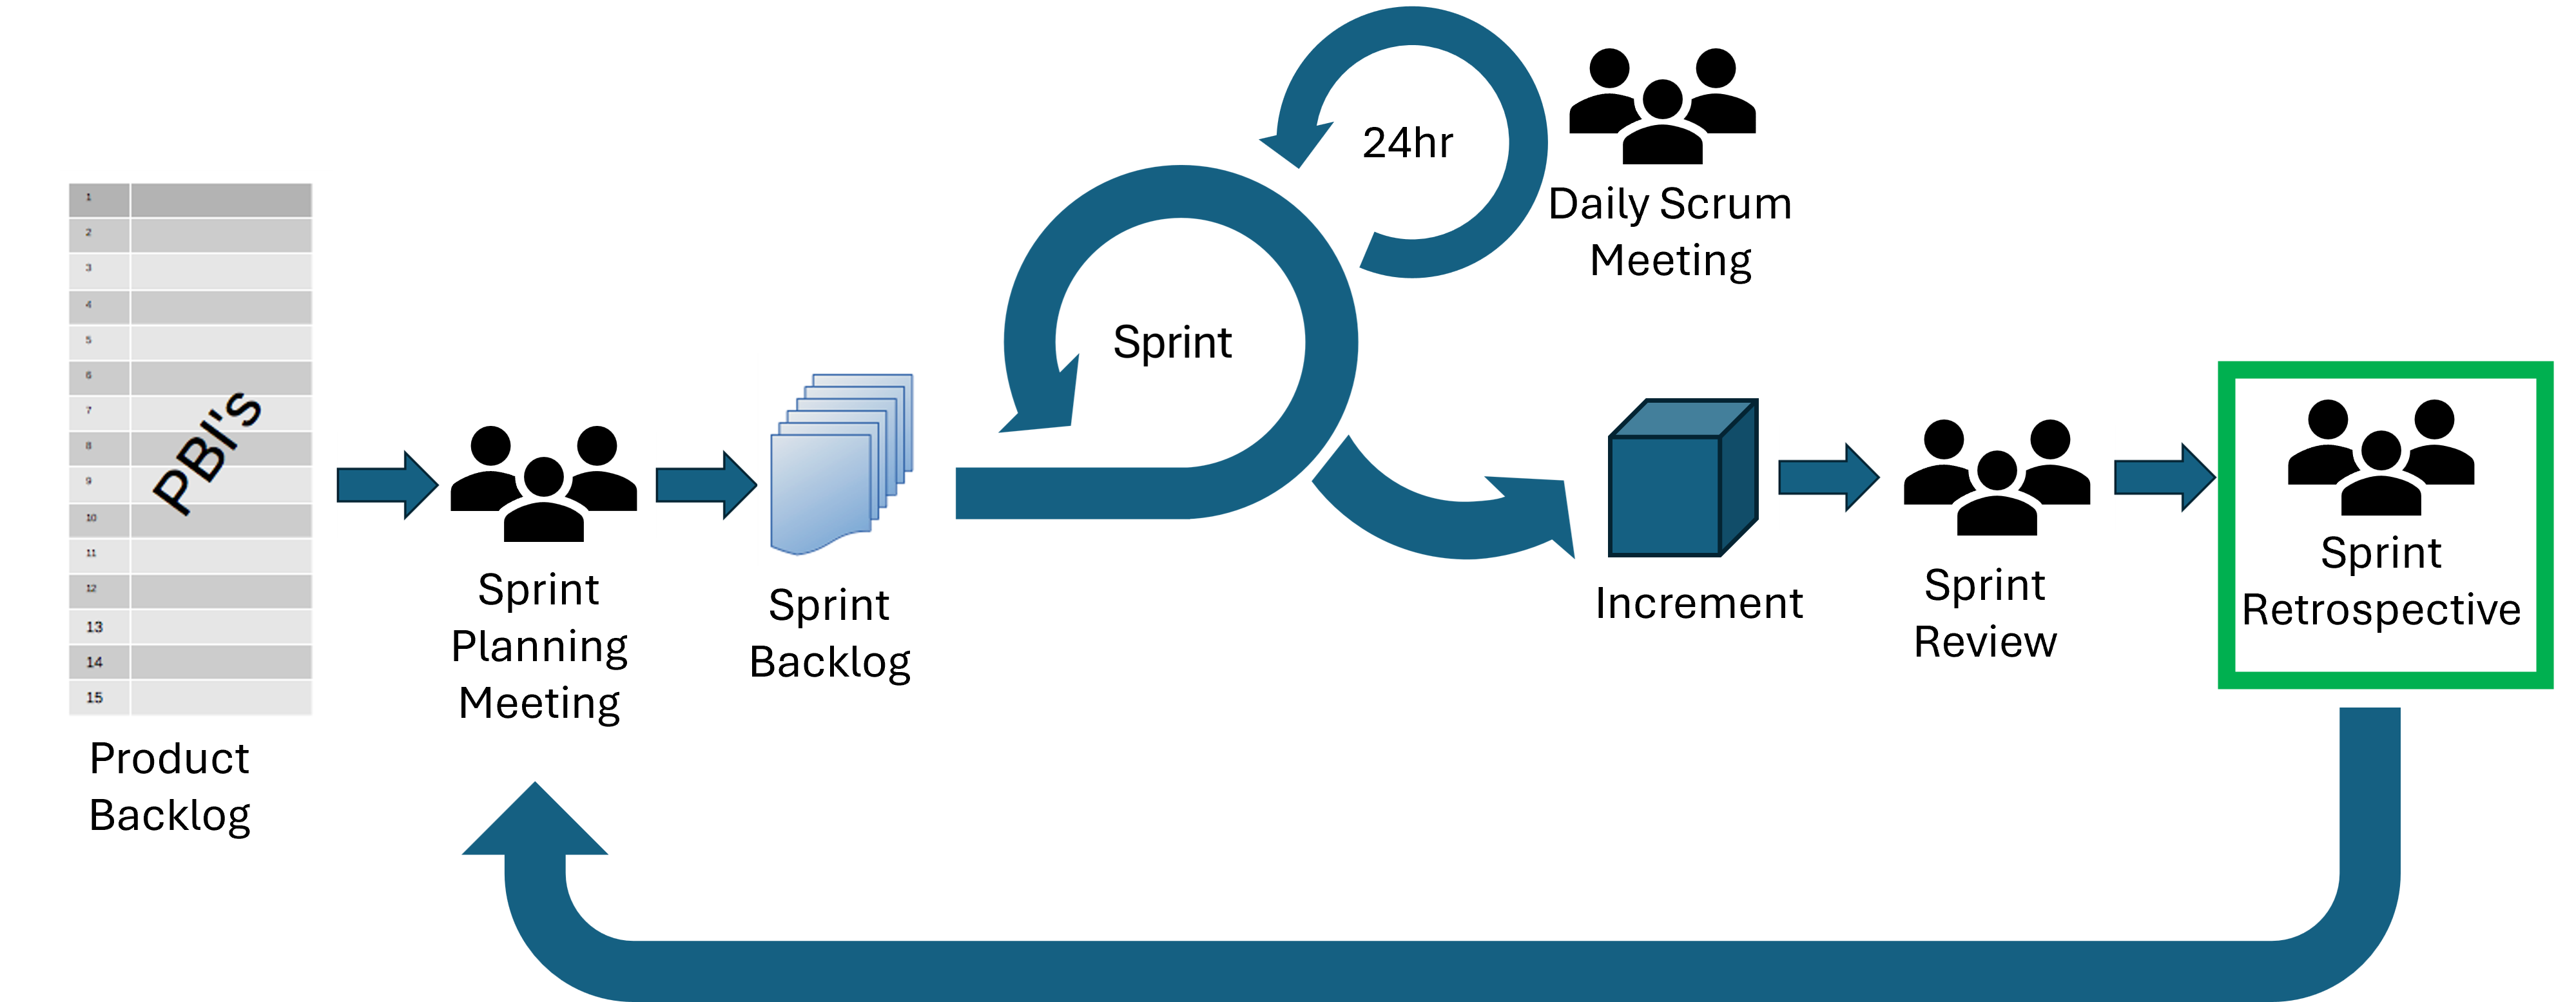
The Sprint Retrospective is a reflective session held by the Scrum Team alone, immediately after the Sprint Review. Its purpose is to inspect how the Sprint went, discuss what worked well, identify areas for improvement, and decide on actionable steps to increase team effectiveness in future sprints.
In the Sprint Retrospective the team might reflect on questions such as:
- What went well during this Sprint?
- What challenges or obstacles did the Scrum Team face?
- How did your prioritisation strategy work?
- Were effort estimates accurate? And if not, why?
The answers to these questions would be documented and used to identify actionable improvements for the next Sprint.
Group Exercise: Sprint 1 Retrospective
(15 minutes)
In your Scrum Team, reflect on Sprint 1 by answering the following questions:
- What went well during this Sprint?
- What challenges or obstacles did the Scrum Team face?
- How did our prioritisation strategy work?
- Were our effort estimates accurate? And if not, why?
Document your responses and identify at least two actionable improvements that can be applied in Sprint 2.
Share your reflections are actionable improvements with the other groups.
Burndown Charts
A burndown chart is a graph that shows the amount of work left to complete against the time remaining for the project (or for the sprint). The estimated amount of time that tasks will take is on the y axis and time is on the x axis. Burndown charts are often used in Scrum and other agile processes.
There are two lines on the chart: the ‘ideal work remaining line’ and the ‘actual work remaining line’. If the actual work line is below the ideal work line, there is less work remaining than was originally predicted and the project is ahead of schedule. Whereas, if the actual work line is above the ideal work line, there is more work remaining than was originally predicted and the project is behind schedule.
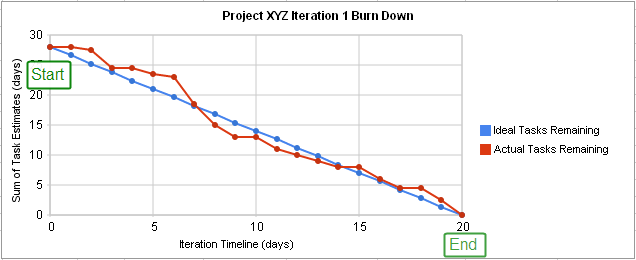
In the next Sprint, keep a note of how long you estimated each task would take, how long it actually took, and the time at which you completed the task so that you can create a burndown chart for Sprint 2.
- The Sprint Retrospective is meeting for only the Scrum Team.
- The Sprint Retrospective is held after the Sprint Review to reflect on what went well, what could be improved, and to identify actionable changes for the next Sprint.
- Actionable improvements identified in the retrospective should be documented and carried forward into the Product Backlog or future sprint planning to ensure continuous improvement.
- Burndown charts visualise progress during the Sprint by comparing estimated effort against actual effort, highlighting whether the team is ahead or behind schedule.
Content from 3.4 Mentoring Session
Last updated on 2026-03-05 | Edit this page
Overview
Questions
- Why is mentoring useful?
- Who leads a mentorship?
- How is mentorship typically structured?
- What are the responsibilities of the mentor and mentee during a mentorship?
- How can we improve how we function as a team?
Objectives
- List the benefits of mentoring
- Describe how a mentoring relationship typically operates
- Identify your current strengths and weaknesses as a team
- Decide what your team wants from a mentoring session
- Receive suggestions from mentor about how to improve how you work as a team
- Refine ways of working and update project backlog based on suggestions
Mentorship within Scrum
As we’ve seen already, good team communication within a project is an indicator of project success. But beyond simple communication, successful projects also create positive environments of knowledge exchange and learning. This might be accomplished through a number of means, for example:
- Collaborative - with team members learning informally through their day-to-day interactions with other members
- Training - where team members attend courses to upskill themselves in an area
- Mentorship - where team members are supported to upskill themselves leveraging the expertise and experience of others within the team. This might be through a traditional senior/junior mentorship, or within peer-to-peer relationships within the team
Conceptually, mentoring is generally well aligned with the Scrum philosophy, with the Scrum pillars of inspection and adaptation advocating for the identification of issues and continuous improvement, albeit within the context of personal skills development. Scum Masters already adopt the role of mentor with regard to Scrum itself, but general mentoring simply extends this to other members of the team and other topics. Within a Scrum environment, this is referred to as taking a mentorship “stance”, where mentorship is typically seen as ad hoc as opposed to a formal mentorship arrangement.
Typical examples are:
- A single member with particular prior experience with a technology guiding another team member or members
- A particular member has prior experience with achieving a desired outcome, perhaps in enacting a particular process or approach unfamiliar to another
- A new member is mentored by an established team member in an area, or as part of a general onboarding process
- A particular member wants to be mentored in other Scrum roles, e.g. Product Owner or Scrum Master
How Does Mentorship Work?
In a general peer arrangement, mentorship is driven by the individual requesting it. Such requests may be around asking for guidance to improve some identified area in how they work, or maybe they want to learn a new skill, but don’t know where to start. Or, it could be they are facing challenges in their work - which may be technical, collaborative, or anything - and they would appreciate a fresh perspective.
Mentorship is thereby driven by the individual themselves, in terms of:
- Direction and duration - the goals to set along the way, and how long the mentorship should last
- Level of formality - for example, regular chats, or formal/performance oriented
- Frequency and regularity of meetings
- Confidentiality level - default is confidential, but perhaps others may be involved along the way
Critically, the ultimate aim of mentorship is to provide support and guidance, but not to assess.
A mentor’s role is to support the mentee’s development by providing guidance, perspective, and encouragement while fostering independence and confidence. This includes helping the mentee clarify their goals, offering constructive feedback on their work and decisions, and sharing relevant experience to help them navigate challenges and opportunities. A mentor also creates a safe and trusting environment where the mentee can ask questions, reflect openly, and learn from mistakes. Importantly, a mentor does not direct or control the mentee’s path, but instead helps the mentee build skills, make informed choices, and develop their own professional identity over time.
Benefits of Mentorship
As such, whilst working towards goals identified by the individual, it becomes a safe place to air concerns, to take advantage of others’ experience, and to identify and develop opportunities for growth. It also offers a reflective, strategic perspective, providing space to think about how you work and what you want to change, without having to consider the details. In turn, it can lead to a mindset of self-reflection and improvement that you can take forward beyond the mentorship. Finally, when the mentorship has run its course, you decide when it ends.
Solo Exercise: How Could Mentoring Help Me?
3 mins.
Assume for a moment that you have an opportunity to obtain a mentorship for yourself with a more experienced colleague, outside of this workshop.
Consider what you’d like to personally learn more about or improve how you do things. This could be from your experiences so far within this workshop, or perhaps something you’ve already acknowledged in your day-to-day working you’d like to improve. List 5 things you’d like to work on.
A Typical Mentorship
For an Individual
How it looks in practice is up to the mentee and the mentor, but typically, mentorship tends towards a common pattern.
When meeting with the mentor:
- At a high level, decide what you want to achieve early (which may change), e.g. career development, technical skills, leadership, etc.
- Set some rough goals over time to reach the desired achievements (which also may change), e.g. learn how to use a particular technology, put a new approach into practice, lead a small project
- Clarify roles and responsibilities of mentor and mentee, so it’s clear who is expected to do what before each meeting
- When to meet in terms of meeting length and frequency
- Occasionally, reflect on how it’s going and potentially re-orient or “sunset” the mentorship
When outside of mentoring sessions, the mentee:
- Works towards implementing changes and working towards goals when time and available effort allows
- Thinks about whether mentorship direction or goals need to change to be more useful
For a Team
When the mentee is a team and the mentor is a more experienced Research Software Engineer (RSE) (as it will be in this session), the mentorship typically focuses on improving the team’s technical practices, processes, adherence to Scrum, and long-term sustainability, rather than supporting a single individual.
Group Exercise: How Can Mentoring Help your Team?
10 mins.
In your groups:
- (5 mins) Based on your findings from the Sprint 1 Retrospective activity, indentify and list (as concise bullet points) your key strengths and weaknesses as a team, and then prioritise those weaknesses based on their impact on your work (i.e. prioritise those you would most appreciate help with)
- (5 mins) Create a list of discussion points and questions for your mentor to help focus the conversation on identifying solutions to address your weaknesses
Group Exercise: Mentoring Session
25 mins.
Discuss your identified weaknesses with your mentor, using the list of discussion points and questions to help drive the conversation. The goal of the meeting should be to identify and decide on a set of at least three clear and specific goals for improvement as a team to address your weaknesses.
The mentor will already be aware of the project and its goals, and within this single meeting their task will be to help you improve as a team - so see it as an opportunity to leverage their experience and explore ways to do even better!
Group Exercise: Plan to Address your Weaknesses
15 mins.
Discuss and decide on how to integrate your improvement goals into how you will approach your next sprint. Refine your product backlog as needed (e.g. reprioritising items, or other such changes) to reflect this.
- A mentee (a team in this case) develops and drives the goals of the mentorship
- A mentor provides structure, guidance, and advice to assist the mentee to achieve their goals
- Prior to beginning a mentorship, work to identify the areas in your work (or team) that you wish to improve or learn more about
- Work with a mentor to develop achievable goals that you (or team) will work towards
Content from Day 4: Our Second Sprint: Preparing to Deliver
Last updated on 2025-04-10 | Edit this page
Overview
Questions
- FIXME
Objectives
- FIXME
- FIXME
Content from 4.1 Preparing Code for Release
Last updated on 2026-03-20 | Edit this page
Overview
Questions
- What preparation should be considered prior to releasing software?
- How should I document my code?
- What tools help teams write and generate documentation?
- Why is licensing software important?
- How do I apply a software licence to code?
- What is the typical process to create a release on GitHub?
Objectives
- Describe the different levels of software reusability
- Describe the purpose and main elements of a README file
- Describe the main types of software documentation
- Explore how to create basic project documentation using a documentation generator
- Explain why adding licensing information to a repository is important
- Outline your rights and obligations under common types of license (e.g. the GPL, MIT, BSD, Apache 2 and Creative Commons licenses)
- Understand how to create a release on GitHub
In previous episodes we have looked at skills, practices, and tools to help us design and develop software in a collaborative environment. In this lesson we will be looking at two critical pieces of the development puzzle that builds on what we have learnt so far - reuse and sharing our software with others.
In this episode we’ll look at the importance of software reusability, and some key techniques and tools improve the reuse of software:
- How and when to write documentation, including how to create a project repository README file that supports new users getting started, and tools and infrastructure to make writing project documentation easier
- What to consider with software licensing, from the perspective of reusing licensed software and how to choose licences
- How to create a release, essentially creating a usable snapshot of your software for others to use
The overall aim is to provide you with some practical experience for these which you’ll take forward into the second sprint which will include tasks in this area.
What do we Mean by Reusability?
In industrial software development software reuse is a deliberate strategy for improving productivity, quality, and delivery speed, by building on existing assets instead of developing everything from scratch. Reuse can occur at multiple levels, from individual code snippets and libraries to entire frameworks and system architectures.
Class Exercise: Why Reuse?
5 mins.
What are the benefits of reusable software?
- Increases productivity by using pre-built components, instead of “reinventing the wheel”
- Reduces development and maintenance costs, since despite a higher cost of incorporating reusability, this is paid off over time by minimising total effort required across projects that inherit that code
- Improves software quality and reliability, since reusing proven, tested components reduces introduction of new bugs
- Improves consistency across projects, by standardising development practices
- Faster onboarding and knowledge transfer, where common components and architectural patterns reduces subsequent ramping-up time across projects
- Increases scalability performance, since reusable components are often designed to be modular as opposed to monolithic, reducing effort required to scale applications
What do we Want from Reuse?
Firstly, whilst we want to ensure our software is reusable by others, as well as ourselves, we should be clear what we mean by ‘reusable’. There are a number of definitions out there, but a helpful one written by Benureau and Rougler in 2017 offers the following levels by which software can be characterised:
- Re-runnable - the code is simply executable and can be run again (but there are no guarantees beyond that)
- Repeatable - the software will produce the same result or behaviour more than once
- Reproducible - results or behaviour generated from the same version of the software can be generated consistently given the same inputs
- Reusable - easy to use, understand, maintain, and modify for others, as well as incorporate (as a whole or in part) into other development ventures
Later levels imply the earlier ones.
As developers we should always aim for reusable software. It is crucial that we can write software that can be understood and ideally modified by others within our team and elsewhere. Where ‘others’, of course, can include a future version of ourselves.
Levels of Software Reuse
Here are some example levels of software development reuse in industry:
- Code-level Reuse - functions and small-scoped utility libraries, classes and objects
- Component-level Reuse - larger self-contained software modules, packages, API, or microservices that provide specific functionality and have well-defined interfaces
- Design and Architectural-Level Reuse - reuse of design patterns, frameworks, and architectural styles, or set of platform components conforming to an architecture
- System-level Reuse - entire system or application used with other similar systems or components to create a new, larger system
- Document and Knowledge Reuse - beyond code and design, the reuse of technical documentation, manuals (or their structural design or technical underpinning), and test plans or test scripts from similar projects
The Need for Documentation
A cornerstone of software reusability is documentation. Software development in industry typically adopts a longer-term, sustainable view of software that is produced. Unlike small personal projects, industrial software is usually developed by teams over long periods of time, often with developers joining and leaving the project.
Documentation thus ensures that knowledge about a given system is preserved and accessible, and the extent to which that system is reusable is closely tied to its supporting documentation. In many cases, beyond trivial software outputs, reusability is critically dependent on documentation since it’s the main enabler for developers to find, understand, trust, and modify software components.
Good documentation:
- Reduces development time - when requirements, interfaces and behaviour are clearly documented
- Reduces maintenance costs - since clear documentation helps developers understand it to maintain, debug and extend the system without requiring the original authors
- Improves quality and reliability - because documentation of testing procedures, requirements, and design decisions helps ensure system continues to behave as expected
- Increases knowledge transfer - explaining how the system works in terms of its architecture, design decisions, and codebase
- Improved compliance governance - with some industries requiring documentation for regulatory or auditing purposes
- Improved user support - with user guides and manuals supporting the correct use of software by customers
Documentation therefore acts as a collective memory for the software being developed, and you may notice the stroing overlap with the benefits of reusability, and is therefore intrinsically tied to it. It is difficult to have truly reusable software without documentation. As a developer you will very likely find yourself involved in both sides of this reuse, either as a producer, generating software to be reused, or as a consumer, reusing software developed by others.
A golden rule of software development is to always assume that someone else may need to both understand and run the software you have written, which includes a future version of yourself.
Types of Documentation
Software documentation can be grouped into several broad categories, each serving a different audience.
Class Exercise: Types of Documentation
2 mins.
What different types of software documentation have you generated or used from other software?
At a lower level, there is also code commenting, a very useful form of documentation for understanding our code is code commenting, and is most effective when used to explain complex interfaces or behaviour, or the reasoning behind why something is coded a certain way. We’ll look into these shortly, but code comments only go so far.
Broadly speaking, supporting documentation tends to fall into:
- Product documentation, describing the the software as a whole, including it’s purpose and aims, and key functionality
- Requirements documentation, such as a Software Requirements Specification (SRS) or user stories
- Technical documentation, such as architectural diagrams, technical specifications that support development, testing, and deployment, technical how-to guides, and documentation of APIs and database schemas
- User documentation, which describes how to use the functionality of the software for users
- Process & project documentation, which covers how the software is developed, e.g. the development workflow (for example, Git branching strategy), issue tracking and backlog documentation, continuous integration procedures, test plans, and release notes
Scrum and Documentation
From an agile Scrum perspective, documentation should be minimalist and purposeful. Documentation should only be created and maintained that continues to add value, and should be living documents that evolve with the product.
Essentially, create documentation when it is needed, as opposed to creating it initially all at once, and documentation tasks (creation or amendment) should be included in the definition of done and completed within that given sprint cycle. This helps avoid technical debt accruing over time, which applies equally to documentation as it does to the software itself.
Licensing
Software licensing is a whole topic in itself, so we’ll just summarise here. Typically in industrial settings a licensing policy will already be in place, whether the software is proprietary or being released as open source, but it’s still important to know some licensing fundamentals, particularly when reusing other licensed software external to an employing company.
In IP law, software is considered a creative work of literature, so any code you write automatically has copyright protection applied. This copyright will usually belong to your employer.
Class Exercise: No Licence?
2 min.
By default, what do you think you are legally allowed to do with software that isn’t licensed?
Since software is automatically under copyright, without a licence no one may:
- Copy it
- Distribute it
- Modify it
- Extend it
- Use it (actually unclear at present - this has not been properly tested in court yet)
Fundamentally there are two kinds of licence, Open Source licences and Proprietary licences, which serve slightly different purposes:
- Proprietary licences are designed to pass on limited rights to end users, and are most suitable if you want to commercialise your software. They tend to be customised to suit the requirements of the software and the institution to which it belongs - again your institutions IP team will be able to help here.
- Open Source licences are designed more to protect the rights of end users - they specifically grant permission to make modifications and redistribute the software to others. The website Choose A License provides recommendations and a simple summary of some of the most common open source licences.
Within the open source licences, there are two categories, copyleft and permissive:
- The permissive licences such as MIT and the multiple variants of the BSD licence are designed to give maximum freedom to the end users of software. These licences allow the end user to do almost anything with the source code.
- The copyleft licences in the GPL still give a lot of freedom to the end users, but any code that they write based on GPLed code must also be licensed under the same licence. This gives the developer assurance that anyone building on their code is also contributing back to the community. It’s actually a little more complicated than this, and the variants all have slightly different conditions and applicability, but this is the core of the licence.
Without understanding a given software licence, developers risk violating legal restrictions, e.g. by incorporating code into a project that requires derivative work to be open source, or that prohibits certain types of redistribution. Licences also affect how software can be integrated with other code, shared with collaborators, and released to users. Being aware of licensing requirements helps developers ensure compliance, avoid legal issues, and make informed decisions about which software components can be safely reused within their projects.
If you want more information on particular licences, the Choose An Open-Source Licence or tl;dr Legal sites can help.
Creating a Copy of the Example Code Repository
For this lesson we’ll need to create a new GitHub repository based on the contents of another repository.
- Once logged into GitHub in a web browser, go to https://github.com/softwaresaved/industry-skills-prepare-release
- Select
Use this template, and then selectCreate a new repositoryfrom the dropdown menu - On the next screen, ensure your personal GitHub account is selected
in the
Ownerfield, and fill inRepository namewithindustry-skills-prepare-release - Ensure the repository is set to
Public - Select
Create repository
You should be presented with the new repository’s main page. Next, we need to clone this repository onto our own machines, using the Bash shell. So firstly open a Bash shell (via Git Bash in Windows or Terminal on a Mac). Then, on the command line, navigate to where you’d like the example code to reside, and use Git to clone it.
For example, to clone the repository in our home directory (replacing
github-account-name with our own account), and change
directory to the repository contents:
BASH
cd
git clone https://github.com/github-account-name/industry-skills-prepare-release
cd industry-skills-prepare-release
We also need to switch to a particular branch in the repository for this episode:
Preparing Code for Release: Experiences from Established RSEs
Watch this video, where established Research Software Engineers discuss their experiences related to releasing code, what can help, and the consequences of not giving it due consideration or effort. They respond to the following questions:
- Can you describe a situation when poor documentation caused problems for your team? What was missing?
- Conversely, what is the best README you have come across, and what made it genuinely useful in practice?
- When preparing a repository for its first public release, what do you check before you are comfortable making it visible?
- How has using a tool such as MKDocs changed the way you approach documentation, if at all?
- Have you experienced confusion or conflict around licensing in a research project? What happened, and what did you learn?
- What is the most common misunderstanding you see people have about software licences?
- Encountering code with no (or inappropriate) licenses
- Lessons learned about tagging releases on GitHub
- How their own practices around documentation and releasing software changed with experience
Examining the Example Code
Let’s take a look at the example code, which resides in a single
eva_data_analysis.py script by opening this in an
editor.
The script is designed to analyse Extra Vehicular Activity (EVA) data from NASA missions, generating a plot of cumulative time spent in “space walks” over the years. The code makes use of the well-established Pandas data analysis and Matplotlib graph plotting libraries.
By looking at the main() function, we can see the script
invokes a series of functions within the same script file to generate
this plot:
-
read_json_to_dataframe()- load the raw EVA data from a file in JSON format into a Pandas dataframe (a row/column structure that holds the data) so it can be analysed, and “clean” the data so it’s usable -
add_crew_size_column()- add a new column to the dataframe that contains the number of crew on a particular mission -
write_dataframe_to_csv()- output the amended dataframe to a file using a Comma-Separate Value (CSV) format -
plot_cumulative_time_in_space()- once the data is sorted by date, call this function to generate a plot of cumulative time in space over time
There are also some other lower-level functions used by these
higher-level functions - text_to_duration(),
add_duration_hours(), calculate_crew_size(),
and add_crew_size_column().
Let us assume that we’ve been tasked with documenting this example code for reuse in a larger project. Whilst the code already contains good code commenting, we also need to provide human-readable documentation outside of the codebase, and then create a stable release of the code. But let’s check the code commenting first.
We run the code by first creating a virtual environment as we’ve done
before, activating it, and loading in the Python dependencies from a
requirements.txt file, and then running the script, e.g. on
Linux or Mac:
BASH
python3 -m venv venv
source venv/bin/activate
python -m pip install -r requirements.txt
python eva_data_analysis.py
And we should be presented with our plot of total time in space over time.
The repository also contains some Pytest unit tests in
tests/test_eva_analysis.py which contain tests for some of
the functions. We can run also these tests as we have before, which
complete successfully:
Code Commenting
Fortunately, our eva_data_analysis.py script is well
commented, and contains normal code comments as well as a number of a
special type of comment known as a docstring.
Code comments are non-executable notes written within source code that explain what the code is doing, why certain decisions were made, or how particular parts of the program work. They are ignored by the compiler or interpreter and exist solely to help developers understand, maintain, and collaborate on the code more effectively. Comments are typically used to clarify complex logic, describe functions or sections of code, and provide context that may not be obvious from the code itself.
Importantly, clear comments improve the readability of code, support collaboration within development teams, and reduce the risk of misunderstandings or errors when the code is revisited later. With code commenting, typically explaining the why is more important than the what, except where behaviour is complex or counter-intuitive and requires explanation.
In Python, we can comment by beginning with a #, and the
rest of the line is ignored.
However, a special kind of comment exists called a documentation string, or docstring. Docstrings are a special kind of comment for a function, that explain what the function does, the parameters it expects, and what is returned. You can also write docstrings for classes, methods, and modules, but you should usually aim to add docstring comments to your code wherever you can, particularly for critical or complex functions.
Docstrings are formatted using enclosing triple-quotes
""".
Let’s look at an example docstring in
eva_data_analysis.py, for the function
read_json_to_dataframe():
PYTHON
def read_json_to_dataframe(input_file):
    """
    Read the data from a JSON file into a Pandas dataframe.
    Clean the data by removing any rows where the 'duration' value is missing.

    Args:
        input_file (file or str): The file object or path to the JSON file.

    Returns:
         eva_df (pd.DataFrame): The cleaned data as a dataframe structure
    """
    print(f'Reading JSON file {input_file}')
    # Read the data from a JSON file into a Pandas dataframe
    eva_df = pd.read_json(input_file, convert_dates=['date'], encoding='ascii')
    eva_df['eva'] = eva_df['eva'].astype(float)
    # Clean the data by removing any rows where duration is missing
    eva_df.dropna(axis=0, subset=['duration', 'date'], inplace=True)
    return eva_df
Here we can see a concise description of the function, which takes a path to an input file in JSON format, loads that file into a Pandas dataframe, cleans the data so it’s usable, and returns that resulting dataframe.
Documenting a Repository
Project Documentation
A common approach to providing project-level documentation is to include a set of metadata files within the software repository alongside the source code. Many of these files function as “social documentation”, describing the expectations and guidelines for how users and contributors should interact with the project. The table below highlights some common examples of repository metadata files and their roles.
| File | Description |
|---|---|
| README.md | Provides an overview of the project. It can either include inline information or pointers to separate installation instructions and dependencies, usage instructions for running the code or example use cases, links to other metadata files and technical documentation |
| CONTRIBUTING.md | Explains to developers how to contribute code to the project including processes and standards that should be followed. It typically explains how to report issues, propose changes, submit pull requests, follow coding standards, and adhere to the project’s workflow (such as branching strategies or review processes). |
| CODE_OF_CONDUCT.md | Defines expected standards of conduct when engaging in a software project |
| LICENSE | Defines the legal terms of using, modifying and distributing the code |
| CITATION.cff | Provides instructions on how to cite the code, e.g. referencing a technical paper |
| AUTHORS.md | Provides information on who authored the code |
In a typical industrial setup there will likely be a policy or expectations for which files to use and how to use them, possibly with pre-existing templates or boilerplate for such files, since a uniform approach for multiple projects will facilitate easier and more efficient reuse for team members.
Writing a Project README
A repository README file is the first piece of documentation that people should read to acquaint themselves with the software. It concisely explains what the software is about and what it is for, and covers the steps necessary to obtain and install the software and use it to accomplish basic tasks.
In short, it provides enough information across the documentation areas we looked at earlier for people to get started. Think of it not as a comprehensive reference of all functionality, but more a short tutorial with links to further information - hence it should contain brief explanations and be focused on instructional steps.
Repository README files are typically written in Markdown format. a lightweight markup language which is basically a text file with some additional basic syntax to provide ways of formatting them. A big advantage of them is that they can be read as plain-text files or as source files for rendering them with formatting structures, and are very quick to write. GitHub provides a very useful guide to writing Markdown for its repositories.
Our repository already has a README.md split into
typical sections, briefly covering a brief description, technical
pre-requisites needed for using the code, as well as concise
instructions for running it and its included unit tests. It also
includes information on the current maintainers, the licence used, the
original authors and any other acknowledgements. These elements together
practically assists a new user coming to this repository with how to get
started using and developing it, with a clear, simple step-by-step
narrative - importantly in a concise way that avoids overwhelming them.
It also includes supporting contact information if they want to get in
touch with developers of the code. These headings are not a definitive
set, and sections are dependent on the nature of the software. For some
good example READMEs, see matiassingers’
collection of Awesome README links.
Adding Supporting Technical Documentation
MKDocs generates project documentation as a static website from Markdown files. The website can then be hosted on GitHub Pages or other static site hosting services, providing a user-friendly interface for accessing the documentation.
We can install MKDocs package using pip. Here we also
install a plugin mkdocstrings, which will be used later. We
advise you to do this within a virtual environment you created
before:
By default, mkdocstrings does not provide support for a
specific language. Therefore, we specify [python] to
install extra dependencies of mkdocstrings for Python
language support.
After installation, you can intialize a new MKDocs project in our Python project:
This will create two files in your project: mkdocs.yml
and docs/index.md. The first file mkdocs.yml
is the configuration file for your documentation site. It serves as the
central configuration hub for your MKDocs documentation. It tells MKDocs
how to structure your documentation site, which plugins and themes to
use, how to organize navigation, etc.
docs/index.md is the main page of your documentation. It
is usually the landing page of your documentation site.
Let’s first look at the mkdocs.yml file. It is almost
empty now. We can edit it with the following basic configurations:
Here we give a name to our documentation site,
EVA Data Analysis. We set up the navigation menu with one
item Overview that links to index.md. We also
enable two plugins, search to provide search functionality
in the documentation site, and mkdocstrings to
automatically generate API reference documentation from Python
docstrings, which we will see later.
We can try to render the documentation site locally and see what it looks like:
This will start to build a local static documentation site and serve
it at a local web server. By default, it will be available at
http://127.0.0.1:8000/, which will also show in the
terminal output. You can open this URL in your web browser to view the
documentation site.
The documentation site now consists of some default content about
MKDocs. It is rendered from the docs/index.md file. Let’s
edit this file to add some relevant content about our project. For
simplicity, we can borrow the content from our README.md
file.
You can also add more pages to your documentation site by creating
more Markdown files in the docs/ directory, and update the
nav section in mkdocs.yml to include these new
pages. For example, we can create a new page for API (Application
Programming Interface) reference documentation.
An API reference documents the functions, classes, and methods
provided by your software, along with their parameters, return values,
and usage examples. This is particularly useful for understanding how to
interact with your code programmatically. With mkdocs and
mkdocstrings plugin, we can automatically generate API
reference documentation from the docstrings in our Python code.
Let’s first create docs/api.md with the following
content:
Apart from the title, there is only one line
:::eva_data_analysis in this file. This is a special syntax
provided by the mkdocstrings plugin to indicate that we
want to generate API documentation for the
eva_data_analysis module. The plugin will parse the
docstrings in this module and generate the corresponding
documentation.
Now we can call mkdocs serve again to render the
documentation site locally and check how the API reference page looks
like.
Now we can see that all the functions defined in the
eva_data_analysis module are automatically documented with
their docstrings.
And also configure mkdocs.yml to use google
style docstring format for mkdocstrings plugin:
YAML
site_name: EVA Data Analysis

nav:
  - Overview: index.md
  - API Reference: api.md

plugins:
  - search
  - mkdocstrings:
      handlers:
        python:
          options:
            docstring_style: google
Then we can render the documentation site locally again with
mkdocs serve, the input parameters and return values of the
load_csv function are now nicely formatted in a table.
Solo Exercise: Edit index.md
10 mins.
Like GitHub repository READMEs, mkdocs documentation
pages also use Markdown. Using the README.md as a
reference, change the docs/index.md file to briefly reflect
how to use the tool. Include brief sections on:
- Pre-requisites
- Usage
- Running tests
Once complete, use python3 -m mkdocs serve to view and
check your updated index file.
Once you are happy with the documentation site, you can deploy it to GitHub Pages so that others can access it online. Do to this:
- Commit the changes we made to the repository:
To deploy the documentation to GitHub Pages, you can use the following command:
This command assumes you have access to the GitHub repository of the
current project. It will automatically create a new branch called
gh-pages in your repository, which will contain the static
files of your documentation site, and push this branch to GitHub.
Once built on GitHub, you can view the generated repository documentation by going to https://github-username.github.io/industry-skills-prepare-release/.
Tagging a Release in GitHub
There are many ways in which Git and GitHub can help us make a software release from our code. For example, we can use the GitHub website to create a new release. Let’s look at how to do this using Git tagging on the command line.
Let us see what tags we currently have in our repository:
Since we have not tagged any commits yet, there is unsurprisingly no output.
From a repository perspective, when creating the release (e.g. from
the main branch) we must ensure that any feature branches
intended for this release have been fully merged into the
main branch. In addition - critically - when we
create a release, we must ensure that all of the backlog items in a
given sprint meet the criteria specified in the Definition of Done (DoD)
for the project. A product backlog is only “done” when it meets all DoD
criteria.
Once we are satisfied this is the case, we can create a new tag on
the last commit in our main branch by doing:
So we can check the tags again:
A tag should now be listed:
OUTPUT
0.1.0And also, for more information:
So now we have added a tag, we need this reflected in our Github repository. You can push this tag to your remote by doing:
We can now use the more memorable tag to refer to this specific
commit. Plus, once we have pushed this back up to GitHub, it appears as
a specific release within our code repository which can be downloaded in
compressed .zip or .tar.gz formats. Note that
these downloads just contain the state of the repository at that commit,
and not its entire history.
Using tagging allows us to highlight commits that are particularly important, which is very useful for reproducibility and reuse purposes.
Summary
Software reuse is an important strategy in software development that improves productivity, quality, and delivery speed by building on existing components rather than creating everything from scratch. Achieving this requires clear documentation, well-structured projects, and a clear release process, as well as practices that allow other developers (both within and outside a team) to understand and adapt the software. Importantly, documentation acts as the collective memory of a software project, helping developers understand how it works, how to use it, and how it was developed.
Note that the tools and techniques we show are illustrative examples. An industrial outfit will have their own policies, approaches and tools for documenting and creating releases, but the principles here are transferrable and the important part is the continual (and normalised) process of coding, documenting and releasing within an agile process that is repeatable and efficient.
- Software reuse improves productivity, quality and development speed by building on existing code and components rather than creating everything from scratch.
- Reuse can occur at multiple levels, including code snippets, software components, architectural designs, entire systems, and documentation.
- Reusable software should ideally be re-runnable, repeatable, reproducible, and ultimately reusable, meaning it is understandable, maintainable, and adaptable by others.
- Documentation is essential for reuse, helping developers understand, trust, and modify software over time.
- Repository documentation, such as README files and supporting metadata helps users and contributors understand how to use and interact with a project.
- Software licensing determines how code can be used, modified, and shared.
- Creating software releases provides stable snapshots of a project, which improves reproducibility, distribution, and reuse by others.
Content from 4.2 Sprint 2 Planning Meeting
Last updated on 2026-03-18 | Edit this page
Overview
Questions
- What methods exist to help a team reach a consensus on estimates?
- What is planning (or Scrum) poker?
Objectives
- Apply a group planning poker technique for estimating the size of each task
- Devise a sprint backlog for sprint 2 from the updated product backlog
Improving Estimation through Structured Consensus
We’ve looked at t-shirt estimation as a quick technique for estimating task effort, particularly early in the planning cycles. However, for projects with more complex requirements a more structured approach that is based on team consensus can prove more effective.
Scrum (or planning) poker is a method for estimation that helps a Scrum team arrive at a consensus of effort (or complexity) for a given user story or requirement. In Scrum estimation sessions, each team member has a deck of cards containing story point values (often based on the Fibonacci sequence). When estimating a user story or requirement, everyone selects a card privately and reveals it at the same time, similar to players revealing cards in poker.
Usually moderated by the Product Owner or Scrum Master, it has a number of benefits:
- It helps make the activity interactive and engaging
- Encourages team discussion, as differences in estimation prompt useful conversations about the work
- The simultaneous reveal prevents people from being influenced by others’ estimates, encouraging more independent and honest assessments
- Increases shared understanding of the backlog and reduces assumptions, since the team collectively clarifies the requirements, as well as their complexity and risks
- Improves estimation accuracy, since multiple perspectives often lead to more realism in estimates
This approach typically occurs before Sprint Planning, but also proves useful whenever team consensus on an estimate is required.
The team needs to agree on what each story point card value means, and serves as a baseline for estimation meetings. For the purposes of this training and the time constraints of the next sprint, let’s use the following story point matrix, which uses scaled down time effort estimates for each card:
| Story Points | Relative Size | Typical Effort | Characteristics / Example |
|---|---|---|---|
| 1/2 | Extremely Small | < 2 mins | Minor change, small bug fix, simple configuration update |
| 1 | Very Small | < 5 mins | Minor change, small bug fix, simple configuration update |
| 2 | Small | 10 mins | Small code change, minor enhancement, simple UI adjustment |
| 3 | Small–Medium | 15 mins | Straightforward feature with minimal complexity |
| 5 | Medium | 25 mins | Feature requiring multiple steps or moderate logic |
| 8 | Medium–Large | 40 mins | More complex feature with dependencies or testing required |
| 13 | Large | 65 mins | Complex functionality with multiple components |
| 20 | Very Large | > 100 mins | Major feature; often a candidate to break into smaller stories |
| 40+ | Too Large | Too big to estimate | Should be split into smaller user stories before sprint planning |
The process works as follows:
Setup: All team members are given an identical set of cards containing the values: 0, 1/2, 1, 2, 3, 5, 8, 13, 20, 40, and 100. These are typically aligned with the Fibonacci sequence. They often portray abstract “story points” as an approximation of the complexity of a given task, although some teams use them as direct time estimates for how long that task takes to complete.
The Product Owner/Scrum Master briefly explains a user story or requirement from the backlog.
The development team asks questions to ensure everyone understands its scope and gets an accurate sense of the work that needs to be done to complete that specific item.
Each team member chooses an estimate privately, selecting one of their cards.
Everyone reveals their estimates simultaneously, to prevent anchoring or influence from others.
If there is consensus and everyone reveals the same estimate, that becomes the official estimate for that backlog item and is recorded.
If there are differing opinions about these initial estimates, the team members with the highest and lowest estimates take some time to discuss why they those that specific number. Following this, everyone reselects their cards, and the process repeats until the team reaches a reasonable consensus.
This process continues until all backlog items have been estimated.
Group Exercise: Play Scrum Poker
20 mins.
Conduct a planning poker exercise in your team.
Instead of using physical cards, use the free Firepoker online tool:
- Either the Product Owner or Scrum Master role assumes the role of moderator
- The Moderator:
- Creates a new game by selecting
Play now, adding in some game details and selectingCreate game - Copies the browser URL from the next page into the shared document so the other team members can access it in their own browser
- Selects the
Free-formtab on the page, and copies in the requirement issue number and title from the backlog, and selectsAdd story
- Creates a new game by selecting
- Everyone in the team (including the Moderator) vote by selecting their estimate from the cards.
- Once everyone has voted, everyone’s selections are automatically revealed to all
- If there isn’t total consensus, discuss the lowest and highest estimates from those that suggested them, and repeat the voting until a consensus is reached. he Moderator ensures that discussions are kept brief so the exercise finishes within the allotted time
- The Moderator enters the consensus value into the backlog item issue on GitHub as a comment
Continue the exercise until all backlog items have been estimated.
NB: don’t press Back on your browser, since it will
terminate the poker voting session and you’ll need to reopen it from the
link!
Group Exercise: Sprint 2 Planning for Coffee Beans Analysis
20 mins.
Conduct the Sprint Planning Meeting for Sprint 2 of the Coffee Beans Analysis Project.
Roles
- One person should be Scrum Master. You are the servant leader who helps the group apply Scrum effectively, removes blockers and improves flow for the Scrum Team.
- One person should role play as the Product Owner. You should represent the interests of the client throughout the meeting.
- The rest of the group should be developers. The Scrum Master and acting Product Owner can also be developers.
Questions for Sprint Planning
Remember to answer the following questions during the Sprint Planning Meeting:
- Why is this Sprint valuable?
- What can be Done this Sprint?
- How will the chosen work get Done?
The output from your Sprint Planning Meeting should be your Sprint 2 Backlog including:
- A Sprint Goal
- The subset of items from the Product Backlog that you will work on this Sprint
- A plan for delivering the Increment by the end of the Sprint
- Planning Poker makes estimation sessions interactive and encourages active team participation.
- Simultaneous estimation reduces bias and helps clarify requirements, complexity, and risks.
- Collaborative discussion improves shared understanding of the backlog and leads to more realistic estimates.
Content from 4.3 Sprint 2 Work Block
Last updated on 2026-03-19 | Edit this page
Overview
Questions
- How do we run Daily Scrum meetings again?
Objectives
- Hold Daily Scrum Meeting
- Develop code in accordance with the issues in the Sprint 2 backlog
- Review other team members’ code
- Judge when issues have been completed and can be closed
- Develop adequate documentation for the project
- Apply a license to the code
- Create a release for the code
Group Exercise: Daily Scrum Meeting
(10 minutes)
In your team, review the Sprint 2 Backlog and discuss:
- Which issue will each person begin working on?
- Are there any dependencies between tasks?
- Does everyone have a clear starting point?
Make sure each team member selects at least one issue to begin working on.
Coffee Beans Analysis Project Sprint 2
You will now begin Sprint 2.
As well as the sprint items you’ll be working on, keep a note of how long each task actually took in the backlog for each item. You can use this information (together with the logged estimates) later to produce a burndown chart as discussed previously.
You will have 2 hours (not including lunch!) to work collaboratively to deliver an Increment that you can demonstrate to the client. Focus on making steady, visible progress and communicating regularly with your team.
- Keep Daily Scrum meetings short - team members should aim to be concise and efficient!
Content from 4.4 Sprint 2 Review Meeting
Last updated on 2026-03-19 | Edit this page
Overview
Questions
- How to choose a product name?
- How do we run Sprint Review meetings again?
Objectives
- Choose three candidate names for your software product
- Participate in a Sprint review meeting
- Verify sprint backlog against definition of done
What’s in a Name?
5 mins.
A product name is important because it shapes how people first perceive and engage with what you’ve created.
Take a few minutes as a team to decide on three candidate names for your product to suggest to the client.
The Software Sustainability Institute’s guide on naming projects and products may provide some helpful pointers.
Sprint 2 Review
Following our second sprint, as before, we now prepare for and hold a Sprint Review meeting for the client. You may find it useful to refer back to the material on sprint reviews.
Prepare for the Sprint Review
Take 30 minutes to prepare for the Sprint 2 Review.
- Prepare your demonstration and decide who will present each element
- Write a structure (or agenda) for the meeting (including a short item on deciding a product name from the candidates)
- Consider how your progress has moved the project toward the Product Goal
- Prepare any questions you have for the client
- Decide who will take on each role
Sprint 2 Review Meeting
Teams conduct the Sprint Review meeting with the clients (30 mins).
Update Product Backlog
Teams spend 15 minutes updating the Product Backlog (15 mins).
- Use a checklist for Sprint Reviews (and other meetings) to ensure you don’t forget anything.
Content from 4.5 Sprint 2 Retrospective
Last updated on 2026-03-19 | Edit this page
Overview
Questions
- How do we run Sprint Retrospectives again?
Objectives
- Participate in a Sprint retrospective meeting
- Reflect on what went well and what could be improved
- Listen and respect other team members’ opinions
- Reflect on how the prioritisation strategy worked
- How did your backlog estimates compare against your actual effort?
Group Exercise: Sprint 2 Retrospective
(15 minutes)
In your Scrum Team, reflect on Sprint 2 by answering the following questions:
- What went well during this Sprint?
- What challenges or obstacles did the Scrum Team face?
- How did our prioritisation strategy work?
- Were our effort estimates accurate? And if not, why?
Document your responses and identify at least two actionable improvements that can be applied in (a hypothetical) future sprint.
Share your reflections are actionable improvements with the other groups.
- Routine reflections on plans vs. the reality are key to improvement over time.
Content from 4.6 Personal Reflection
Last updated on 2026-03-20 | Edit this page
Overview
Questions
- How can personal reflection support my growth as a software engineer?
Objectives
- Understand why personal reflection is a valuable professional habit
- Reflect honestly on your own experience across the week
- Identify specific skills or areas you want to develop further
- Set intentions for taking your learning into your career
Personal Reflection
You’ve just run a retrospective with your Scrum team. This has provided a structured way of looking back on what worked, what didn’t, and how to improve. That same habit of honest and purposeful reflection is just as valuable when applied to yourself as an individual.
In Agile environments, retrospectives are built into the process precisely because improvement doesn’t happen automatically but requires deliberate thought. The same is true of your own development as a software engineer. Moving quickly from one project to the next without pausing to reflect means you risk repeating the same mistakes, or missing the chance to build on what’s actually going well.
Reflection helps you build self-awareness about how you work best, where your blind spots are, and what kind of software engineer you want to become. This could include technical elements, but can also include how you collaborate, communicate, and handle uncertainty.
Individual Exercise: Reflect on the Week
(10 minutes)
Work through the following prompts on your own. You can keep your notes to yourself, we won’t ask you to share.
- What is the most valuable thing you learned this week?
- What role did you naturally fall into in the team project? Was it the role you expected?
- Was there a moment where things went wrong or didn’t go to plan? What happened, and what did you learn from it?
- Which of the topics covered this week do you feel least confident about? What is one concrete step you could take to address that?
- Write down two or three specific habits or practices from this week that you intend to carry into your first professional role.
- Is there anything you want to explore further before you start work?
- Personal reflection is a professional skill, not just an end-of-course activity.
- Regularly comparing your intentions against your actions is key to deliberate improvement over time.
Content from Day 5: Deliver to Clients
Last updated on 2025-04-10 | Edit this page
Overview
Questions
- FIXME
Objectives
- FIXME
Content from 5.1 Prepare to Deliver
Last updated on 2026-03-19 | Edit this page
Overview
Questions
- What should you do (and not do) when presenting to others?
- How should you communicate with a non-technical audience?
- What should be included in the project presentation?
- What are the scoring criteria for the presentation?
Objectives
- Describe techniques and approaches for communicating and presenting to a non-technical audience
- Briefly describe the criteria for delivery assessment
- List the key topics the delivery presentation needs to cover
- Within teams decide on panel presentation structure
- Decide who will be responsible for presenting each aspect and other roles for the session
- Develop a presentation for panel review session
Earlier in the course we covered the importance of effective communication with clients. This is also important when presenting delivery of a final solution - as a completed project - to clients, since it provides the ultimate opportunity to clearly demonstrate the value of the product and show how it meets the client’s requirements and goals.
Such presentations allow the development team to explain key design decisions, highlight features, and showcase how the software can be used in practice, helping to build trust and confidence in the solution. The presentation also creates a space for feedback, questions, and clarification, ensuring that the client understands the delivered system and that any final issues or expectations can be addressed.
Class Exercise: Compare and Contrast
15 mins.
Watch the following two videos as a class, and note down in the shared class document any feedback, either positive or what could be improved:
- Delivering a bad presentation - spot the mistakes
- Delivering a good presentation - identify the good techniques
NB: these YouTube videos were created by Learning Resources at the University of Bedfordshire.
First video:
- Didn’t introduce themselves
- Hadn’t tested or set up the presentation equipment before the presentation
- Appeared to check their phone
- Not relevant or unprofessional pictures
- Very little eye contact with the audience
- Spoke too fast at points
- Had their back to the audience and crossed their arms while presenting
- Mostly read the content on the slides verbatim
- Presentation used a loud colour scheme, and font/text sizes that were inconsistent and very difficult to read
- Distracting animations in the presentation
- Impolitely asked questions and interrupted when they answered
Second video:
- Introduced themselves and the topic at the start of the presentation
- Consistent use of a clear font and appropriate font size
- Paced their delivery
- Gave additional relevant detail on each point in the slides
- Used open body language, facing the audience
- Good eye contact with the audience
- Allowed time for questions at the end
Delivering an Effective Client Presentation
Watch this video by Professor Simon Hettrick, on presenting to a non-technical audience.
Given the technical nature of developing a software solution, presenting a final product to a non-technical audience can prove a challenge!
Focus on Value!
Clients are typically more interested in how the software meets their requirements, solves their problems, and delivers benefits to their organisation. Excessive technical explanations can make the presentation difficult to follow and will distract from the key messages, and risk losing the audience’s engagement, which is especially true if they do not have a technical background.
Instead, keep the presentation focused on functionality, usability, and business impact, using clear language and demonstrations that show how the system supports the client’s goals.
A successful client presentation clearly communicates the outcome of a project, and effectively demonstrates how the developed software meets the client’s requirements and objectives. They provide an opportunity to showcase the functionality and value of the solution, explain key design decisions, and ensure that the client understands how the software is used in practice.
In addition to the comments made in the video, consider the following when planning and writing a delivery presentation:
- Have a clear narrative - it should be clear what will be presented, and what is being presented, within a logical and clear structure
- Focus on value - emphasise how the solution solves the client’s problem and improves their outcomes, highlighting key features and benefits
- Explain design decisions - summarise important technical or architectural designs where relevant, whilst avoiding overlong technical rabbit holes that explain the technical journey but detract from clarity
- Address quality - where relevant, show how you followed a sound development process and engineering practices to ensure a quality product
- Be honest about any solution limitations - as well as challenges encountered, and how you overcame them
- Prepare for and encourage feedback - invite the client to ask questions or suggest potential future refinements, anticipating likely concerns or queries in advance
It’s also typical to deliver a demonstration of the product to the client, demonstrating the key features and highlighting how - in practical terms - the software will provide value to the client. It’s important to not only focus on the software’s desired functionality, but also the requestd non-functional characteristics of what is being delivered, e.g. documentation and reproducibility of results.
Many of the points above also apply to delivering an effective demonstation, but also consider the following:
- Plan a simple, clear narrative - structure the demo around a simple and realistic scenario or tasks whilst highlighting benefits, instead of covering unrelated features
- Use realistic data - demonstrate the system using meaningful data or scenarios that reflect real use
- Explain what you are doing - talk through each step so the client understands what is happening, how the software works, and why it matters
- Keep the timing under control - cover the most compelling aspects of the demo first, so you have the option of cutting less important benefits if you run out of time
- Practice the demo beforehand - rehearse the sequence to avoid the “demo curse”, and exclamations of “it hasn’t done that before!”
Panel Scoring Criteria
The panel members will use the following criteria to evaluate presentations. Note the balance of marks allocated across the different areas. In particular, the presentation/demo and agile-based teamwork areas make 60% of the total marks.
Presentation and Product Demonstration (30%)
- Is it a clear and understandable presentation?
- Is there a logical flow and structure to the presentation?
- How engaging was the presentation?
- Did the presentation finish within its allotted time?
- How effectively, and to what extent, were presentation duties divided well across team members?
- As a team, how effectively did the group handle the Q&A?
Agile-based teamwork (30%)
- Is there a clear definition and distribution of roles across the team?
- Generally, how well did the group appear to work together as a team in the project? e.g.
- Communication, task delegation, identify and address challenges
- To what extent, and how well, did the team employ the Scrum agile
approach, techniques, and practices taught throughout the course? e.g.
- Techniques: user stories, MoSCoW prioritisation, task estimation, sprints, backlog refinement
- Meetings: sprint planning meetings, daily scrum meetings, sprint review, sprint retrospective
- Artifacts: product backlog, sprint backlog, definition of done
- How effectively did the team make use of the client meeting? e.g. manage the agenda, clarify and prioritise requirements, manage expectations
- To what extent did the team take on board any advice given by their mentor?
End product (20%)
- To what extent does the product achieve the stated goals of the
project? e.g. to what extent is the developed software
- Usable for its intended purpose?
- Reusable, modifiable and extensible?
Software engineering practices (20%)
- To what extent, and how well, did the team employ the software engineering techniques, tools, and practices taught throughout the course? e.g. Git collaborative workflow (inc. pull requests and code review), automated unit testing, continuous integration, documentation, release management Was the team’s choice of software licence well justified?
Group Exercise: Nosce te Ipsum - Know Thyself
20 mins.
Similarly to retrospectives conducted after a single sprint, when preparing for a client presentation it really helps to reflect and identify where you have done well overall throughout the project, and what could have gone better. This feeds into your planning, and helps to ensure you play to your strengths whilst mitigating your weaknesses.
(10 mins) Think back to your sprint retrospectives and general experiences. In your teams discuss, decide and note down in your group shared document what you think your key strengths are for each of these areas of the scoring criteria:
- Your developed software product and how it meets the clients needs
- How you developed the software within using the agile Scrum approach (and how effectively you worked as a team)
- How well you employed the software engineering practices, tools, and techniques taught throughout the course
Aim to roughly order each list, putting the most compelling, strongest items at the top. Given the small scale of the group project, feel free to embellish slightly!
(10 mins) Repeat the above activity, but this time focus on your weaknesses, and what you could have done better.
Group Exercise: Prepare your Presentation!
90 mins.
As a group, prepare a short presentation that showcases what you have developed over the week, and how you’ve done it.
As a team, decide on a structure to the presentation and who will be responsible for presenting each aspect (and any other roles for the session).
Using the panel scoring criteria above to help guide the content, the presentation should include (but aren’t limited to):
- Brief recap of the project goals
- How the product meets the stated goals of the project
- How the team employed the Scrum agile approach, techniques, and practices
- How the team employed software engineering tools and practices
- Short demonstration of the product, highlighting how it meets the project goals
- Short Q&A session at the end
- Client presentations demonstrate the final value of the delivered software and how it meets client requirements and goals.
- Presentations provide an opportunity for questions, feedback, and clarification from the client.
- Effective presentations should have a clear narrative and logical structure.
- Focus on value, usability, and business impact rather than excessive technical detail.
- Briefly explain important design choices and development quality practices.
- Be transparent about limitations or challenges and how they were addressed.
- A product demonstration should show realistic scenarios, clear explanations, and meaningful data.
- Preparation and practice are essential to ensure a smooth, engaging, and well-timed presentation.
Content from 5.2 Delivery Meeting
Last updated on 2025-04-10 | Edit this page
Overview
Questions
- FIXME
Objectives
- Deliver final project presentation
- Answer questions from the panel regarding the project
- Obtain feedback from the panel on delivery presentation
- FIXME
Content from 5.3 Reflection
Last updated on 2025-04-10 | Edit this page
Overview
Questions
- FIXME
Objectives
- FIXME
- FIXME